Oki MC361MFP MC361, MC561 Setup Guide (English, Fran栩s, Espa?ol, Po - Page 34
Determine the Names of the Items Required for Scan To Network PC
 |
View all Oki MC361MFP manuals
Add to My Manuals
Save this manual to your list of manuals |
Page 34 highlights
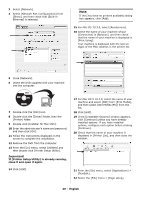
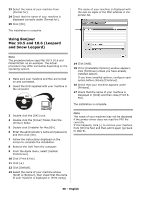
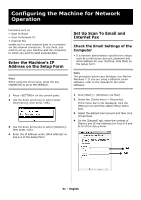
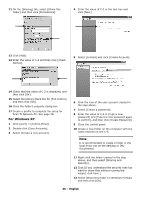
Windows 2000 1 Click [Start] > [Settings] > [Control Panel]. 2 Double-click [System]. 3 Select the [Network Identification] tab and then click [Properties]. 4 Note the name in [Computer name] on line C-1 of the Setup Form. 5 Click [Cancel] to close the window. Determine the Names of the Items Required for Scan To Network PC Determine the names of the following items and fill them in on lines C-2 to C-6 on the Setup Form. • User name to log into the destination computer (C-2) • Password to log into the destination computer (C-3) • Profile name to register the settings on your machine (C-4) • Shared folder name on the destination computer (C-5) • File name of the scanned data (C-6) Configure the Computer for Scan To Network PC Register your machine on the computer as a user and then set up a shared folder to which scanned images are sent and saved. • Windows 7, see below • Windows Server 2008 R2, see below • Windows 2008, see below • Windows Vista, see below • Windows Server 2003, see page 35 • Windows XP, see page 36 • Windows 2000, see page 37 Important! If the computer is in a domain, the procedure of adding a user account may be different from the procedure below. Refer to the Microsoft Windows manual. Windows 7, Windows Server 2008 R2, Windows 2008, Windows Vista Note The procedure below uses Windows 7 as an example. The display may differ depending on the operating system. 1 Click [Start] > [Control Panel]. 2 Select [Add or remove user accounts]. 3 Select [Create a new account]. 4 Enter the information from line C-2 of the Setup Form in the text box. 5 Ensure that [Standard user] is selected, and then click [Create Account]. 6 Click the icon of the user account created in the previous step. 7 Select [Create a password]. 8 Enter the information from line C-3 in [New password] and [Confirm for new password], then click [Create password]. 9 Close the control panel. 10 Create a new folder on the computer with the name entered on line C-5. Note It is recommended to create a folder in the local drive, not on the desktop or [My Documents]. 11 Right-click the folder created in step above and select [Properties]. 34 - English
-
 1
1 -
2
-
3
-
4
-
5
-
6
-
7
-
8
-
9
-
10
-
11
-
12
-
13
-
14
-
15
-
16
-
17
-
18
-
19
-
20
-
21
-
22
-
23
-
24
-
25
-
26
-
27
-
28
-
 29
29 -
 30
30 -
 31
31 -
 32
32 -
 33
33 -
 34
34 -
 35
35 -
 36
36 -
 37
37 -
 38
38 -
 39
39 -
40
-
41
-
42
-
43
-
44
-
45
-
46
-
47
-
48
-
49
-
50
-
51
-
52
-
53
-
54
-
55
-
56
-
57
-
58
-
59
-
60
-
61
-
62
-
63
-
64
-
65
-
66
-
67
-
68
-
69
-
70
-
71
-
72
-
73
-
74
-
75
-
76
-
77
-
78
-
79
-
80
-
81
-
82
-
83
-
84
-
85
-
86
-
87
-
88
-
89
-
90
-
91
-
92
-
93
-
94
-
95
-
96
-
97
-
98
-
99
-
100
-
101
-
102
-
103
-
104
-
105
-
106
-
107
-
108
-
109
-
110
-
111
-
112
-
113
-
114
-
115
-
116
-
117
-
118
-
119
-
120
-
121
-
122
-
123
-
124
-
125
-
126
-
127
-
128
-
129
-
130
-
131
-
132
-
133
-
134
-
135
-
136
-
137
-
138
-
139
-
140
-
141
-
142
-
143
-
144
-
145
-
146
-
147
-
148
-
149
-
150
-
151
-
152
-
153
-
154
-
155
-
156
-
157
-
158
-
159
-
160
-
161
-
162
-
163
-
164
-
165
-
166
-
167
-
168
-
169
-
170
-
171
-
172
-
173
-
174
-
175
-
176
-
177
-
178
-
179
-
180
-
181
-
182
-
183
-
184
-
185
-
186
-
187
-
188
-
189
-
190
-
191
-
192
-
193
-
194
-
195
-
196
-
197
-
198
-
199
-
200
-
201
-
202
-
203
-
204
-
205
-
206
-
207
-
208
-
209
-
210
-
211
-
212
-
213
-
214
-
215
-
216
 |
 |
