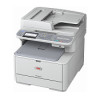
Oki MC361MFP MC361, MC561 Setup Guide (English, Fran栩s, Espa?ol, Po - Page 28
Using Ethertalk, Mac 10.5 Leopard, Using Bonjour Rendezvous, Mac 10.3.9 to 10.4.11, English
 |
View all Oki MC361MFP manuals
Add to My Manuals
Save this manual to your list of manuals |
Page 28 highlights
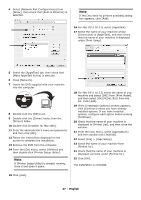
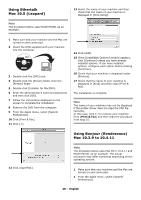
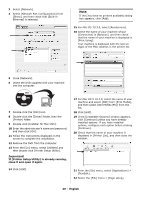
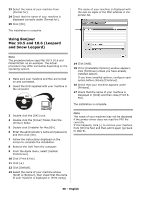
Using Ethertalk Mac 10.5 (Leopard) Note The procedure below uses Model MC561 as an example. 13 Select the name of your machine and then check that the name of your machine is displayed in [Print Using]. 1 Make sure that your machine and the Mac are turned on and connected. 2 Insert the DVD supplied with your machine into the computer. 3 Double-click the [OKI] icon. 4 Double-click the [Driver] folder, then the [Printer] folder. 5 Double-click [Installer for MacOSX]. 6 Enter the administrator's name and password, and then click [OK]. 7 Follow the instructions displayed on the screen to complete the installation. 8 Remove the DVD from the computer. 9 From the Apple menu, select [System Preferences]. 10 Click [Print & Fax]. 11 Click [+]. 14 Click [Add]. 15 If the [Installable Options] window appears, click [Continue] unless you have already installed options. If you have installed options, configure each option before clicking [Continue]. 16 Check that your machine is displayed under [Printers]. 17 Check that the name of your machine is displayed in [Kind] and then close [Print & Fax]. The installation is complete. Note The name of your machine may not be displayed if the printer driver does not read the PPD file correctly. In this case, click [-] to remove your machine from [Print & Fax] and then redo the procedure from step 10. Using Bonjour (Rendezvous) Mac 10.3.9 to 10.4.11 12 Click [AppleTalk]. Note The procedure below uses Mac OS X 10.4.11 and Model MC561 as an example. The actual procedure may differ somewhat depending on the operating system. 1 Make sure that your machine and the Mac are turned on and connected. 2 From the Apple menu, select [System Preferences]. 28 - English
-
 1
1 -
2
-
3
-
4
-
5
-
6
-
7
-
8
-
9
-
10
-
11
-
12
-
13
-
14
-
15
-
16
-
17
-
18
-
19
-
20
-
21
-
22
-
 23
23 -
 24
24 -
 25
25 -
 26
26 -
 27
27 -
 28
28 -
 29
29 -
 30
30 -
 31
31 -
 32
32 -
 33
33 -
34
-
35
-
36
-
37
-
38
-
39
-
40
-
41
-
42
-
43
-
44
-
45
-
46
-
47
-
48
-
49
-
50
-
51
-
52
-
53
-
54
-
55
-
56
-
57
-
58
-
59
-
60
-
61
-
62
-
63
-
64
-
65
-
66
-
67
-
68
-
69
-
70
-
71
-
72
-
73
-
74
-
75
-
76
-
77
-
78
-
79
-
80
-
81
-
82
-
83
-
84
-
85
-
86
-
87
-
88
-
89
-
90
-
91
-
92
-
93
-
94
-
95
-
96
-
97
-
98
-
99
-
100
-
101
-
102
-
103
-
104
-
105
-
106
-
107
-
108
-
109
-
110
-
111
-
112
-
113
-
114
-
115
-
116
-
117
-
118
-
119
-
120
-
121
-
122
-
123
-
124
-
125
-
126
-
127
-
128
-
129
-
130
-
131
-
132
-
133
-
134
-
135
-
136
-
137
-
138
-
139
-
140
-
141
-
142
-
143
-
144
-
145
-
146
-
147
-
148
-
149
-
150
-
151
-
152
-
153
-
154
-
155
-
156
-
157
-
158
-
159
-
160
-
161
-
162
-
163
-
164
-
165
-
166
-
167
-
168
-
169
-
170
-
171
-
172
-
173
-
174
-
175
-
176
-
177
-
178
-
179
-
180
-
181
-
182
-
183
-
184
-
185
-
186
-
187
-
188
-
189
-
190
-
191
-
192
-
193
-
194
-
195
-
196
-
197
-
198
-
199
-
200
-
201
-
202
-
203
-
204
-
205
-
206
-
207
-
208
-
209
-
210
-
211
-
212
-
213
-
214
-
215
-
216
 |
 |
