Oki MC361MFP MC361, MC561 Setup Guide (English, Fran栩s, Espa?ol, Po - Page 31
Configuring the Machine for Network Operation, Enter the Machine’s IP Address on the Setup Form
 |
View all Oki MC361MFP manuals
Add to My Manuals
Save this manual to your list of manuals |
Page 31 highlights
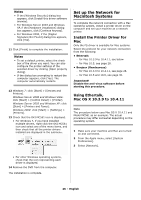
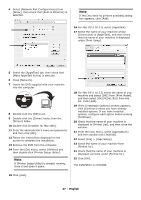
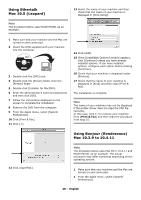
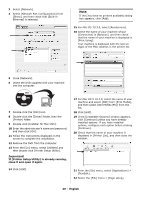
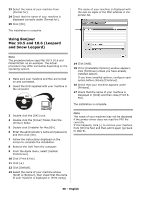
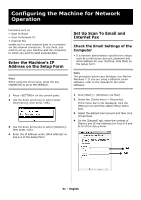
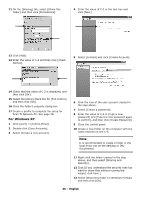
Configuring the Machine for Network Operation Functions such as • Scan To Email • Scan To Network PC • Internet Fax enable you to send scanned data to a computer via the network connection. To use them, you need to set up your machine and the computers to which you want to send scanned data. Enter the Machine's IP Address on the Setup Form Note When using the arrow keys, press the key repetitively to go to the selection. Set Up Scan To Email and Internet Fax Check the Email Settings of the Computer • If a network administrator specifies the values such as a mail server account, password and email address for your machine, note them on the Setup Form. Note The procedure below uses Windows Live Mail on Windows 7. If you are using a different email software, refer to the manual for the email software. 1 Press on the control panel. 2 Use the down arrow key to select [View Information], then press . 3 Use the down arrow key to select [Network], then press . 4 Enter the IP address under [IPv4 address] on line A-2 of the Setup Form. 1 Click [Start] > [Windows Live Mail]. 2 Select the [Tools] menu > [Accounts]. If the menu bar is not displayed, click the [Menus] icon and then select [Show menu bar]. 3 Select the default mail account and then click [Properties]. 4 On the [General] tab, enter the content of [Name] and [E-mail address] on lines B-9 and B-10 of the Setup Form. 31 - English
-
 1
1 -
2
-
3
-
4
-
5
-
6
-
7
-
8
-
9
-
10
-
11
-
12
-
13
-
14
-
15
-
16
-
17
-
18
-
19
-
20
-
21
-
22
-
23
-
24
-
25
-
 26
26 -
 27
27 -
 28
28 -
 29
29 -
 30
30 -
 31
31 -
 32
32 -
 33
33 -
 34
34 -
 35
35 -
 36
36 -
37
-
38
-
39
-
40
-
41
-
42
-
43
-
44
-
45
-
46
-
47
-
48
-
49
-
50
-
51
-
52
-
53
-
54
-
55
-
56
-
57
-
58
-
59
-
60
-
61
-
62
-
63
-
64
-
65
-
66
-
67
-
68
-
69
-
70
-
71
-
72
-
73
-
74
-
75
-
76
-
77
-
78
-
79
-
80
-
81
-
82
-
83
-
84
-
85
-
86
-
87
-
88
-
89
-
90
-
91
-
92
-
93
-
94
-
95
-
96
-
97
-
98
-
99
-
100
-
101
-
102
-
103
-
104
-
105
-
106
-
107
-
108
-
109
-
110
-
111
-
112
-
113
-
114
-
115
-
116
-
117
-
118
-
119
-
120
-
121
-
122
-
123
-
124
-
125
-
126
-
127
-
128
-
129
-
130
-
131
-
132
-
133
-
134
-
135
-
136
-
137
-
138
-
139
-
140
-
141
-
142
-
143
-
144
-
145
-
146
-
147
-
148
-
149
-
150
-
151
-
152
-
153
-
154
-
155
-
156
-
157
-
158
-
159
-
160
-
161
-
162
-
163
-
164
-
165
-
166
-
167
-
168
-
169
-
170
-
171
-
172
-
173
-
174
-
175
-
176
-
177
-
178
-
179
-
180
-
181
-
182
-
183
-
184
-
185
-
186
-
187
-
188
-
189
-
190
-
191
-
192
-
193
-
194
-
195
-
196
-
197
-
198
-
199
-
200
-
201
-
202
-
203
-
204
-
205
-
206
-
207
-
208
-
209
-
210
-
211
-
212
-
213
-
214
-
215
-
216
 |
 |
