Oki MC361MFP MC361, MC561 Setup Guide (English, Fran栩s, Espa?ol, Po - Page 33
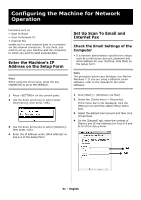
Set Up Scan To Network PC, Check the Name of the Computer, Computer
 |
View all Oki MC361MFP manuals
Add to My Manuals
Save this manual to your list of manuals |
Page 33 highlights
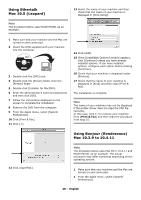
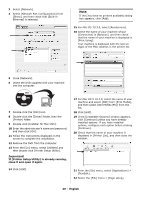
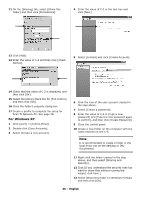
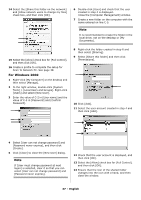
10 Use the down arrow key to select [Email Setting] and press the right arrow key. 11 Referring to the Setup Form: a) Server Address: Press the right arrow key, then enter the information from line B-2. b) Use the arrow keys to select [Enter], then press . c) Your machine's email address: Press the right arrow key, then enter the information from line B-1. d) Select [Enter], press . e) Authentication Method: Press the right arrow key, then use the down arrow kwy to select the method from line B-4. f) Continue to follow the on-screen instructions to enter the requested information from section B of the Setup Form. g) When all the information has been entered, "Email Setting was completed" appears on the display, and the screen returns to the Setup Menu. 12 When the setup menu screen appears, press . The setup for Scan To Email and Internet Fax is complete. For details on how to use Scan To Email and Internet Fax, see the Basic User Guide on the DVD supplied with your machine. Check the Name of the Computer Check the name of the computer following the procedure below, and fill it in on line C-1 of the Setup Form. Windows 7, Windows Server 2008 R2, Windows Server 2008 Windows Vista Note The procedure below uses Windows 7 as an example. The display may differ depending on the operating system. 1 Click [Start] > [Control Panel]. 2 Select [System and Security]. For Windows Server 2008 and Windows Vista, select [System and Maintenance]. 3 Select [See the name of this computer] under [System]. 4 Note the name in [Computer name] on line C-1 of the Setup Form. Set Up Scan To Network PC The Scan To Network PC function enables you to send and save scanned images to the "shared folder" of a computer on the network. To use this function, register your machine on the computer as a user and create a shared folder, and then create a profile on your machine to register the settings for the computer. • Before starting the setup, get permission from the network administrator to create a shared folder on the computer by following the procedure below. • The CIFS protocol is used in this procedure. 5 Close the window. Windows Server 2003 Windows XP 1 For Windows Server 2003, click [Start] > [Control Panel] > [System]. For Windows XP, click [start] > [Control Panel] > [Performance and Maintenance] > [System]. 2 Select the [Computer Name] tab and then click [Change]. 3 Note the name in [Computer name] on line C-1 of the Setup Form. 4 Click [Cancel] to close the window. 33 - English
-
 1
1 -
2
-
3
-
4
-
5
-
6
-
7
-
8
-
9
-
10
-
11
-
12
-
13
-
14
-
15
-
16
-
17
-
18
-
19
-
20
-
21
-
22
-
23
-
24
-
25
-
26
-
27
-
 28
28 -
 29
29 -
 30
30 -
 31
31 -
 32
32 -
 33
33 -
 34
34 -
 35
35 -
 36
36 -
 37
37 -
 38
38 -
39
-
40
-
41
-
42
-
43
-
44
-
45
-
46
-
47
-
48
-
49
-
50
-
51
-
52
-
53
-
54
-
55
-
56
-
57
-
58
-
59
-
60
-
61
-
62
-
63
-
64
-
65
-
66
-
67
-
68
-
69
-
70
-
71
-
72
-
73
-
74
-
75
-
76
-
77
-
78
-
79
-
80
-
81
-
82
-
83
-
84
-
85
-
86
-
87
-
88
-
89
-
90
-
91
-
92
-
93
-
94
-
95
-
96
-
97
-
98
-
99
-
100
-
101
-
102
-
103
-
104
-
105
-
106
-
107
-
108
-
109
-
110
-
111
-
112
-
113
-
114
-
115
-
116
-
117
-
118
-
119
-
120
-
121
-
122
-
123
-
124
-
125
-
126
-
127
-
128
-
129
-
130
-
131
-
132
-
133
-
134
-
135
-
136
-
137
-
138
-
139
-
140
-
141
-
142
-
143
-
144
-
145
-
146
-
147
-
148
-
149
-
150
-
151
-
152
-
153
-
154
-
155
-
156
-
157
-
158
-
159
-
160
-
161
-
162
-
163
-
164
-
165
-
166
-
167
-
168
-
169
-
170
-
171
-
172
-
173
-
174
-
175
-
176
-
177
-
178
-
179
-
180
-
181
-
182
-
183
-
184
-
185
-
186
-
187
-
188
-
189
-
190
-
191
-
192
-
193
-
194
-
195
-
196
-
197
-
198
-
199
-
200
-
201
-
202
-
203
-
204
-
205
-
206
-
207
-
208
-
209
-
210
-
211
-
212
-
213
-
214
-
215
-
216
 |
 |
