Olympus D150 D-150/C-1 Zoom Reference Manual (2.7MB) - Page 38
Monitor, BASIC SHOOTING OPERATIONS, No. of images that, can be shot, Battery status, Record mode
 |
View all Olympus D150 manuals
Add to My Manuals
Save this manual to your list of manuals |
Page 38 highlights
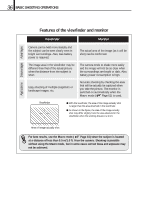
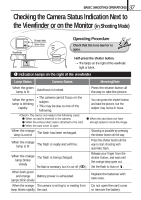
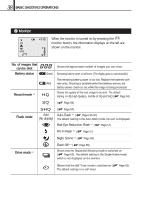
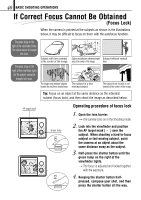
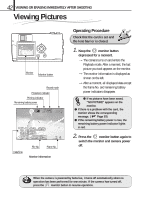
38 BASIC SHOOTING OPERATIONS 2 Monitor HQ When the monitor is turned on by pressing the monitor button, the information displays on the left are T shown on the monitor. W No. of images that can be shot Battery status Shows the approximate number of images you can shoot. (Green) Remaining battery power is sufficient. (The display goes out automatically.) Record mode *1 (Red) HQ The remaining battery power is too low. Replace the batteries with new ones. Shooting is possible when the batteries are low, but battery power could run out while the image is being processed. Shows the quality of the next image to be shot. The default setting is HQ (High Quality), middle of SQ and SHQ ( Page 54). SQ ( Page 54) Flash mode SHQ Auto (No display) ( Page 54) Auto-Flash *1 ( Pages 56-57) The default setting is the Auto-Flash mode. No icon is displayed. Red-Eye Reduction Flash *1 ( Page 57) Fill-In Flash *2 ( Page 57) Night Scene *2 ( Page 58) Drive mode *2 Flash Off *2 ( Page 58) Shows that the Sequential Shooting mode is switched on ( Page 63). The default setting is the Single-Frame mode, which is not displayed on the monitor. Shows that the Self-Timer mode is switched on ( The default setting is no self-timer. Page 62).
-
 1
1 -
2
-
3
-
4
-
5
-
6
-
7
-
8
-
9
-
10
-
11
-
12
-
13
-
14
-
15
-
16
-
17
-
18
-
19
-
20
-
21
-
22
-
23
-
24
-
25
-
26
-
27
-
28
-
29
-
30
-
31
-
32
-
 33
33 -
 34
34 -
 35
35 -
 36
36 -
 37
37 -
 38
38 -
 39
39 -
 40
40 -
 41
41 -
 42
42 -
 43
43 -
44
-
45
-
46
-
47
-
48
-
49
-
50
-
51
-
52
-
53
-
54
-
55
-
56
-
57
-
58
-
59
-
60
-
61
-
62
-
63
-
64
-
65
-
66
-
67
-
68
-
69
-
70
-
71
-
72
-
73
-
74
-
75
-
76
-
77
-
78
-
79
-
80
-
81
-
82
-
83
-
84
-
85
-
86
-
87
-
88
-
89
-
90
-
91
-
92
-
93
-
94
-
95
-
96
-
97
-
98
-
99
-
100
-
101
-
102
-
103
-
104
-
105
-
106
-
107
-
108
 |
 |
