Olympus D150 D-150/C-1 Zoom Reference Manual (2.7MB) - Page 68
White Balance Settings, Cloudy Sky
 |
View all Olympus D150 manuals
Add to My Manuals
Save this manual to your list of manuals |
Page 68 highlights
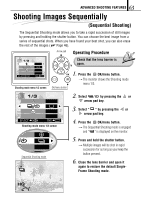
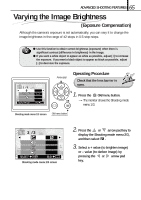
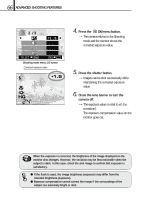
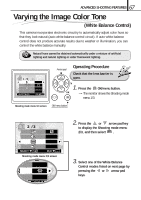
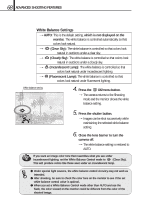
68 ADVANCED SHOOTING FEATURES White Balance Settings [AUTO: This is the default setting, which is not displayed on the monitor. The white balance is controlled automatically so that colors look natural. [ (Clear Sky): The white balance is controlled so that colors look natural in outdoors under a clear sky. [ (Cloudy Sky): The white balance is controlled so that colors look natural in outdoors under a cloudy sky. [ (Incandescent Lamp): The white balance is controlled so that colors look natural under incandescent lighting. [ (Fluorescent Lamp): The white balance is controlled so that colors look natural under fluorescent lighting. White balance setting 4. Press the OK/menu button. [The camera returns to the Shooting mode and the monitor shows the white balance setting. HQ 5. Press the shutter button. [Images can be shot successively while maintaining the selected white balance setting. 6. Close the lens barrier to turn the camera off. [The white balance setting is restored to AUTO. If you want an image color tone that resembles what you see under incandescent lighting, set the White Balance Control mode to (Clear Sky). This will produce colors like those seen under an incandescent lamp. ⅷ Under special light sources, the white balance control circuitry may not work as intended. ⅷ After shooting, be sure to check the color tone on the monitor to see if the set white balance control value is optimal. ⅷ When you set a White Balance Control mode other than AUTO and use the flash, the color viewed on the monitor could be different from the color of the shooted image.
-
 1
1 -
2
-
3
-
4
-
5
-
6
-
7
-
8
-
9
-
10
-
11
-
12
-
13
-
14
-
15
-
16
-
17
-
18
-
19
-
20
-
21
-
22
-
23
-
24
-
25
-
26
-
27
-
28
-
29
-
30
-
31
-
32
-
33
-
34
-
35
-
36
-
37
-
38
-
39
-
40
-
41
-
42
-
43
-
44
-
45
-
46
-
47
-
48
-
49
-
50
-
51
-
52
-
53
-
54
-
55
-
56
-
57
-
58
-
59
-
60
-
61
-
62
-
 63
63 -
 64
64 -
 65
65 -
 66
66 -
 67
67 -
 68
68 -
 69
69 -
 70
70 -
 71
71 -
 72
72 -
 73
73 -
74
-
75
-
76
-
77
-
78
-
79
-
80
-
81
-
82
-
83
-
84
-
85
-
86
-
87
-
88
-
89
-
90
-
91
-
92
-
93
-
94
-
95
-
96
-
97
-
98
-
99
-
100
-
101
-
102
-
103
-
104
-
105
-
106
-
107
-
108
 |
 |
