Onkyo BD-SP309 Owner Manual - Page 20
Turning the power on, Entering standby, About the Home screen - software update
 |
View all Onkyo BD-SP309 manuals
Add to My Manuals
Save this manual to your list of manuals |
Page 20 highlights
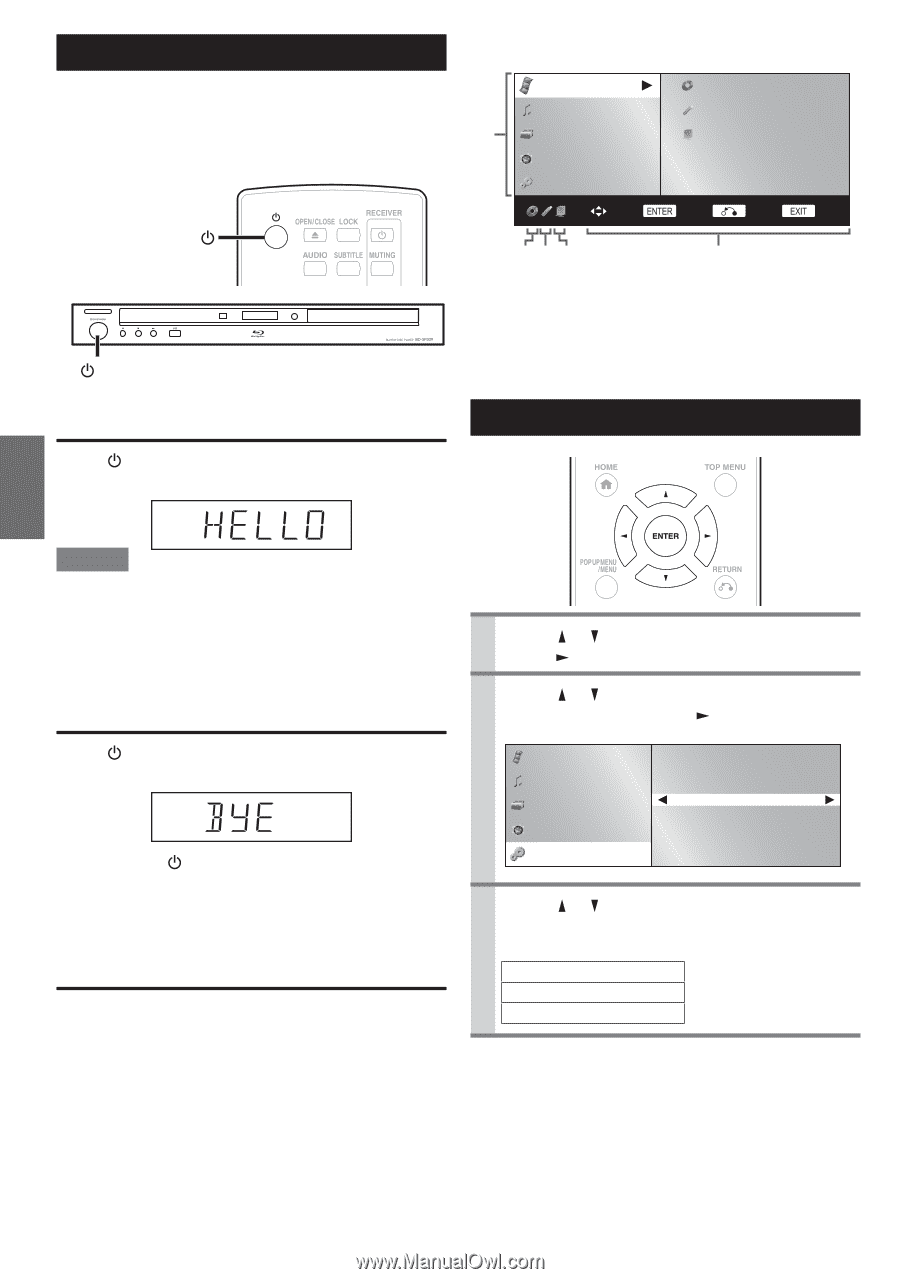
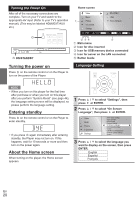
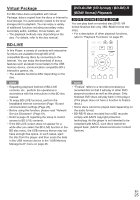
Turning the Power On After all of the necessary connections are complete, Turn on your TV and switch to the appropriate AV input (Refer to your TV's operation manual). (This may be labeled HDMI/EXT/AUX etc.) ON/STANDBY Turning the power on Press on the remote control or on the Player to turn on the power of the Player. Home screen Video Music 1 Picture e-Contents Settings BD-VIDEO USB Home Network Select Enter Return Exit 234 5 1 Main menu 2 Icon for disc inserted 3 Icon for USB memory device connected 4 Icon for server on the LAN connected 5 Button Guide Language Setting NOTE • When you turn on this player for the ¿rst time after purchase or when you turn on this player after you perform "System Reset" (see page 44), the language setting screen will be displayed, so please perform the language setting. Entering standby Press on the remote control or on the Player to enter standby. • If you press again immediately after entering standby, the Player may not turn on. If this happens, wait for 10 seconds or more and then turn on the power again. About the Home screen When turning on the player, the Home screen appears. 1 Press / to select "Settings", then press or ENTER. 2 Press / to select "On Screen Language", then press or ENTER. Video Music Picture e-Contents Settings Audio Video Settings Smart Settings HDMI Control Playback Setting On Screen Language Communication Setup Version USB Memory Management Software Update Settings System 3 Press / to select the language you want to display on the screen, then press ENTER. English Español Français En 20
-
 1
1 -
2
-
3
-
4
-
5
-
6
-
7
-
8
-
9
-
10
-
11
-
12
-
13
-
14
-
 15
15 -
 16
16 -
 17
17 -
 18
18 -
 19
19 -
 20
20 -
 21
21 -
 22
22 -
 23
23 -
 24
24 -
 25
25 -
26
-
27
-
28
-
29
-
30
-
31
-
32
-
33
-
34
-
35
-
36
-
37
-
38
-
39
-
40
-
41
-
42
-
43
-
44
-
45
-
46
-
47
-
48
-
49
-
50
-
51
-
52
-
53
-
54
-
55
-
56
-
57
-
58
-
59
-
60
-
61
-
62
-
63
-
64
-
65
-
66
-
67
-
68
-
69
-
70
-
71
-
72
-
73
-
74
-
75
-
76
-
77
-
78
-
79
-
80
-
81
-
82
-
83
-
84
-
85
-
86
-
87
-
88
-
89
-
90
-
91
-
92
-
93
-
94
-
95
-
96
-
97
-
98
-
99
-
100
-
101
-
102
-
103
-
104
-
105
-
106
-
107
-
108
-
109
-
110
-
111
-
112
-
113
-
114
-
115
-
116
-
117
-
118
-
119
-
120
-
121
-
122
-
123
-
124
-
125
-
126
-
127
-
128
-
129
-
130
-
131
-
132
-
133
-
134
-
135
-
136
-
137
-
138
-
139
-
140
-
141
-
142
-
143
-
144
-
145
-
146
-
147
-
148
-
149
-
150
-
151
-
152
-
153
-
154
-
155
-
156
-
157
-
158
-
159
-
160
-
161
-
162
-
163
-
164
-
165
-
166
-
167
-
168
-
169
-
170
-
171
-
172
-
173
-
174
-
175
-
176
-
177
-
178
-
179
-
180
-
181
-
182
-
183
-
184
-
185
-
186
-
187
-
188
 |
 |