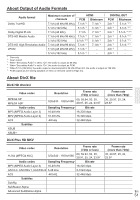
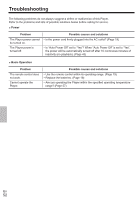
Onkyo BD-SP309 Owner Manual - Page 47
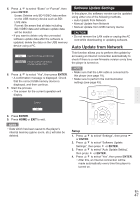
Auto Update from Network
 |
View all Onkyo BD-SP309 manuals
Add to My Manuals
Save this manual to your list of manuals |
Page 47 highlights
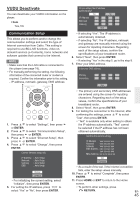
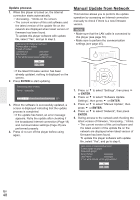
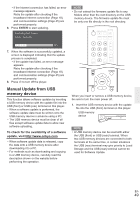
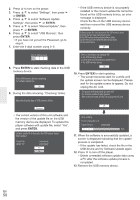
5. Press / to select "Erase" or "Format", then press ENTER. Erase: Deletes only BD-VIDEO data written on the USB memory device such as BDLIVE data. Format: Be aware that all data including BD-VIDEO data and software update data will be deleted. • If you want to delete only the unneeded software update data after the software is updated, delete the data on the USB memory device using a PC. Erase Format Erases BD-VIDEO data on USB memory. Erase all contents on USB memory including protected contents. 6. Press / to select "Yes", then press ENTER. • A con¿rmation message is displayed. Check that the correct USB memory device is displayed, and then continue. 7. Start the process. • The screen for the current operation will display. Software Update Settings In this player, the software version can be updated using either one of the following methods. • Auto Update from Network • Manual Update from Network • Manual Update from USB memory device CAUTION • Do not remove the LAN cable or unplug the AC cord while downloading or updating software. Auto Update from Network This function allows you to perform the update by accessing an Internet connection automatically to check if there is a new ¿rmware version every time the player is turned on. NOTE • Make sure that the LAN cable is connected to this player (see page 18). • Make sure to perform the communication settings (see page 45). Complete OK 8. Press ENTER. 9. Press HOME or EXIT to exit. NOTE • Data which has been saved to the player's internal memory (game score, etc.) will also be deleted. Setup 1. Press / to select "Settings", then press or ENTER. 2. Press / to select "Software Update Settings", then press or ENTER. 3. Press / to select "Auto Update Setting", then press or ENTER. 4. Press / to select "Yes", then press ENTER. • After this, an Internet connection will be made automatically every time this player is turned on. En 47
-
 1
1 -
2
-
3
-
4
-
5
-
6
-
7
-
8
-
9
-
10
-
11
-
12
-
13
-
14
-
15
-
16
-
17
-
18
-
19
-
20
-
21
-
22
-
23
-
24
-
25
-
26
-
27
-
28
-
29
-
30
-
31
-
32
-
33
-
34
-
35
-
36
-
37
-
38
-
39
-
40
-
41
-
 42
42 -
 43
43 -
 44
44 -
 45
45 -
 46
46 -
 47
47 -
 48
48 -
 49
49 -
 50
50 -
 51
51 -
 52
52 -
53
-
54
-
55
-
56
-
57
-
58
-
59
-
60
-
61
-
62
-
63
-
64
-
65
-
66
-
67
-
68
-
69
-
70
-
71
-
72
-
73
-
74
-
75
-
76
-
77
-
78
-
79
-
80
-
81
-
82
-
83
-
84
-
85
-
86
-
87
-
88
-
89
-
90
-
91
-
92
-
93
-
94
-
95
-
96
-
97
-
98
-
99
-
100
-
101
-
102
-
103
-
104
-
105
-
106
-
107
-
108
-
109
-
110
-
111
-
112
-
113
-
114
-
115
-
116
-
117
-
118
-
119
-
120
-
121
-
122
-
123
-
124
-
125
-
126
-
127
-
128
-
129
-
130
-
131
-
132
-
133
-
134
-
135
-
136
-
137
-
138
-
139
-
140
-
141
-
142
-
143
-
144
-
145
-
146
-
147
-
148
-
149
-
150
-
151
-
152
-
153
-
154
-
155
-
156
-
157
-
158
-
159
-
160
-
161
-
162
-
163
-
164
-
165
-
166
-
167
-
168
-
169
-
170
-
171
-
172
-
173
-
174
-
175
-
176
-
177
-
178
-
179
-
180
-
181
-
182
-
183
-
184
-
185
-
186
-
187
-
188
 |
 |