Onkyo TX SR800 Owner Manual - Page 46
Input Setup Menu
 |
UPC - 751398004926
View all Onkyo TX SR800 manuals
Add to My Manuals
Save this manual to your list of manuals |
Page 46 highlights
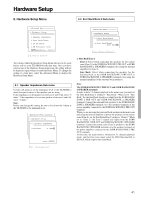
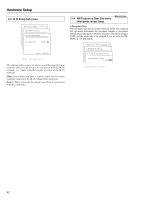
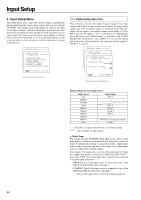
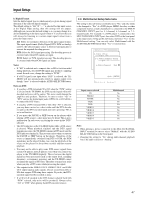
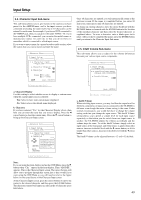
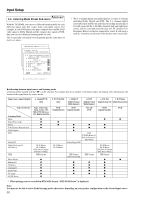
Input Setup 2. Input Setup Menu This menu allows you to make the various settings concerning the signals input from the various input sources that you use with the TX-SR800. The settings made in this menu are valid for the input source that is currently selected with the input source buttons at the front panel and, therefore, these settings are made separately for each input source. Each input source may have a great number of settings that are difficult to keep track of, so we recommend making a chart to record what you have set and for which component to prevent confusion later. Advanced Menu 2.Input Setup Input:DVD 1.Digital Setup 2.Multichannel Setup 3.Video Setup 4.Character Input 5.Intelli Volume 6.Listening Mode Preset |ENTER|Quit:|SETUP| 2-1. Digital Setup Sub-menu This sub-menu concerns the input of digital signals from input sources and if these settings are incorrectly made, the digital audio signals may not be properly output, or not heard at all. This submenu will not appear if the selected input source button is AM or FM. It will also not appear if "Yes" is selected in 2-2. Multichannel Setup Sub-menu and "Multichannel" is selected in the AUDIO SELECTOR. Furthermore, since VIDEO 5 is fixed to the optical digital terminal on the front panel, this sub-menu will not appear if VIDEO 5 is selected. Advanced Menu 2.Input Setup Input:DVD 2-1.Digital Setup Input:DVD a.Digital Input :COAX1 b.Digital Format :All Quit:|SETUP| Initial settings for each input source Input source CD PHONO TUNER TAPE VIDEO 1 VIDEO 2 VIDEO 3 VIDEO 4 VIDEO 5 DVD Digital input OPT 1 ---- OPT 2 COAX 2 COAX 3 OPT 3 ---OPTICAL on front panel (fixed) COAX 1 ---- : Available for digital input but not set in initial settings. : Not available for digital input. a. Digital Input This setting tells the TX-SR800 which input source button on the front panel is connected with which digital input jack on the rear panel. To perform this setting, you must first select a digital input source at the front panel and then set the name of the digital input jack it is connected to with this setting. For example, if the input source selected at the front panel is CD and the compact disc player is connected to DIGITAL INPUT OPT 1, then select "OPT1" here. If the input source selected is not connected to a digital input, then select "----." OPT1-3: Select if the input source is connected to any of the DIGITAL INPUT OPT jacks 1 through 3. COAX1-3: Select if the input source is connected to any of the DIGITAL INPUT COAX jacks 1 through 3. ----: Select if the input source is not from a digital input jack. 46
-
 1
1 -
2
-
3
-
4
-
5
-
6
-
7
-
8
-
9
-
10
-
11
-
12
-
13
-
14
-
15
-
16
-
17
-
18
-
19
-
20
-
21
-
22
-
23
-
24
-
25
-
26
-
27
-
28
-
29
-
30
-
31
-
32
-
33
-
34
-
35
-
36
-
37
-
38
-
39
-
40
-
 41
41 -
 42
42 -
 43
43 -
 44
44 -
 45
45 -
 46
46 -
 47
47 -
 48
48 -
 49
49 -
 50
50 -
 51
51 -
52
-
53
-
54
-
55
-
56
-
57
-
58
-
59
-
60
-
61
-
62
-
63
-
64
-
65
-
66
-
67
-
68
-
69
-
70
-
71
-
72
-
73
-
74
-
75
-
76
 |
 |
