Onkyo TX SR800 Owner Manual - Page 49
Intelli Volume Sub-menu, 4. Character Input Sub-menu
 |
UPC - 751398004926
View all Onkyo TX SR800 manuals
Add to My Manuals
Save this manual to your list of manuals |
Page 49 highlights
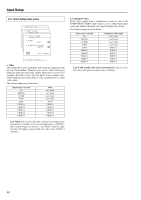
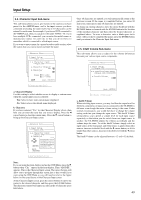
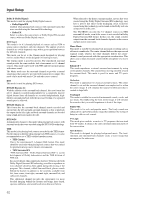
Input Setup 2-4. Character Input Sub-menu This sub-menu allows you to give names to the stations you have preset for the AM/FM tuner, and to the input sources you have connected (excluding the tuner itself). Up to 10 characters can be entered for each name. For example, if you have a DVD connected to the VIDEO4 jack, then you can give it the name "DVD2." Or, if you have multiple VCRs connected, you can enter the model names or manufacturer names for each one so that you do not have to remember which is connected to which input source. If you want to enter a name for a preset broadcast radio station, select the station that you want to name and enter the name. Advanced Menu 2.Input Setup Input:DVD 2-4.Character Input Input:DVD a.Character Display :No b.Character : Press to edit. to clear. Quit:|SETUP| Once 10 characters are entered, you will automatically return to the previous screen. If the name is completed before you enter 10 characters, enter spaces until 10 characters are entered. To change an existing character, move the cursor backward with the RETURN button or forward with the ENTER button to the location of the mistaken character and then enter the desired character as explained above. To erase a character, enter a blank space in its place. After you have completed the name, press the ENTER button until you return to the Character Input Sub-menu. 2-5. Intelli Volume Sub-menu This sub-menu allows you to adjust for the volume differences between your various input source components. Advanced Menu 2.Input Setup Input:DVD 2-5.IntelliVolume Setup Input:DVD a.IntelliVolume : 0dB a. Character Display Use this setting to select whether or not to display a custom name when the current input source is selected. Yes: Select to have your custom name displayed. No: Select to have the default name displayed. b. Character If you have selected "Yes" for the Character Display above, then here you can enter the name that you want to display. Press the cursor button to clear the current entry. Press the cursor button to bring up the Character Input screen. Advanced Menu 2.Input Setup Input:DVD 2-4.Character Input Input:DVD b.Character : ABCDEFGHIJKLM NOPQRSTUVWXYZ abcdefghijklm nopqrstuvwxyz |ENTER| 0123456789 Back: |RETURN| Quit:|SETUP| a. Intelli Volume When switching input sources, you may find that the output level for different components or input sources connected to the TX-SR800 is different even though the main volume setting is the same. Under normal circumstances, you would then have to change the volume setting each time you change the input source. This Intelli Volume setting allows you to preset a volume level for each input source separately so that when you do switch from one input source to another, the TX-SR800 adjusts the volume accordingly and the volume stays the same. To set the Intelli Volume, simply select an input source at the front panel, and if that source is quieter than other sources, increase its decibel level with the cursor button, or if it is louder than other sources, decrease its decibel level with the cursor button. The Intelli Volume can be adjusted between -12 and +12 decibels. Note: If you are using the front display and not the OSD Menu, press the button when "Chr. " appears in the front display. Then "ABCDEF.." appears. This is the Character Input screen. The cursor buttons will allow you to navigate through this screen just as they would if you were using the OSD Menu so you will need to refer to the figure below for the actual layout of the Character Input screen. At the Character Input screen, press the cursor buttons to move the cursor to the desired character and then press the ENTER button. The characters entered will appear in order in the 10-character space field above. 49
-
 1
1 -
2
-
3
-
4
-
5
-
6
-
7
-
8
-
9
-
10
-
11
-
12
-
13
-
14
-
15
-
16
-
17
-
18
-
19
-
20
-
21
-
22
-
23
-
24
-
25
-
26
-
27
-
28
-
29
-
30
-
31
-
32
-
33
-
34
-
35
-
36
-
37
-
38
-
39
-
40
-
41
-
42
-
43
-
 44
44 -
 45
45 -
 46
46 -
 47
47 -
 48
48 -
 49
49 -
 50
50 -
 51
51 -
 52
52 -
 53
53 -
 54
54 -
55
-
56
-
57
-
58
-
59
-
60
-
61
-
62
-
63
-
64
-
65
-
66
-
67
-
68
-
69
-
70
-
71
-
72
-
73
-
74
-
75
-
76
 |
 |
