Panasonic WV-NF284 Network Camera - Page 15
About the operation window, Live] button, Basic setup] button, Multi-screen setup] button
 |
UPC - 791871505298
View all Panasonic WV-NF284 manuals
Add to My Manuals
Save this manual to your list of manuals |
Page 15 highlights
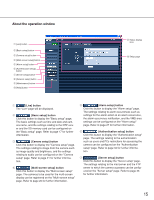
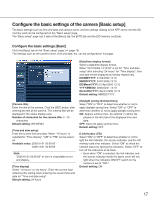
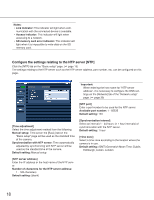
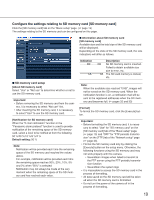
About the operation window q [Live] button w [Basic setup] button e [Camera setup] button r [Multi-screen setup] button t [Alarm setup] button y [Authentication setup] button u [Server setup] button i [Network setup] button o [Maintenance] button !0 [Help] button !1 Status display area !2 Setup page q [Live] button The "Live" page will be displayed. w [Basic setup] button Click this button to display the "Basic setup" page. The basic settings such as time and date and cam- era name, and the settings relating to the NTP serv- er and the SD memory card can be configured on the "Basic setup" page. Refer to page 17 for further information. e [Camera setup] button Click this button to display the "Camera setup" page. The settings relating to image from the camera such as image quality and brightness, and the settings relating to audio can be configured on the "Camera setup" page. Refer to page 21 for further informa- tion. r [Multi-screen setup] button Click this button to display the "Multi-screen setup" page. The cameras to be used for the multi-screen display can be registered on the "Multi-screen setup" page. Refer to page 26 for further information. t [Alarm setup] button Click this button to display the "Alarm setup" page. The settings relating to alarm occurrences such as settings for the alarm action at an alarm occurrence, the alarm occurrence notification, and the VMD area settings can be configured on the "Alarm setup" page. Refer to page 27 for further information. y [Authentication setup] button Click this button to display the "Authentication setup" page. The settings relating to the authentication such as users and PCs restrictions for accessing the camera can be configured on the "Authentication setup" page. Refer to page 34 for further informa- tion. u [Server setup] button Click this button to display the "Server setup" page. The settings relating to the mail server and the FTP server to which the camera accesses can be config- ured on the "Server setup" page. Refer to page 36 for further information. 15
-
 1
1 -
2
-
3
-
4
-
5
-
6
-
7
-
8
-
9
-
 10
10 -
 11
11 -
 12
12 -
 13
13 -
 14
14 -
 15
15 -
 16
16 -
 17
17 -
 18
18 -
 19
19 -
 20
20 -
21
-
22
-
23
-
24
-
25
-
26
-
27
-
28
-
29
-
30
-
31
-
32
-
33
-
34
-
35
-
36
-
37
-
38
-
39
-
40
-
41
-
42
-
43
-
44
-
45
-
46
-
47
-
48
-
49
-
50
-
51
-
52
-
53
-
54
-
55
-
56
 |
 |
