Panasonic WV-NF284 Network Camera - Page 4
Monitor Images on a PC, Monitor images from a single camera - manual
 |
UPC - 791871505298
View all Panasonic WV-NF284 manuals
Add to My Manuals
Save this manual to your list of manuals |
Page 4 highlights
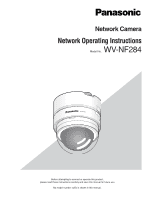
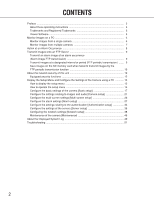
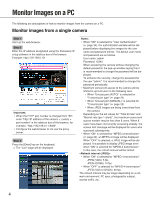
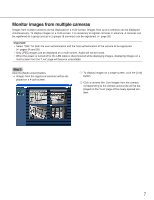
Monitor Images on a PC The following are descriptions of how to monitor images from the camera on a PC. Monitor images from a single camera Step 1 Start up the web browser. Step 2 Enter the IP address designated using the Panasonic IP setup software in the address box of the browser. Example: http://192.168.0.10/ Important: • When the HTTP port number is changed from "80", enter "http://IP address of the camera +: (colon) + port number" in the address box of the browser, for example, "http://192.168.0.11:8080". • Configure the web browser to not use the proxy server. Step 3 Press the [Enter] key on the keyboard. → The "Live" page will be displayed. Notes: • When "ON" is selected for "User Authentication" (☞ page 34), the authentication window will be displayed before displaying live images for the user name and password entries. The default user name and password are as follows. User name: admin Password: 12345 When accessing the camera without changing the default password, the pop-up window saying that it is recommended to change the password will be displayed. To enhance the security, change the password for the user "admin". It is recommended to change this password periodically. • Maximum concurrent access to the camera will be limited to up to 8 users in the following case. • When "Unicast port (AUTO)" is selected for "Transmission type" (☞ page 22) • When "Unicast port (MANUAL)" is selected for "Transmission type" (☞ page 22) • When JPEG images are being transmitted from the camera Depending on the set values for "Total bit rate" and "Max bit rate (per 1 client)", the maximum concurrent access number may be less than 8 users. When 8 users have been concurrently accessing already, the access limit message will be displayed for users who accessed subsequently. • When "ON" is selected for "MPEG-4 transmission" (☞ page 22), an MPEG-4 image will be displayed. When "OFF" is selected, a JPEG image will be displayed. It is possible to display JPEG image even when "ON" is selected for "MPEG-4 transmission". In this case, the refresh interval will be limited. • When "ON" is selected for "MPEG-4 transmission" JPEG (VGA): 5 fps JPEG (QVGA): 10 fps • When "OFF" is selected for "MPEG-4 transmission" JPEG (VGA or QVGA): 30 fps The refresh interval may be longer depending on a network environment, PC spec, photographic subject, access traffic, etc. 4
-
 1
1 -
 2
2 -
 3
3 -
 4
4 -
 5
5 -
 6
6 -
 7
7 -
 8
8 -
 9
9 -
 10
10 -
11
-
12
-
13
-
14
-
15
-
16
-
17
-
18
-
19
-
20
-
21
-
22
-
23
-
24
-
25
-
26
-
27
-
28
-
29
-
30
-
31
-
32
-
33
-
34
-
35
-
36
-
37
-
38
-
39
-
40
-
41
-
42
-
43
-
44
-
45
-
46
-
47
-
48
-
49
-
50
-
51
-
52
-
53
-
54
-
55
-
56
 |
 |