Panasonic WV-NF284 Network Camera - Page 6
Camera name, AUX buttons *2 - by
 |
UPC - 791871505298
View all Panasonic WV-NF284 manuals
Add to My Manuals
Save this manual to your list of manuals |
Page 6 highlights
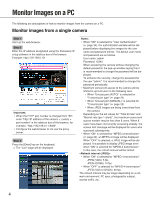
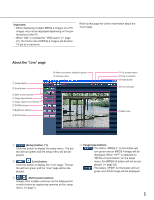
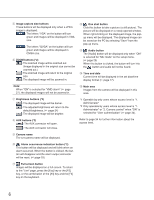
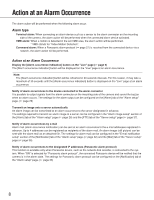
t Image capture size buttons These buttons will be displayed only when a JPEG image is displayed. : The letters "VGA" on the button will turn green and images will be displayed in VGA size. : The letters "QVGA" on the button will turn green and images will be displayed in QVGA size. y ZOOM buttons (*2) : The zoomed image will be zoomed out. (Image displayed in the original size cannot be zoomed out.) : The zoomed image will return to the original size. : The displayed image will be zoomed in. !2 One shot button Click this button to take a picture (a still picture). The picture will be displayed on a newly opened window. When right-clicking on the displayed image, the popup menu will be displayed. The displayed image can be saved on the PC by selecting "Save" from the pop-up menu. !3 Audio button The [Audio] button will be displayed only when "ON" is selected for "Mic mode" on the setup menu. (☞ page 25) When this button is clicked, the button will turn into the button and audio will not be heard. !4 Time and date Current time will be displayed in the set date/time display format (☞ page 17). Note: When "ON" is selected for "VMD alarm" (☞ page 27), the displayed images will not be zoomed in. u Brightness buttons (*2) : The displayed image will be darker. : The adjusted brightness will return to the default brightness. (☞ page 24) : The displayed image will be brighter. i AUX buttons (*2) : The AUX connector will open. : The AUX connector will close. !5 Main area Images from the camera will be displayed in this area. *1 Operable by only users whose access level is "1. Administrator" *2 Only operable by users whose access level is "1. Administrator" or "2. Camera control" when "ON" is selected for "User authentication" (☞ page 34). Refer to page 34 for further information about the access level. o Camera name The set camera name will be displayed. !0 Alarm occurrence indication button (*2) This button will be displayed and will blink when an alarm occurred. When the button is clicked, the button will disappear and the alarm output connector will be reset. (☞ page 29) !1 Full screen button Images will be displayed on a full screen. To return to the "Live" page, press the [Esc] key or the [F5] key, or the combination of the [Alt] key and the [F4] key on the keyboard. 6
-
 1
1 -
 2
2 -
 3
3 -
 4
4 -
 5
5 -
 6
6 -
 7
7 -
 8
8 -
 9
9 -
 10
10 -
 11
11 -
 12
12 -
13
-
14
-
15
-
16
-
17
-
18
-
19
-
20
-
21
-
22
-
23
-
24
-
25
-
26
-
27
-
28
-
29
-
30
-
31
-
32
-
33
-
34
-
35
-
36
-
37
-
38
-
39
-
40
-
41
-
42
-
43
-
44
-
45
-
46
-
47
-
48
-
49
-
50
-
51
-
52
-
53
-
54
-
55
-
56
 |
 |
