Pfaff Varimatic 6091 Owner's Manual - Page 35
Pfaff Varimatic 6091 Manual
 |
View all Pfaff Varimatic 6091 manuals
Add to My Manuals
Save this manual to your list of manuals |
Page 35 highlights
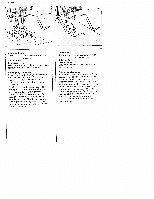
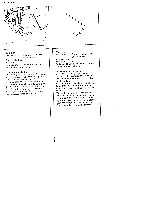
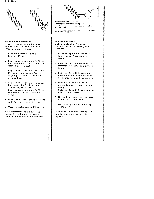
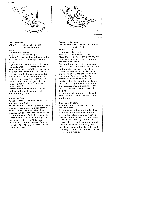
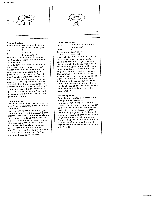
01/29/2008 Knopfloch einstellen StichldngenEinsteller 9 in den Knopf lochbereich bel 3 stellen. Knopflochfuf anbringen. Stichdichte im Knopftoch bereich N einstellen. Einlauffaden wie folgt im NähfuR einlegen: Faden über die hintere Nocke 0 legen, straff ziehen und in der vorderen Nocke P einklem men. Beim Ndhen Iduft der Pfeil 0 an der Skala R entlang. Dadurch kann die Knopflochlange bestimmt werden, Zum Knopflochndhen feines Nahgarn ver wenden. Buttonhole setting Stitch length control 9 at range 3 for buttonhole sewing. Attach the button hole foot. Set the stitch density at range N. Insert a gimp thread in the sewing foot as shown in the illustration: Place the thread over the back ridge 0, and pull it taut so that it is held in tab P at the front. During sewing, arrow 0 runs along scale R. This is how the buttonhole length is determined. For sewing buttonholes use light sewing thread. Reglage de Ia boutonniere Regle-point 9 du fil d'aiguille dans Ia zone boutonnières sur 3. Fixer Ia semelle boutonnières. Regler Ia densité des points dans a zone boutonnières N. Introduire Ic fit de passe dans Ia semelle comme suit: Poser Ic fit sur le crochet arrière 0, Ic tendre et l'accrocher dans le crochet avant P. Pendant Ia couture Ia flèche 0 coulisse Ic long de l'échelle graduée R. Ainsi, it est possible de determiner Ia longueur de Ia bou tonnière. Utiliser du fit a coudre fin. Knoopsgat instellen: Steeklengte-instelwiel 9 in de knoops gatenzone op 3 zetten. Knoopsgaten voet inklikken. Steekdichtheid in knoopsgatenzone N instellen. Dc vul draad alsvolgt aanbrengen: Draad over bet achterste nokje 0 leggen, strak aantrekken en in het voorste nokje P vastklemmen. Bij bet naaien lodpt pIjl 0 langs lengte schaal R. Hierdoor kan de lengte van het knoopsgat worden bepaald. Dc Iengteverdeling op de slede van de voet verloopt in halve centimeters. Voor knoopsgaten dun naaigaren gebruiken.
-
 1
1 -
2
-
3
-
4
-
5
-
6
-
7
-
8
-
9
-
10
-
11
-
12
-
13
-
14
-
15
-
16
-
17
-
18
-
19
-
20
-
21
-
22
-
23
-
24
-
25
-
26
-
27
-
28
-
29
-
 30
30 -
 31
31 -
 32
32 -
 33
33 -
 34
34 -
 35
35 -
 36
36 -
 37
37 -
 38
38 -
 39
39 -
 40
40 -
41
-
42
-
43
-
44
-
45
-
46
-
47
-
48
-
49
-
50
-
51
-
52
-
53
-
54
-
55
-
56
-
57
-
58
-
59
-
60
-
61
-
62
-
63
-
64
-
65
-
66
-
67
-
68
-
69
-
70
-
71
-
72
-
73
-
74
 |
 |
