Pfaff Varimatic 6091 Owner's Manual - Page 38
Knopt, annähen, Knopf, Sewing, buttons, Buttons
 |
View all Pfaff Varimatic 6091 manuals
Add to My Manuals
Save this manual to your list of manuals |
Page 38 highlights
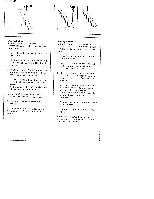
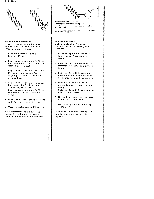
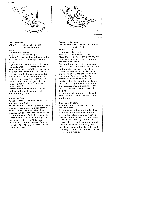
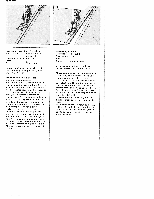
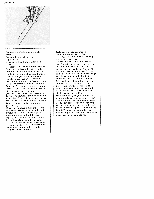
01/29/2008 Knopt annähen Nähful/ ohne NähfuB oder mit Klarsichtfu1 Stich: F Transporteur: versenken Garn: feines Nähgarn Drehen Sie das Handrad auf sich zu, bis die Nadel in linker Stichiage abwärts geht. Legen Sie nun den Knopf auf die zuvor markierte Stelle. Vorsichtig Stoff mit Knopf unter den Nähfulhalter schieben. Nähful,haIter senken und die Nadel in die linke Knopfbohrung einstechen las sen. Handrad weiter drehen, bis die Nadel in die rechte Knopfbohrung em sticht. Dabei am Knopf evtl. eine Kor rektur vornehmen. 6-8 Uberstiche nähen (Abb. NI. Stichmuster-Einstellrad auf D stellen und einige Steppstiche in der linken Knopfbohrung nähen. Knopf mit Stiel Grole Knapfe in schweren Stoffen be nötigen einen Stiel. Die Nadel in die linke Knopfbohrung em stechen lassen. Bevor Sie den Nähful senken, legen Sie einen Maschinen nadelkolben oder em Streichholz auf die Knopfmitte (Abb. 0). Einige Uberstiche nähen und ca. 15 cm Fadenlange ste hen lassen, Ober und Unterfaden durchfädeln (Abb. P1 und den Stiel um wickeln (Abb. Ql. Die Fadenenden von Hand verknoten. Sewing on buttons Sewing foot: Clear-view foot or without sewing foot Stitch: F Feed dog: Lowered Thread: Fine sewing thread Move the needle to its left position, and turn the hand wheel towards you until the needle descends. Position the button on the previously marked fabric: Carefully place fabric and button under the sewing foot holder. Lower the sewing foot holder and let the needle stitch into the left hole of the button. Raise the needle. Set pattern selector wheel at F. Turn the handwheel further until the needle stit ches into the right hole of the button. If necessary, alter the position of the button. Sew six to eight zigzag stitches (Fig. N). Set pattern selector wheel at D, and sew a few stitches in the left hole of the button. Buttons with stem Large buttons on heavy materials require a stem. Let the needle stitch into the left hole of the button. Before lowering the sewing foot place a sewing machine needle shank or a match on the middle of the button (Fig. 01. Sew a few zigzag stitches and leave a thread end, about 6 inches or 1 5 cm long. Pull needle and bobbin threads to the right side (Fig. P1 and wrap the stem (Fig. Q(. Tie off the thread ends.
-
 1
1 -
2
-
3
-
4
-
5
-
6
-
7
-
8
-
9
-
10
-
11
-
12
-
13
-
14
-
15
-
16
-
17
-
18
-
19
-
20
-
21
-
22
-
23
-
24
-
25
-
26
-
27
-
28
-
29
-
30
-
31
-
32
-
 33
33 -
 34
34 -
 35
35 -
 36
36 -
 37
37 -
 38
38 -
 39
39 -
 40
40 -
 41
41 -
 42
42 -
 43
43 -
44
-
45
-
46
-
47
-
48
-
49
-
50
-
51
-
52
-
53
-
54
-
55
-
56
-
57
-
58
-
59
-
60
-
61
-
62
-
63
-
64
-
65
-
66
-
67
-
68
-
69
-
70
-
71
-
72
-
73
-
74
 |
 |
