Philips PXG30 User Manual - Page 23
Computer Input
 |
UPC - 037849938089
View all Philips PXG30 manuals
Add to My Manuals
Save this manual to your list of manuals |
Page 23 highlights
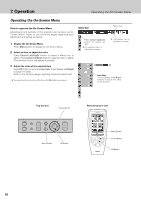
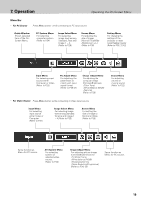
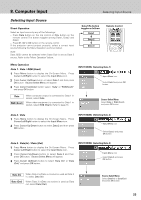
8. Computer Input Selecting Input Source Selecting Input Source Direct Operation Select an Input source by any of the followings: - Press Data button on the top control or CH+ button on the remote control.The button toggles among Data1, Data2 and Data3. - Press D1, D2 or D3 button on the remote control. If the projector cannot project properly, select a correct input source following the Menu Operation as shown below. Note: Data 3(D3) cannot be selected when Data (Out) is set as Data 3 source. Refer to the "Menu Operation" below. Data/CH+ button toggles as follows Data1 Data 2 Data 3 Remote Control Menu Operation Data 1 : Data / RGB (Scart) 1 Press Menu button to display the On-Screen Menu. Press Cursor Left/Right button to select the Input Menu icon. 2 Press Cursor Up/Down button to select Data 1 and then press OK button. Source Select Menu will appear. 3 Press Cursor Up/Down button select "Data" or "RGB(Scart)" and press OK button. INPUT MENU (Selecting Data 1) Input Menu icon Select Data1 and press OK button. Data RGB (Scart) When computer output is connected to Data 1 in socket, select Data. When video equipment is connected to Data 1 in socket, select RGB (Scart). Refer to page 31. Source Select Menu Select Data or RGB (Scart) and press OK button. Data 2 : Data 1 Press Menu button to display the On-Screen Menu. Press Cursor Left/Right button to select the Input Menu icon. 2 Press Cursor Up/Down button to select Data 2 and then press OK button. INPUT MENU (Selecting Data 2) Input Menu icon Select Data 2 and press OK button. Data 3 : Data(In) / Data (Out) 1 Press Menu button to display the On-Screen Menu. Press Cursor Left/Right button to select the Input Menu icon. 2 Press Cursor Up/Down button to select Data 3 and then press OK button. Source Select Menu will appear. 3 Press Cursor Up/Down button to select "Data (In)" or "Data (Out)" and press OK button. INPUT MENU (Selecting Data 3) Input Menu icon Select Data 3 and press OK button. Data (In) When Data 3 in/Data out socket is used as Data 3 in, select Data (In) Data (Out) When Data 3 in/Data out socket is used as Data out, select Data (Out) Source Select Menu Select Data(In) or Data(Out) and press OK button. 23
-
 1
1 -
2
-
3
-
4
-
5
-
6
-
7
-
8
-
9
-
10
-
11
-
12
-
13
-
14
-
15
-
16
-
17
-
 18
18 -
 19
19 -
 20
20 -
 21
21 -
 22
22 -
 23
23 -
 24
24 -
 25
25 -
 26
26 -
 27
27 -
 28
28 -
29
-
30
-
31
-
32
-
33
-
34
-
35
-
36
-
37
-
38
-
39
-
40
-
41
-
42
-
43
-
44
-
45
-
46
-
47
-
48
-
49
-
50
-
51
-
52
 |
 |
