Philips PXG30 User Manual - Page 24
Selecting Computer System
 |
UPC - 037849938089
View all Philips PXG30 manuals
Add to My Manuals
Save this manual to your list of manuals |
Page 24 highlights
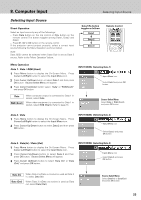
8. Computer Input Selecting Computer System Selecting Computer System This projector accepts various kinds of computer signals including VGA, SVGA, XGA and SXGA. By selecting a Data input as a signal source, it automatically detects the signal format and tune itself to project a proper image without any additional settings. (Signal formats provided in this projector is shown on Page 49.) Note : The projector may display one of the following messages. Auto When the projector cannot recognize connected signal as PC system provided in this projector, Auto Image Adjustment function operates to adjust the projector and the message "Auto" is displayed on System Menu icon. (Refer to page 25.) ---- There is no signal input from a computer. Make sure the computer and the projector are properly connected. (Refer to "Installation" on page 15.) PC SYSTEM MENU System Menu icon Displays system being selected. Select Computer System Manually PC system can be also selected manually. 1 Press Menu button to display the On-Screen Menu. Press Cursor Left/Right buttons to select PC System Menu icon. 2 Press Cursor Down button to select the system that you want to set, and then press OK button. PC SYSTEM MENU System Menu icon Displays selected system. Note: If the image is not provided properly, manual adjustment may be required. Refer to the section "Manual PC Adjustment".(page 26~27) The systems on this dialog box can be selected. Custom Mode (1~5) set in PC Adjust Menu. (P26, 27) 24
-
 1
1 -
2
-
3
-
4
-
5
-
6
-
7
-
8
-
9
-
10
-
11
-
12
-
13
-
14
-
15
-
16
-
17
-
18
-
 19
19 -
 20
20 -
 21
21 -
 22
22 -
 23
23 -
 24
24 -
 25
25 -
 26
26 -
 27
27 -
 28
28 -
 29
29 -
30
-
31
-
32
-
33
-
34
-
35
-
36
-
37
-
38
-
39
-
40
-
41
-
42
-
43
-
44
-
45
-
46
-
47
-
48
-
49
-
50
-
51
-
52
 |
 |
