Pioneer AVH-P6800DVD Owner's Manual - Page 26
Listening to the radio, Tuner
 |
UPC - 012562803548
View all Pioneer AVH-P6800DVD manuals
Add to My Manuals
Save this manual to your list of manuals |
Page 26 highlights
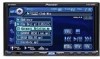
Section 06 Tuner Listening to the radio 12 3 4 56 7 8 These are the basic steps necessary to operate the radio. More advanced tuner operation is explained starting on the next page. 1 Source name Shows the selected source name. 2 Source icon Shows which source has been selected. 3 Band indicator Shows which band the radio is tuned to, AM or FM. 4 Preset number indicator Shows which preset has been selected. 5 STEREO indicator Shows when the selected frequency is being broadcast in stereo. 6 LOCAL indicator Shows when local seek tuning is on. 7 Frequency indicator Shows the frequency to which the tuner is tuned. 8 Preset list display Shows the preset list. 1 Touch the source icon and then touch TUNER to select the tuner. 2 Touch the screen to display the touch panel keys. 3 Touch BAND to select a band. Touch BAND repeatedly until the desired band is displayed, FM1, FM2, FM3 for FM or AM. 4 To select a preset channel, touch a preset channel on the list or touch a or b (P.CH). The preset channel you selected is tuned in. # Touching LIST switches between the preset channel list display and the a/b (P.CH) display. Either way, the channels that can be selected are the same. 5 To perform manual tuning, briefly touch c or d. The frequencies move up or down step by step. # You can also perform manual tuning by moving the joystick on the remote control left or right. 6 To perform seek tuning, keep touching c or d for about one second and release. The tuner will scan the frequencies until a broadcast strong enough for good reception is found. # You can cancel seek tuning by briefly touching either c or d. # If you keep touching c or d you can skip stations. Seek tuning starts as soon as you release the key. # You can also perform seek tuning by holding the joystick on the remote control left or right. Note If you do not use the touch panel keys within 30 seconds, they will be hidden automatically. 26 En
-
 1
1 -
2
-
3
-
4
-
5
-
6
-
7
-
8
-
9
-
10
-
11
-
12
-
13
-
14
-
15
-
16
-
17
-
18
-
19
-
20
-
 21
21 -
 22
22 -
 23
23 -
 24
24 -
 25
25 -
 26
26 -
 27
27 -
 28
28 -
 29
29 -
 30
30 -
 31
31 -
32
-
33
-
34
-
35
-
36
-
37
-
38
-
39
-
40
-
41
-
42
-
43
-
44
-
45
-
46
-
47
-
48
-
49
-
50
-
51
-
52
-
53
-
54
-
55
-
56
-
57
-
58
-
59
-
60
-
61
-
62
-
63
-
64
-
65
-
66
-
67
-
68
-
69
-
70
-
71
-
72
-
73
-
74
-
75
-
76
-
77
-
78
-
79
-
80
-
81
-
82
-
83
-
84
-
85
-
86
-
87
-
88
-
89
-
90
-
91
-
92
-
93
-
94
-
95
-
96
-
97
-
98
-
99
-
100
-
101
-
102
-
103
-
104
-
105
-
106
-
107
-
108
-
109
-
110
-
111
-
112
-
113
-
114
-
115
-
116
-
117
-
118
-
119
-
120
-
121
-
122
-
123
-
124
-
125
-
126
-
127
-
128
-
129
-
130
-
131
-
132
-
133
 |
 |
