Ricoh C410DN Hardware Guide - Page 13
Guide to the Printer, Exterior: Front View - toner
 |
UPC - 026649025341
View all Ricoh C410DN manuals
Add to My Manuals
Save this manual to your list of manuals |
Page 13 highlights
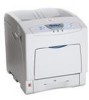
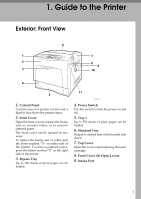
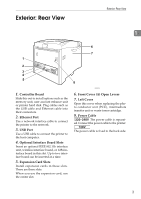
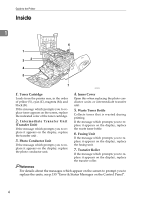
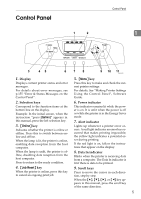
1. Guide to the Printer Exterior: Front View 1. Control Panel Contains keys for printer control and a display that shows the printer status. 2. Front Cover Open the front cover to replace the fusing unit or transfer roller, or to remove jammed paper. The front cover can be opened in two ways: To replace the fusing unit or roller, pull the levers marked "A" on either side of the printer. To remove jammed paper, press the button marked "Z" on the right side of the printer. 3. Bypass Tray Up to 100 sheets of plain paper can be loaded. AQC021S 4. Power Switch Use this switch to turn the power on and off. 5. Tray 1 Up to 550 sheets of plain paper can be loaded. 6. Standard Tray Output is stacked here with the print side down. 7. Top Cover Open this cover when replacing the toner cartridge. 8. Front Cover (A) Open Levers 9. Intake Port 1
-
 1
1 -
2
-
3
-
4
-
5
-
6
-
7
-
 8
8 -
 9
9 -
 10
10 -
 11
11 -
 12
12 -
 13
13 -
 14
14 -
 15
15 -
 16
16 -
 17
17 -
 18
18 -
19
-
20
-
21
-
22
-
23
-
24
-
25
-
26
-
27
-
28
-
29
-
30
-
31
-
32
-
33
-
34
-
35
-
36
-
37
-
38
-
39
-
40
-
41
-
42
-
43
-
44
-
45
-
46
-
47
-
48
-
49
-
50
-
51
-
52
-
53
-
54
-
55
-
56
-
57
-
58
-
59
-
60
-
61
-
62
-
63
-
64
-
65
-
66
-
67
-
68
-
69
-
70
-
71
-
72
-
73
-
74
-
75
-
76
-
77
-
78
-
79
-
80
-
81
-
82
-
83
-
84
-
85
-
86
-
87
-
88
-
89
-
90
-
91
-
92
-
93
-
94
-
95
-
96
-
97
-
98
-
99
-
100
-
101
-
102
-
103
-
104
-
105
-
106
-
107
-
108
-
109
-
110
-
111
-
112
-
113
-
114
-
115
-
116
-
117
-
118
-
119
-
120
-
121
-
122
-
123
-
124
-
125
-
126
-
127
-
128
-
129
-
130
-
131
-
132
-
133
-
134
-
135
-
136
-
137
-
138
-
139
-
140
-
141
-
142
-
143
-
144
-
145
-
146
-
147
-
148
-
149
-
150
-
151
-
152
-
153
-
154
-
155
-
156
-
157
-
158
-
159
-
160
-
161
-
162
-
163
-
164
-
165
-
166
-
167
-
168
-
169
-
170
-
171
-
172
-
173
-
174
-
175
-
176
-
177
-
178
-
179
-
180
-
181
-
182
-
183
-
184
-
185
-
186
-
187
-
188
-
189
-
190
-
191
-
192
-
193
-
194
-
195
-
196
-
197
-
198
-
199
-
200
-
201
-
202
-
203
-
204
 |
 |
