Ricoh C410DN Hardware Guide - Page 17
Control Panel, Display, Selection keys, Power indicator, Data In indicator, Scroll keys
 |
UPC - 026649025341
View all Ricoh C410DN manuals
Add to My Manuals
Save this manual to your list of manuals |
Page 17 highlights
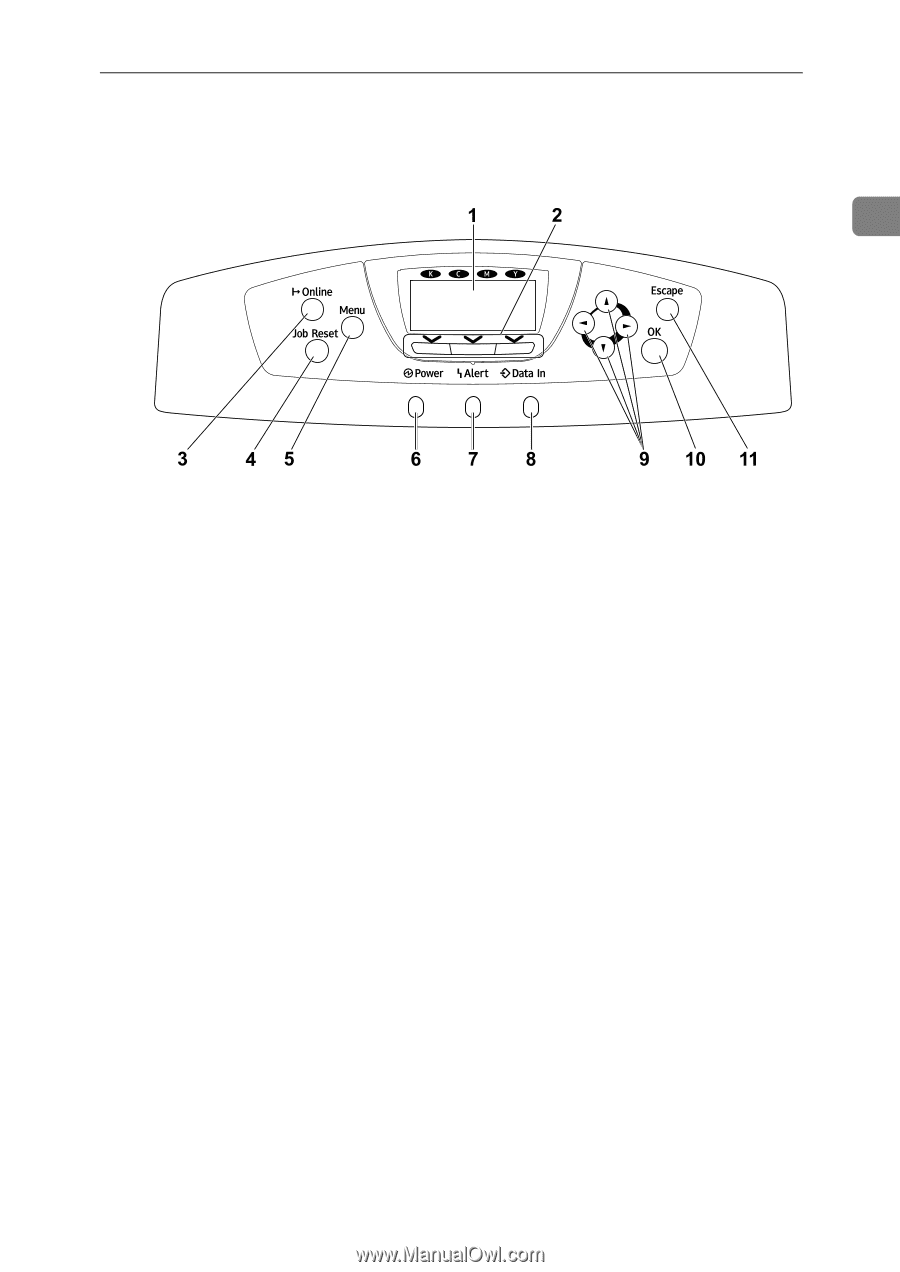
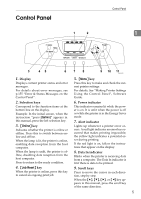
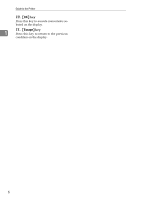
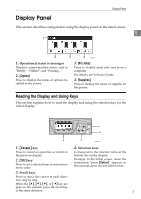
Control Panel Control Panel 1 AQC024S 1. Display Displays current printer status and error messages. For details about error messages, see p.155 "Error & Status Messages on the Control Panel". 2. Selection keys Correspond to the function items at the bottom line on the display. Example: In the initial screen, when the instruction "press [Option]" appears in this manual, press the left selection key. 3. {Online} key Indicates whether the printer is online or offline. Press this to switch between online and offline. When the lamp is lit, the printer is online, enabling data reception from the host computer. When the lamp is unlit, the printer is offline, disabling data reception from the host computer. Press to return to the ready condition. 4. {Job Reset} key When the printer is online, press this key to cancel an ongoing print job. 5. {Menu} key Press this key to make and check the current printer settings. For details, See "Making Printer Settings Using the Control Panel", Software Guide. 6. Power indicator This indicator remains lit while the power is on. It is unlit when the power is off or while the printer is in the Energy Saver mode. 7. Alert indicator Lights up whenever a printer error occurs. A red light indicates an error has occurred that makes printing impossible; the yellow light indicates a potential error during printing. If the red light is on, follow the instructions that appear on the display. 8. Data In indicator Blinks when the printer is receiving data from a computer. The Data In indicator is lit if there is data to be printed. 9. Scroll keys Press to move the cursor in each direction, step by step. When the {U}, {T}, {V}, or {W} key appears in this manual, press the scroll key of the same direction. 5
-
 1
1 -
2
-
3
-
4
-
5
-
6
-
7
-
8
-
9
-
10
-
11
-
 12
12 -
 13
13 -
 14
14 -
 15
15 -
 16
16 -
 17
17 -
 18
18 -
 19
19 -
 20
20 -
 21
21 -
 22
22 -
23
-
24
-
25
-
26
-
27
-
28
-
29
-
30
-
31
-
32
-
33
-
34
-
35
-
36
-
37
-
38
-
39
-
40
-
41
-
42
-
43
-
44
-
45
-
46
-
47
-
48
-
49
-
50
-
51
-
52
-
53
-
54
-
55
-
56
-
57
-
58
-
59
-
60
-
61
-
62
-
63
-
64
-
65
-
66
-
67
-
68
-
69
-
70
-
71
-
72
-
73
-
74
-
75
-
76
-
77
-
78
-
79
-
80
-
81
-
82
-
83
-
84
-
85
-
86
-
87
-
88
-
89
-
90
-
91
-
92
-
93
-
94
-
95
-
96
-
97
-
98
-
99
-
100
-
101
-
102
-
103
-
104
-
105
-
106
-
107
-
108
-
109
-
110
-
111
-
112
-
113
-
114
-
115
-
116
-
117
-
118
-
119
-
120
-
121
-
122
-
123
-
124
-
125
-
126
-
127
-
128
-
129
-
130
-
131
-
132
-
133
-
134
-
135
-
136
-
137
-
138
-
139
-
140
-
141
-
142
-
143
-
144
-
145
-
146
-
147
-
148
-
149
-
150
-
151
-
152
-
153
-
154
-
155
-
156
-
157
-
158
-
159
-
160
-
161
-
162
-
163
-
164
-
165
-
166
-
167
-
168
-
169
-
170
-
171
-
172
-
173
-
174
-
175
-
176
-
177
-
178
-
179
-
180
-
181
-
182
-
183
-
184
-
185
-
186
-
187
-
188
-
189
-
190
-
191
-
192
-
193
-
194
-
195
-
196
-
197
-
198
-
199
-
200
-
201
-
202
-
203
-
204
 |
 |