Ricoh FAX 1190L User's Guide - Page 112
Replacing the drum unit, Change Drum Soon
 |
View all Ricoh FAX 1190L manuals
Add to My Manuals
Save this manual to your list of manuals |
Page 112 highlights
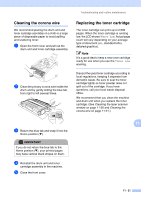
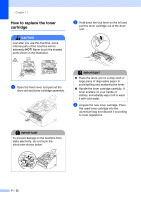
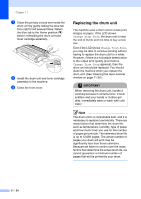
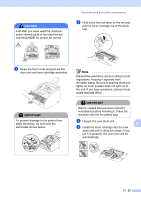
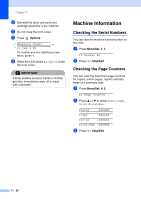
Chapter 11 7 Clean the primary corona wire inside the drum unit by gently sliding the blue tab from right to left several times. Return the blue tab to the Home position (▼) before reinstalling the drum unit and toner cartridge assembly. 8 Install the drum unit and toner cartridge assembly in the machine. 9 Close the front cover. Replacing the drum unit The machine uses a drum unit to create print images on paper. If the LCD shows Change Drum Soon, the drum unit is near the end of its life and it is time to buy a new one. Even if the LCD shows Change Drum Soon, you may be able to continue printing without having to replace the drum unit for a while. However, if there is a noticeable deterioration in the output print quality (even before Change Drum Soon appears), then the drum unit should be replaced. You should clean the machine when you replace the drum unit. (See Cleaning the laser scanner window on page 11-20.) IMPORTANT When removing the drum unit, handle it carefully because it contains toner. If toner scatters and your hands or clothes get dirty, immediately wipe or wash with cold water. Note The drum unit is a consumable item, and it is necessary to replace it periodically. There are many factors that determine the drum life, such as temperature, humidity, type of paper and how much toner you use for the number of pages per print job. The estimated drum life is up to 12,000 pages. The actual number of pages your drum will print may be significantly less than these estimates. Because we have no control over the many factors that determine the actual drum life, we cannot guarantee a minimum number of pages that will be printed by your drum. 11 - 24
-
 1
1 -
2
-
3
-
4
-
5
-
6
-
7
-
8
-
9
-
10
-
11
-
12
-
13
-
14
-
15
-
16
-
17
-
18
-
19
-
20
-
21
-
22
-
23
-
24
-
25
-
26
-
27
-
28
-
29
-
30
-
31
-
32
-
33
-
34
-
35
-
36
-
37
-
38
-
39
-
40
-
41
-
42
-
43
-
44
-
45
-
46
-
47
-
48
-
49
-
50
-
51
-
52
-
53
-
54
-
55
-
56
-
57
-
58
-
59
-
60
-
61
-
62
-
63
-
64
-
65
-
66
-
67
-
68
-
69
-
70
-
71
-
72
-
73
-
74
-
75
-
76
-
77
-
78
-
79
-
80
-
81
-
82
-
83
-
84
-
85
-
86
-
87
-
88
-
89
-
90
-
91
-
92
-
93
-
94
-
95
-
96
-
97
-
98
-
99
-
100
-
101
-
102
-
103
-
104
-
105
-
106
-
 107
107 -
 108
108 -
 109
109 -
 110
110 -
 111
111 -
 112
112 -
 113
113 -
 114
114 -
 115
115 -
 116
116 -
 117
117 -
118
-
119
-
120
-
121
-
122
-
123
-
124
-
125
-
126
-
127
-
128
-
129
-
130
-
131
-
132
-
133
-
134
-
135
-
136
-
137
-
138
-
139
-
140
-
141
-
142
-
143
-
144
-
145
-
146
-
147
-
148
-
149
-
150
-
151
-
152
-
153
-
154
-
155
-
156
-
157
-
158
-
159
-
160
-
161
-
162
-
163
-
164
-
165
-
166
 |
 |
