Ricoh SP 201Nw User Guide - Page 14
Interior, Alert Indicator, Stop Fences, Front Cover, Bypass Tray, Tray 1, Power Switch - drivers
 |
View all Ricoh SP 201Nw manuals
Add to My Manuals
Save this manual to your list of manuals |
Page 14 highlights
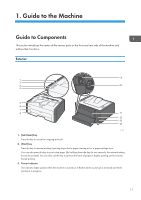
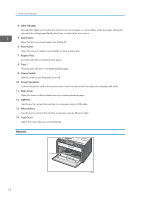
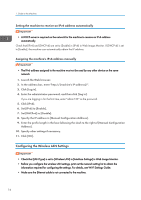
1. Guide to the Machine 4. Alert Indicator This indicator lights up red when the machine runs out of paper or consumables, when the paper settings do not match the settings specified by the driver, or when other errors occur. 5. Stop Fences Raise this fence to prevent paper from falling off. 6. Front Cover Open this cover to replace consumables or clear a paper jam. 7. Bypass Tray This tray can hold one sheet of plain paper. 8. Tray 1 This tray can hold up to 150 sheets of plain paper. 9. Power Switch Use this switch to turn the power on or off. 10. Power Connector Connect the power cord to the machine here. Insert the other end of the cable into a nearby wall outlet. 11. Rear Cover Open this cover to deliver sheets face up or remove jammed paper. 12. USB Port Use this port to connect the machine to a computer using a USB cable. 13. Ethernet Port Use this port to connect the machine to network using an Ethernet cable. 14. Tray Cover Attach this cover when you extend the tray. Interior 1 12 CTT065
-
 1
1 -
2
-
3
-
4
-
5
-
6
-
7
-
8
-
 9
9 -
 10
10 -
 11
11 -
 12
12 -
 13
13 -
 14
14 -
 15
15 -
 16
16 -
 17
17 -
 18
18 -
 19
19 -
20
-
21
-
22
-
23
-
24
-
25
-
26
-
27
-
28
-
29
-
30
-
31
-
32
-
33
-
34
-
35
-
36
-
37
-
38
-
39
-
40
-
41
-
42
-
43
-
44
-
45
-
46
-
47
-
48
-
49
-
50
-
51
-
52
-
53
-
54
-
55
-
56
-
57
-
58
-
59
-
60
-
61
-
62
-
63
-
64
-
65
-
66
-
67
-
68
-
69
-
70
-
71
-
72
-
73
-
74
-
75
-
76
-
77
-
78
-
79
-
80
-
81
-
82
-
83
-
84
 |
 |