Ricoh SP 201Nw User Guide - Page 53
Click [Smart Organizing Monitor for SP xxx Series Status].
 |
View all Ricoh SP 201Nw manuals
Add to My Manuals
Save this manual to your list of manuals |
Page 53 highlights
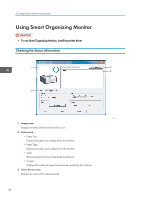
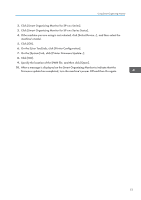
Using Smart Organizing Monitor 2. Click [Smart Organizing Monitor for SP xxx Series]. 3. Click [Smart Organizing Monitor for SP xxx Series Status]. 4. If the machine you are using is not selected, click [Select Device...], and then select the machine's model. 5. Click [OK]. 6. On the [User Tool] tab, click [Printer Configuration]. 7. On the [System] tab, click [Printer Firmware Update...]. 8. Click [OK]. 9. Specify the location of the DWN file, and then click [Open]. 10. After a message is displayed on the Smart Organizing Monitor to indicate that the firmware update has completed, turn the machine's power Off and then On again. 51
-
 1
1 -
2
-
3
-
4
-
5
-
6
-
7
-
8
-
9
-
10
-
11
-
12
-
13
-
14
-
15
-
16
-
17
-
18
-
19
-
20
-
21
-
22
-
23
-
24
-
25
-
26
-
27
-
28
-
29
-
30
-
31
-
32
-
33
-
34
-
35
-
36
-
37
-
38
-
39
-
40
-
41
-
42
-
43
-
44
-
45
-
46
-
47
-
 48
48 -
 49
49 -
 50
50 -
 51
51 -
 52
52 -
 53
53 -
 54
54 -
 55
55 -
 56
56 -
 57
57 -
 58
58 -
59
-
60
-
61
-
62
-
63
-
64
-
65
-
66
-
67
-
68
-
69
-
70
-
71
-
72
-
73
-
74
-
75
-
76
-
77
-
78
-
79
-
80
-
81
-
82
-
83
-
84
 |
 |

2.
Click [Smart Organizing Monitor for SP xxx Series].
3.
Click [Smart Organizing Monitor for SP xxx Series Status].
4.
If the machine you are using is not selected, click [Select Device...], and then select the
machine's model.
5.
Click [OK].
6.
On the [User Tool] tab, click [Printer Configuration].
7.
On the [System] tab, click [Printer Firmware Update...].
8.
Click [OK].
9.
Specify the location of the DWN file, and then click [Open].
10.
After a message is displayed on the Smart Organizing Monitor to indicate that the
firmware update has completed, turn the machine's power Off and then On again.
Using Smart Organizing Monitor
51