Ridgid R4512 Owners Manual - Page 22
Installing The Blade
 |
View all Ridgid R4512 manuals
Add to My Manuals
Save this manual to your list of manuals |
Page 22 highlights
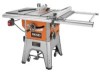
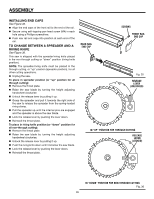
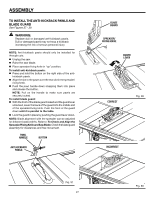
ASSEMBLY INSTALLING THE BLADE See Figure 23 - 24. The blade and blade wrenches are located on the side of the saw in the storage area. Twist the knob counterclockwise to remove it. Remove the blade and two blade wrenches. Loosen the height adjusting handwheel lock knob and turn the handwheel clockwise to raise the blade arbor. Place the new blade on the arbor shaft (blade teeth must point down toward the front of the saw to work properly). Place the blade washer and the blade nut over the arbor shaft. Be sure the dome side of the blade washer faces out from the blade and that all items are snug against the arbor housing. Make sure the blade nut is securely tightened. Do not overtighten. Using the open end blade wrench, place the flat open end into the flats on the arbor shaft. Insert the closed end of the other blade wrench over the hex nut. Holding both wrenches firmly, push the closed end wrench to the back of the machine. Make sure the blade nut is securely tightened. Do not overtighten. Rotate the blade by hand to make sure it turns freely. Lower the saw blade and install the throat plate. throat plate blade arbor OPEN END blade WRENCH blade blade washer blade nut Fig. 23 closed end blade WRENCH Fig. 24 22
-
 1
1 -
2
-
3
-
4
-
5
-
6
-
7
-
8
-
9
-
10
-
11
-
12
-
13
-
14
-
15
-
16
-
 17
17 -
 18
18 -
 19
19 -
 20
20 -
 21
21 -
 22
22 -
 23
23 -
 24
24 -
 25
25 -
 26
26 -
 27
27 -
28
-
29
-
30
-
31
-
32
-
33
-
34
-
35
-
36
-
37
-
38
-
39
-
40
-
41
-
42
-
43
-
44
-
45
-
46
-
47
-
48
-
49
-
50
-
51
-
52
-
53
-
54
-
55
-
56
-
57
-
58
-
59
-
60
-
61
-
62
-
63
-
64
-
65
-
66
-
67
-
68
-
69
-
70
-
71
-
72
-
73
-
74
-
75
-
76
-
77
-
78
-
79
-
80
-
81
-
82
-
83
-
84
-
85
-
86
-
87
-
88
-
89
-
90
-
91
-
92
-
93
-
94
-
95
-
96
-
97
-
98
-
99
-
100
-
101
-
102
-
103
-
104
-
105
-
106
-
107
-
108
-
109
-
110
 |
 |
