Ridgid R4512 Owners Manual - Page 44
Constructing A Table Extension - table saw extension
 |
View all Ridgid R4512 manuals
Add to My Manuals
Save this manual to your list of manuals |
Page 44 highlights
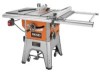
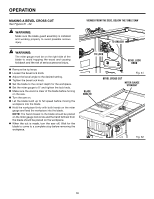
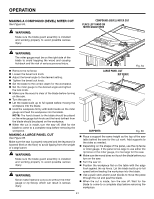
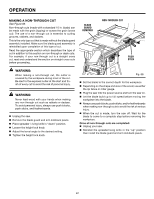
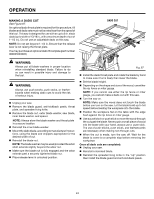
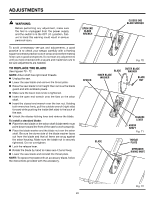
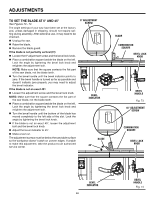
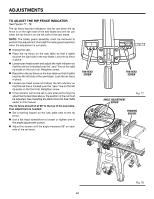
OPERATION CONSTRUCTING a TABLE EXTENSION See Figure 68. You may construct a wood table extension to support larger workpieces. The finished height of the table extension should be 1-3/4 in. The finished length and width should be 27 in. x 14-5/8 in. Assemble the pieces as shown. The finished extension should fit snugly into the rails, and should be level with the saw table and extensions. TO INSTALL THE TABLE EXTENSION ONTO THE RAILS See Figure 69. Make sure that when you install the table extension onto the rails, it is level with the rest of the saw table. To do this, use two 2 x 4 boards that are 55-1/2 in. in length. Securely clamp the boards to the end of the saw table, and to the spreader bar. Insert the table extension from underneath the rails and set it into position. Make sure the extension lies flat and is aligned with the rest of the saw table. There should be no space between the extension and the boards. There are holes in the spreader bar. Attach the extension to the saw with pan head phillips screws and supplied washers as shown. 14-5/8 in. 3/4 in. 1 in. x 2 in. 2 in. x 4 in. board 27 in. Fig. 68 washer screw table extension Fig. 69 44
-
 1
1 -
2
-
3
-
4
-
5
-
6
-
7
-
8
-
9
-
10
-
11
-
12
-
13
-
14
-
15
-
16
-
17
-
18
-
19
-
20
-
21
-
22
-
23
-
24
-
25
-
26
-
27
-
28
-
29
-
30
-
31
-
32
-
33
-
34
-
35
-
36
-
37
-
38
-
 39
39 -
 40
40 -
 41
41 -
 42
42 -
 43
43 -
 44
44 -
 45
45 -
 46
46 -
 47
47 -
 48
48 -
 49
49 -
50
-
51
-
52
-
53
-
54
-
55
-
56
-
57
-
58
-
59
-
60
-
61
-
62
-
63
-
64
-
65
-
66
-
67
-
68
-
69
-
70
-
71
-
72
-
73
-
74
-
75
-
76
-
77
-
78
-
79
-
80
-
81
-
82
-
83
-
84
-
85
-
86
-
87
-
88
-
89
-
90
-
91
-
92
-
93
-
94
-
95
-
96
-
97
-
98
-
99
-
100
-
101
-
102
-
103
-
104
-
105
-
106
-
107
-
108
-
109
-
110
 |
 |
