Ridgid R4512 Owners Manual - Page 30
How To Make A Jig For Rip Cutting
 |
View all Ridgid R4512 manuals
Add to My Manuals
Save this manual to your list of manuals |
Page 30 highlights
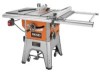
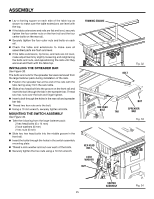
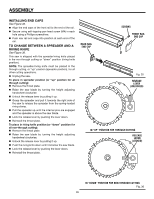
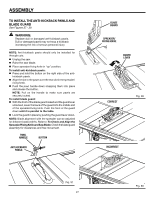
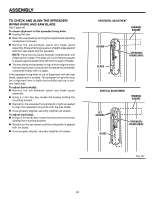
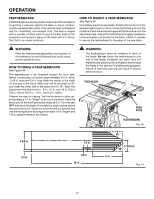
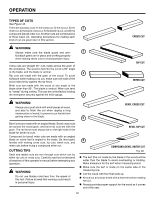
OPERATION cutting aids See Figure 41. Push sticks are devices used for safely pushing a workpiece through the blade. They can be made in various sizes and shapes from scrap wood to use in a specific project. The stick must be narrower than the workpiece, with a 90˚ notch in one end and shaping for a grip on the other end. A push block has a handle fastened by recessed screws from the underside. Be sure the screw is recessed. Use it on non-through cuts. AUXILIARY FENCE An auxiliary fence is a device used to close the gap between the rip fence and the saw table. Always make and use an auxiliary fence when ripping material 1/8 in. or thinner. How to Make and ATTACH an auxiliary fence (for rip cutting thin workpiece) See Figure 42. An auxiliary fence may be made for the saw by cutting a piece of wood to 3/4 in. thick, 3-1/2 in. wide, and 31 in. long. To attach the auxiliary fence to the rip fence: Drill two countersunk holes in the locations shown. WARNING: When mounting an auxiliary fence face, position mounting hardware beyond arrows at right and left. Keep fasteners away from blade. Slide two T-bolts (not included) into the rip fence groove beyond the arrows at right and left of the label on the rip fence. Match the T-bolts to the holes in the auxiliary fence and secure it to the rip fence with a washer and nut. Ensure that the auxiliary fence is securely attached before use. How to Make a jig (for rip cutting narrow workpiece) See Figure 43. If ripping a narrow workpiece places the hands too close to the blade, it will be necessary to make and use a jig. To make a jig: Attach a handle to a long, straight piece of wood and secure from the underside using recessed screws. Cut an L-shaped stop in the side of the jig. To use a jig: Position the workpiece flat on the table with the edge flush against the jig and against the stop. Holding the jig handle and using a push block, make the rip cut as described later in this section. PUSH STICKS PUSH BLOCKS AUXILIARY FENCE T-bolt Fig. 41 rip fence 31 in. 3/4 in. nut washer STOP 3-1/2 in. Fig. 42 jig handle jig Fig. 43 30
-
 1
1 -
2
-
3
-
4
-
5
-
6
-
7
-
8
-
9
-
10
-
11
-
12
-
13
-
14
-
15
-
16
-
17
-
18
-
19
-
20
-
21
-
22
-
23
-
24
-
 25
25 -
 26
26 -
 27
27 -
 28
28 -
 29
29 -
 30
30 -
 31
31 -
 32
32 -
 33
33 -
 34
34 -
 35
35 -
36
-
37
-
38
-
39
-
40
-
41
-
42
-
43
-
44
-
45
-
46
-
47
-
48
-
49
-
50
-
51
-
52
-
53
-
54
-
55
-
56
-
57
-
58
-
59
-
60
-
61
-
62
-
63
-
64
-
65
-
66
-
67
-
68
-
69
-
70
-
71
-
72
-
73
-
74
-
75
-
76
-
77
-
78
-
79
-
80
-
81
-
82
-
83
-
84
-
85
-
86
-
87
-
88
-
89
-
90
-
91
-
92
-
93
-
94
-
95
-
96
-
97
-
98
-
99
-
100
-
101
-
102
-
103
-
104
-
105
-
106
-
107
-
108
-
109
-
110
 |
 |
