Ridgid R4512 Owners Manual - Page 27
To Install The Anti-kickback Pawls And, Blade Guard, Warning - riving knife
 |
View all Ridgid R4512 manuals
Add to My Manuals
Save this manual to your list of manuals |
Page 27 highlights
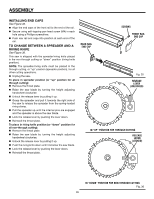
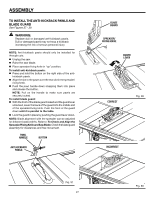
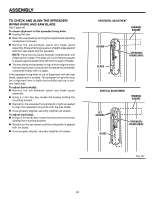
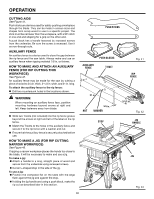
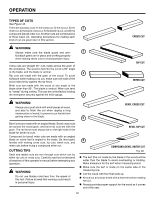
ASSEMBLY TO INSTALL THE ANTI-KICKBACK PAWLS AND BLADE GUARD See Figures 37 - 39. WARNING: Replace dull or damaged anti-kickback pawls. Dull or damaged pawls may not stop a kickback increasing the risk of serious personal injury. NOTE: Anti-kickback pawls should only be installed for through cuts. Unplug the saw. Raise the saw blade. Place spreader/riving knife in "up" position. To install anti-kickback pawls: Press and hold the button on the right side of the anti- kickback pawls. Align the slot in the pawls over the rear slot in the spreader/ riving knife. Push the pawl handle down snapping them into place and release the button. NOTE: Pull on the handle to make sure pawls are securely locked. To install blade guard: With the front of the blade guard raised and the guard lever unlocked, lower the back of the guard into the middle slot of the spreader/riving knife. Push the front of the guard down until it is parallel to the table. Lock the guard in place by pushing the guard lever down. NOTE: Blade alignment with the spreader can be adjusted for different blade widths. Refer to: To Check and Align the Spreader/Riving Knife and Saw Blade. Check the blade guard assembly for clearances and free movement. pawl handle button ANTI-KICKBACK PAWLS BLADE guard SPREADER/ RIVING KNIFE guard LEVER CORRECT Fig. 38 INCORRECT Fig. 37 27 Fig. 39
-
 1
1 -
2
-
3
-
4
-
5
-
6
-
7
-
8
-
9
-
10
-
11
-
12
-
13
-
14
-
15
-
16
-
17
-
18
-
19
-
20
-
21
-
 22
22 -
 23
23 -
 24
24 -
 25
25 -
 26
26 -
 27
27 -
 28
28 -
 29
29 -
 30
30 -
 31
31 -
 32
32 -
33
-
34
-
35
-
36
-
37
-
38
-
39
-
40
-
41
-
42
-
43
-
44
-
45
-
46
-
47
-
48
-
49
-
50
-
51
-
52
-
53
-
54
-
55
-
56
-
57
-
58
-
59
-
60
-
61
-
62
-
63
-
64
-
65
-
66
-
67
-
68
-
69
-
70
-
71
-
72
-
73
-
74
-
75
-
76
-
77
-
78
-
79
-
80
-
81
-
82
-
83
-
84
-
85
-
86
-
87
-
88
-
89
-
90
-
91
-
92
-
93
-
94
-
95
-
96
-
97
-
98
-
99
-
100
-
101
-
102
-
103
-
104
-
105
-
106
-
107
-
108
-
109
-
110
 |
 |
