Samsung HZ50W User Manual (user Manual) (ver.1.0) (English) - Page 42
Flash, Left button
 |
UPC - 044701014119
View all Samsung HZ50W manuals
Add to My Manuals
Save this manual to your list of manuals |
Page 42 highlights
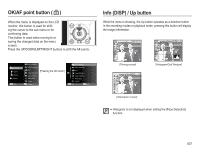
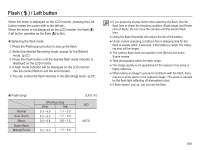
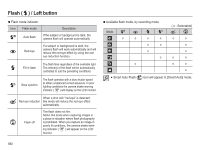
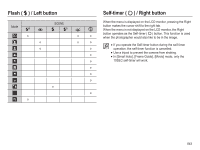
Flash ( ) / Left button When the menu is displayed on the LCD monitor, pressing the Left button makes the cursor shift to the left tab. When the menu is not displayed on the LCD monitor, the flash ( ) /Left button operates as the flash ( ) button. Ê Selecting the flash mode 1. Press the Flash pop-up button to pop up the flash. 2. Select the desired Recording mode, except for the [Movie] mode. (p.22) 3. Press the Flash button until the desired flash mode indicator is displayed on the LCD monitor. 4. A flash mode indicator will be displayed on the LCD monitor. Use the correct flash to suit the environment. Ä You can control the flash intensity in the [Shooting] menu. (p.57) Ê Flash range Normal Auto macro Macro Super Macro Manual Focus Shooting range Wide Tele 0.3 ~ 6.0 1.7 ~ 3.0 0.3 ~ 6.0 1.7 ~ 3.0 0.3 ~ 0.8 0.8 ~ 1.5 - 0.3 ~ 6.0 1.7 ~ 3.0 (Unit: m) ISO AUTO å If you press the shutter button after selecting the flash, the first flash fires to check the shooting condition (Flash range and Power ratio of flash). Do not move the camera until the second flash fires. å Using the flash frequently will reduce the life of the battery. å Under normal operating conditions the re-charging time for the flash is usually within 5 seconds. If the battery is weak, the charging time will be longer. å The camera flash does not operate in the [Movie] and some Scene modes. å Take photographs within the flash range. å The image quality is not guaranteed if the subject is too close or highly reflective. å When taking an image in poorly lit conditions with the flash, there may be a white speck in the captured image. The speck is caused by the flash light reflecting off atmospheric dust. å If flash doesn't pop up, can not use the flash. 041
-
 1
1 -
2
-
3
-
4
-
5
-
6
-
7
-
8
-
9
-
10
-
11
-
12
-
13
-
14
-
15
-
16
-
17
-
18
-
19
-
20
-
21
-
22
-
23
-
24
-
25
-
26
-
27
-
28
-
29
-
30
-
31
-
32
-
33
-
34
-
35
-
36
-
 37
37 -
 38
38 -
 39
39 -
 40
40 -
 41
41 -
 42
42 -
 43
43 -
 44
44 -
 45
45 -
 46
46 -
 47
47 -
48
-
49
-
50
-
51
-
52
-
53
-
54
-
55
-
56
-
57
-
58
-
59
-
60
-
61
-
62
-
63
-
64
-
65
-
66
-
67
-
68
-
69
-
70
-
71
-
72
-
73
-
74
-
75
-
76
-
77
-
78
-
79
-
80
-
81
-
82
-
83
-
84
-
85
-
86
-
87
-
88
-
89
-
90
-
91
-
92
-
93
-
94
-
95
-
96
-
97
-
98
-
99
-
100
-
101
-
102
-
103
-
104
-
105
-
106
-
107
-
108
-
109
-
110
-
111
-
112
-
113
-
114
-
115
-
116
-
117
-
118
-
119
-
120
 |
 |