Samsung HZ50W User Manual (user Manual) (ver.1.0) (English) - Page 57
Setting AEB area, Auto Focus type
 |
UPC - 044701014119
View all Samsung HZ50W manuals
Add to My Manuals
Save this manual to your list of manuals |
Page 57 highlights
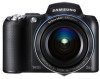
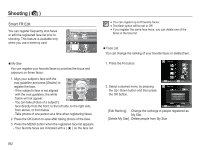
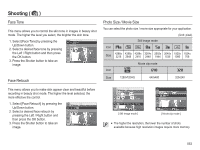
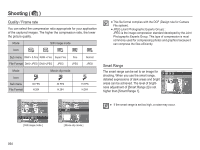
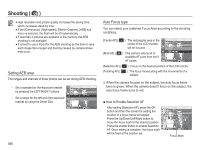
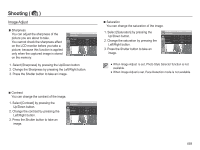
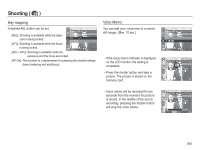
Shooting ( ) å High resolution and picture quality increases file saving time, which increases stand-by time. å If the [Continuous], [High-speed], [Motion Capture], [AEB] sub menu is selected, the flash will be off automatically. å If less than 3 pictures are available in the memory, the AEB shooting is not available. å It is best to use a tripod for the AEB shooting as the time to save each image file is longer and blurring caused by camera shake may occur. Setting AEB area The ranges and intervals of three photos can be set during AEB shooting. - Set a standard for the exposure bracket by pressing the LEFT/RIGHT buttons. - Set a range for the left and right exposure bracket by using the Smart Dial. -2 -1 0 +1 +2 AEB Area Back Move 056 Auto Focus type You can select your preferred Focus Area according to the shooting conditions. [Center AF] ( ) : The rectangular area in the center of the LCD monitor will be focused Focus Area [Multi AF] ( ) : This camera selects all of available AF point from the 9 AF points. Back Move [Selection AF] ( ) : Focus on the desired position of the LCD monitor. [Tracking AF] ( ) : The focus moves along with the movements of a subject. Ä When the camera focuses on the subject, the auto focus frame turns to green. When the camera doesn't focus on the subject, the auto focus frame turns to red. Ŷ How to Enable Selection AF After setting [Selection AF], press the OK button and then the screen for setting the location of a focus frame will appear. Press the Up/Down/Left/Right button to move the focus mark to the desired position. Press the shutter button to enable Selection AF. Once setting is complete, the focus mark will be fixed at the position set. Move Set Focus Mark
-
 1
1 -
2
-
3
-
4
-
5
-
6
-
7
-
8
-
9
-
10
-
11
-
12
-
13
-
14
-
15
-
16
-
17
-
18
-
19
-
20
-
21
-
22
-
23
-
24
-
25
-
26
-
27
-
28
-
29
-
30
-
31
-
32
-
33
-
34
-
35
-
36
-
37
-
38
-
39
-
40
-
41
-
42
-
43
-
44
-
45
-
46
-
47
-
48
-
49
-
50
-
51
-
 52
52 -
 53
53 -
 54
54 -
 55
55 -
 56
56 -
 57
57 -
 58
58 -
 59
59 -
 60
60 -
 61
61 -
 62
62 -
63
-
64
-
65
-
66
-
67
-
68
-
69
-
70
-
71
-
72
-
73
-
74
-
75
-
76
-
77
-
78
-
79
-
80
-
81
-
82
-
83
-
84
-
85
-
86
-
87
-
88
-
89
-
90
-
91
-
92
-
93
-
94
-
95
-
96
-
97
-
98
-
99
-
100
-
101
-
102
-
103
-
104
-
105
-
106
-
107
-
108
-
109
-
110
-
111
-
112
-
113
-
114
-
115
-
116
-
117
-
118
-
119
-
120
 |
 |