Samsung SGH-I537 User Manual At&t Sgh-i537 Galaxy S 4 Active Jb English Us - Page 20
Configuring your Phone, Welcome to AT&T Ready2Go, English, Accessibility, Got Google?
 |
View all Samsung SGH-I537 manuals
Add to My Manuals
Save this manual to your list of manuals |
Page 20 highlights
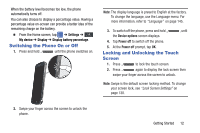
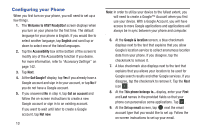
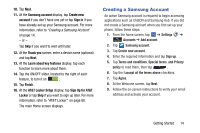
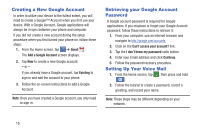
Configuring your Phone When you first turn on your phone, you will need to set up a few things. 1. The Welcome to AT&T Ready2Go! screen displays when you turn on your phone for the first time. The default language for your phone is English. If you would like to select another language, tap English and scroll up or down to select one of the listed languages. 2. Tap the Accessibility box at the bottom of the screen to modify any of the Accessibility function if you desire. For more information, refer to "Accessory Settings" on page 142. 3. Tap Next. 4. At the Got Google? display, tap Yes if you already have a Google account and sign in to your account, or tap No if you do not have a Google account. 5. If you answered No in step 4, tap Get an account and follow the on-screen instructions to create a new Google account or sign in to an existing account. If you want to wait until later to create a Google account, tap Not now. 13 Note: In order to utilize your device to the fullest extent, you will need to create a Google™ Account when you first use your device. With a Google Account, you will have access to more Google applications and applications will always be in sync between your phone and computer. 6. At the Google & location screen, a blue checkmark displays next to the text that explains that you allow Google's location service to collect anonymous location data from your phone. If you disagree, tap the checkmark to remove it. 7. A blue checkmark also displays next to the text that explains that you allows your location to be used for Google search results and other Google services. If you disagree, tap the checkmark to remove it. Tap the Next icon . 8. At the This phone belongs to... display, enter your First and Last names in the provided fields so that your phone can personalize some applications. Tap . 9. At the Set up email screen, tap next the email account type that you would like to set up. Follow the on-screen instructions to set up your email.
-
 1
1 -
2
-
3
-
4
-
5
-
6
-
7
-
8
-
9
-
10
-
11
-
12
-
13
-
14
-
 15
15 -
 16
16 -
 17
17 -
 18
18 -
 19
19 -
 20
20 -
 21
21 -
 22
22 -
 23
23 -
 24
24 -
 25
25 -
26
-
27
-
28
-
29
-
30
-
31
-
32
-
33
-
34
-
35
-
36
-
37
-
38
-
39
-
40
-
41
-
42
-
43
-
44
-
45
-
46
-
47
-
48
-
49
-
50
-
51
-
52
-
53
-
54
-
55
-
56
-
57
-
58
-
59
-
60
-
61
-
62
-
63
-
64
-
65
-
66
-
67
-
68
-
69
-
70
-
71
-
72
-
73
-
74
-
75
-
76
-
77
-
78
-
79
-
80
-
81
-
82
-
83
-
84
-
85
-
86
-
87
-
88
-
89
-
90
-
91
-
92
-
93
-
94
-
95
-
96
-
97
-
98
-
99
-
100
-
101
-
102
-
103
-
104
-
105
-
106
-
107
-
108
-
109
-
110
-
111
-
112
-
113
-
114
-
115
-
116
-
117
-
118
-
119
-
120
-
121
-
122
-
123
-
124
-
125
-
126
-
127
-
128
-
129
-
130
-
131
-
132
-
133
-
134
-
135
-
136
-
137
-
138
-
139
-
140
-
141
-
142
-
143
-
144
-
145
-
146
-
147
-
148
-
149
-
150
-
151
-
152
-
153
-
154
-
155
-
156
-
157
-
158
-
159
-
160
-
161
-
162
-
163
-
164
-
165
-
166
-
167
-
168
-
169
-
170
-
171
-
172
-
173
-
174
-
175
-
176
-
177
-
178
-
179
-
180
-
181
-
182
-
183
-
184
-
185
-
186
-
187
-
188
-
189
-
190
-
191
-
192
-
193
-
194
-
195
-
196
-
197
-
198
-
199
-
200
-
201
-
202
-
203
-
204
-
205
-
206
-
207
-
208
-
209
-
210
-
211
-
212
-
213
-
214
-
215
-
216
-
217
-
218
-
219
-
220
-
221
-
222
-
223
-
224
-
225
-
226
-
227
-
228
-
229
-
230
-
231
-
232
-
233
-
234
-
235
-
236
-
237
-
238
-
239
-
240
-
241
-
242
-
243
-
244
-
245
-
246
-
247
-
248
-
249
-
250
-
251
-
252
-
253
-
254
-
255
-
256
-
257
-
258
-
259
-
260
-
261
-
262
-
263
-
264
-
265
 |
 |
