Samsung SGH-I537 User Manual At&t Sgh-i537 Galaxy S 4 Active Jb English Us - Page 212
Record, Pause, Cancel, Delete, Storage, Recording quality, Limit for MMS, Contextual filename
 |
View all Samsung SGH-I537 manuals
Add to My Manuals
Save this manual to your list of manuals |
Page 212 highlights
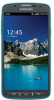
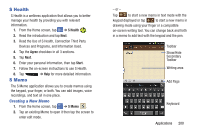
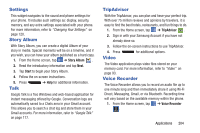
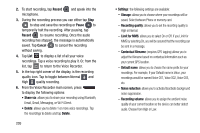
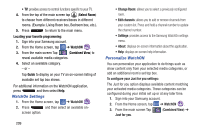
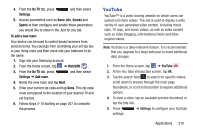
2. To start recording, tap Record and speak into the microphone. 3. During the recording process you can either tap Stop to stop and save the recording or Pause to temporarily halt the recording. After pausing, tap Record to resume recording. Once the audio recording has stopped, the message is automatically saved. Tap Cancel to cancel the recording without saving. 4. Tap List to display a list of all your voice recordings. Tap a voice recording to play it. Or, from the list, tap to return to the Voice Recorder. 5. In the top right corner of the display, is the recording quality icon. Tap to toggle between Normal and High quality recording. 6. From the Voice Recorder main screen, press to display the following options: • Share via: allows you to share your recording using Bluetooth, Email, Gmail, Messaging, or Wi-Fi Direct. • Delete: allows you to delete 1 or more voice recordings. Tap the recordings to delete and tap Delete. 205 • Settings: the following settings are available: - Storage: allows you to choose where your recordings will be saved. Select between Phone or memory card. - Recording quality: allows you to set the recording quality to High or Normal. - Limit for MMS: allows you to select On or Off. If you Limit for MMS by selecting On, you will be assured that the recording can be sent in a message. - Contextual filename: (requires GPS tagging) allows you to adjust the filename based on contextual information such as your current GPS location. - Default name: allows you to choose the name prefix for your recordings. For example, if your Default name is Voice, your recordings would be named Voice 001, Voice 002, Voice 003, etc. - Noise reduction: allows you to activate/deactivate background noise suppression. - Recording volume: allows you to assign the ambient noise quality of your current location so the device can better detect audio. Choose from High or Low.
-
 1
1 -
2
-
3
-
4
-
5
-
6
-
7
-
8
-
9
-
10
-
11
-
12
-
13
-
14
-
15
-
16
-
17
-
18
-
19
-
20
-
21
-
22
-
23
-
24
-
25
-
26
-
27
-
28
-
29
-
30
-
31
-
32
-
33
-
34
-
35
-
36
-
37
-
38
-
39
-
40
-
41
-
42
-
43
-
44
-
45
-
46
-
47
-
48
-
49
-
50
-
51
-
52
-
53
-
54
-
55
-
56
-
57
-
58
-
59
-
60
-
61
-
62
-
63
-
64
-
65
-
66
-
67
-
68
-
69
-
70
-
71
-
72
-
73
-
74
-
75
-
76
-
77
-
78
-
79
-
80
-
81
-
82
-
83
-
84
-
85
-
86
-
87
-
88
-
89
-
90
-
91
-
92
-
93
-
94
-
95
-
96
-
97
-
98
-
99
-
100
-
101
-
102
-
103
-
104
-
105
-
106
-
107
-
108
-
109
-
110
-
111
-
112
-
113
-
114
-
115
-
116
-
117
-
118
-
119
-
120
-
121
-
122
-
123
-
124
-
125
-
126
-
127
-
128
-
129
-
130
-
131
-
132
-
133
-
134
-
135
-
136
-
137
-
138
-
139
-
140
-
141
-
142
-
143
-
144
-
145
-
146
-
147
-
148
-
149
-
150
-
151
-
152
-
153
-
154
-
155
-
156
-
157
-
158
-
159
-
160
-
161
-
162
-
163
-
164
-
165
-
166
-
167
-
168
-
169
-
170
-
171
-
172
-
173
-
174
-
175
-
176
-
177
-
178
-
179
-
180
-
181
-
182
-
183
-
184
-
185
-
186
-
187
-
188
-
189
-
190
-
191
-
192
-
193
-
194
-
195
-
196
-
197
-
198
-
199
-
200
-
201
-
202
-
203
-
204
-
205
-
206
-
 207
207 -
 208
208 -
 209
209 -
 210
210 -
 211
211 -
 212
212 -
 213
213 -
 214
214 -
 215
215 -
 216
216 -
 217
217 -
218
-
219
-
220
-
221
-
222
-
223
-
224
-
225
-
226
-
227
-
228
-
229
-
230
-
231
-
232
-
233
-
234
-
235
-
236
-
237
-
238
-
239
-
240
-
241
-
242
-
243
-
244
-
245
-
246
-
247
-
248
-
249
-
250
-
251
-
252
-
253
-
254
-
255
-
256
-
257
-
258
-
259
-
260
-
261
-
262
-
263
-
264
-
265
 |
 |
