Samsung SPH-A600 Quick Guide (easy Manual) (English) - Page 79
Internal Phone Book Entry Options, Entering Text, Selecting a Character Input Mode
 |
View all Samsung SPH-A600 manuals
Add to My Manuals
Save this manual to your list of manuals |
Page 79 highlights
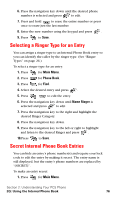
Internal Phone Book Entry Options When you display an Internal Phone Book entry, the following options are displayed when you press . To select an option, highlight it and press or press the corresponding number on the keypad. ᮣ Talk to dial the phone number. (If you are roaming and have Call Guard activated, press to complete the call.) See "To Place Roaming Calls With Call Guard On:" on page 49) ᮣ Edit allows you to modify or add information to the entry. ᮣ Prepend allows you to add a series of numbers before the phone number is dialed. ᮣ Erase allows you to permanently delete the entry. Tip: You can view the next entry by pressing the navigation key right or view the previous entry by pressing the navigation key left. Entering Text Selecting a Character Input Mode Your PCS Phone provides convenient ways to enter words, letters, punctuation, and numbers whenever you are prompted to enter text (for example, when adding an Internal Phone Book entry). To change the character input mode: 1. Before you start entering text, press . 2. To select a character input mode, highlight it and press . ⅷ T9 (English) to enter characters using T9 Text Input (see page 72). ⅷ Alpha to enter characters by tapping the keypad (see page 72). ⅷ Symbols to enter symbols (see page 73). ⅷ Number to enter numbers (see page 73). The Shortcut option is displayed when you are creating an email or entering a URL. The following options are available: ᮣ www. automatically enters "www." Section 2: Understanding Your PCS Phone 2G: Using the Internal Phone Book 71
-
 1
1 -
2
-
3
-
4
-
5
-
6
-
7
-
8
-
9
-
10
-
11
-
12
-
13
-
14
-
15
-
16
-
17
-
18
-
19
-
20
-
21
-
22
-
23
-
24
-
25
-
26
-
27
-
28
-
29
-
30
-
31
-
32
-
33
-
34
-
35
-
36
-
37
-
38
-
39
-
40
-
41
-
42
-
43
-
44
-
45
-
46
-
47
-
48
-
49
-
50
-
51
-
52
-
53
-
54
-
55
-
56
-
57
-
58
-
59
-
60
-
61
-
62
-
63
-
64
-
65
-
66
-
67
-
68
-
69
-
70
-
71
-
72
-
73
-
 74
74 -
 75
75 -
 76
76 -
 77
77 -
 78
78 -
 79
79 -
 80
80 -
 81
81 -
 82
82 -
 83
83 -
 84
84 -
85
-
86
-
87
-
88
-
89
-
90
-
91
-
92
-
93
-
94
-
95
-
96
-
97
-
98
-
99
-
100
-
101
-
102
-
103
-
104
-
105
-
106
-
107
-
108
-
109
-
110
-
111
-
112
-
113
-
114
-
115
-
116
-
117
-
118
-
119
-
120
-
121
-
122
-
123
-
124
-
125
-
126
-
127
-
128
-
129
-
130
-
131
-
132
-
133
-
134
-
135
-
136
-
137
-
138
-
139
-
140
-
141
-
142
-
143
-
144
-
145
-
146
-
147
-
148
-
149
-
150
-
151
-
152
-
153
-
154
-
155
-
156
-
157
-
158
-
159
-
160
-
161
-
162
-
163
-
164
-
165
-
166
-
167
-
168
-
169
-
170
-
171
-
172
-
173
-
174
-
175
-
176
-
177
-
178
 |
 |
