Sharp AR-M355N AR-M355 AR-M455 Operation Manual Suite - Page 206
Settings in the [Job Handling] tab, SELECTING PRINTING FUNCTIONS, Document Filing, Quick File]
 |
View all Sharp AR-M355N manuals
Add to My Manuals
Save this manual to your list of manuals |
Page 206 highlights
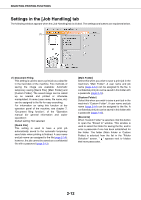
SELECTING PRINTING FUNCTIONS Settings in the [Job Handling] tab The following window appears when the [Job Handling] tab is clicked. The settings and buttons are explained below. (1) (1) Document Filing This setting is used to save a print job as a data file in the hard disk of the machine. Two methods of saving the image are available: Automatic temporary saving [Quick File], [Main Folder] and [Custom Folder]. The saved image can be called up as needed and printed or otherwise manipulated. A name (user name, file name, etc) can be assigned to the file for easy searching. For information on using this function at the operation panel of the machine, see chapter 7, "Document filing function", of the "Operation manual (for general information and copier operation)". Default setting: Not selected. [Quick File] This setting is used to have a print job automatically saved to the automatic temporary save folder when printing is finished. A user name and job name can assigned to the file (page 2-14); however, the job cannot be saved as a confidential file with a password (page 2-13). [Main Folder] Select this when you wish to save a print job in the machine's "Main Folder". A user name and job name (page 2-14) can be assigned to the file. A confidential print job can be saved in this folder with a passcode (page 2-13). [Custom Folder] Select this when you wish to save a print job in the machine's "Custom Folder". A user name and job name (page 2-14) can be assigned to the file. A confidential print job can be saved in this folder with a passcode (page 2-13). [Stored to] When "Custom Folder" is selected, click this button to open the "Stored to" window. This window is used to select the folder for saving the file, and to enter a passcode if one has been established for the folder. The folder (Main Folder or Custom Folder) is selected from the list in the "Folder Selection" screen. " " appears next to folders that have passcodes. 2-12
-
 1
1 -
2
-
3
-
4
-
5
-
6
-
7
-
8
-
9
-
10
-
11
-
12
-
13
-
14
-
15
-
16
-
17
-
18
-
19
-
20
-
21
-
22
-
23
-
24
-
25
-
26
-
27
-
28
-
29
-
30
-
31
-
32
-
33
-
34
-
35
-
36
-
37
-
38
-
39
-
40
-
41
-
42
-
43
-
44
-
45
-
46
-
47
-
48
-
49
-
50
-
51
-
52
-
53
-
54
-
55
-
56
-
57
-
58
-
59
-
60
-
61
-
62
-
63
-
64
-
65
-
66
-
67
-
68
-
69
-
70
-
71
-
72
-
73
-
74
-
75
-
76
-
77
-
78
-
79
-
80
-
81
-
82
-
83
-
84
-
85
-
86
-
87
-
88
-
89
-
90
-
91
-
92
-
93
-
94
-
95
-
96
-
97
-
98
-
99
-
100
-
101
-
102
-
103
-
104
-
105
-
106
-
107
-
108
-
109
-
110
-
111
-
112
-
113
-
114
-
115
-
116
-
117
-
118
-
119
-
120
-
121
-
122
-
123
-
124
-
125
-
126
-
127
-
128
-
129
-
130
-
131
-
132
-
133
-
134
-
135
-
136
-
137
-
138
-
139
-
140
-
141
-
142
-
143
-
144
-
145
-
146
-
147
-
148
-
149
-
150
-
151
-
152
-
153
-
154
-
155
-
156
-
157
-
158
-
159
-
160
-
161
-
162
-
163
-
164
-
165
-
166
-
167
-
168
-
169
-
170
-
171
-
172
-
173
-
174
-
175
-
176
-
177
-
178
-
179
-
180
-
181
-
182
-
183
-
184
-
185
-
186
-
187
-
188
-
189
-
190
-
191
-
192
-
193
-
194
-
195
-
196
-
197
-
198
-
199
-
200
-
 201
201 -
 202
202 -
 203
203 -
 204
204 -
 205
205 -
 206
206 -
 207
207 -
 208
208 -
 209
209 -
 210
210 -
 211
211 -
212
-
213
-
214
-
215
-
216
-
217
-
218
-
219
-
220
-
221
-
222
-
223
-
224
-
225
-
226
-
227
-
228
-
229
-
230
-
231
-
232
-
233
-
234
-
235
-
236
-
237
-
238
-
239
-
240
-
241
-
242
-
243
-
244
-
245
-
246
-
247
-
248
-
249
-
250
-
251
-
252
-
253
-
254
-
255
-
256
-
257
-
258
-
259
-
260
-
261
-
262
-
263
-
264
-
265
-
266
-
267
-
268
-
269
-
270
-
271
-
272
-
273
-
274
-
275
-
276
-
277
-
278
-
279
-
280
-
281
-
282
-
283
-
284
-
285
-
286
-
287
-
288
-
289
-
290
-
291
-
292
-
293
-
294
-
295
-
296
-
297
-
298
-
299
-
300
-
301
-
302
-
303
-
304
-
305
-
306
-
307
-
308
-
309
-
310
-
311
-
312
-
313
-
314
-
315
-
316
-
317
-
318
-
319
-
320
-
321
-
322
-
323
-
324
-
325
-
326
-
327
-
328
-
329
-
330
-
331
-
332
-
333
-
334
-
335
-
336
-
337
-
338
-
339
-
340
-
341
-
342
-
343
-
344
-
345
-
346
-
347
-
348
-
349
-
350
-
351
-
352
-
353
-
354
-
355
-
356
-
357
-
358
-
359
-
360
-
361
-
362
-
363
-
364
-
365
-
366
-
367
-
368
-
369
-
370
-
371
-
372
-
373
-
374
-
375
-
376
-
377
-
378
-
379
-
380
 |
 |
