Sharp AR-M355N AR-M355 AR-M455 Operation Manual Suite - Page 297
Selecting Resolution And Exposure Settings, Selecting The Resolution, Change The Resolution.,
 |
View all Sharp AR-M355N manuals
Add to My Manuals
Save this manual to your list of manuals |
Page 297 highlights
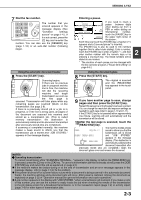
SELECTING RESOLUTION AND EXPOSURE SETTINGS After loading an original, you can adjust the resolution and exposure settings to match the condition of the originalfor example, if it has small or faint characters, or if it is a photo. After loading the original in fax mode, adjust the settings as explained below. SELECTING THE RESOLUTION The initial resolution setting is STANDARD. To change the setting, follow these steps: I Change the resolution. 1 Touch the [RESOLUTION] key. STANDARD RESOLUTION AUTO 81/2X11 ORIGINAL 2 Touch the [STANDARD] key, [FINE] key, [SUPER FINE] key, or [ULTRA FINE] key. The selected key is STANDARD FINE highlighted. If you touched the [FINE] key, [SUPER FINE] key, SUPER FINE HALF TONE or [ULTRA FINE] key, ULTRA FINE you can also select halftone by touching the [HALF TONE] key. I Resolution settings Touch this key if your original consists Standard of normal-sized characters (like those in this manual). Touch this key if your original has small Fine characters or diagrams. The original will be scanned at twice the resolution of the [STANDARD] setting. Super fine Touch this key if your original has intricate pictures or diagrams. A higherquality image will be produced than with the [FINE] setting. Ultra fine Touch this key if your original has intricate pictures or diagrams. This setting gives the best image quality. However, transmission will take longer than with the other settings. 3 Touch the [OK] key. You will return to the OK initial screen. DARD NE FINE HALF TONE FINE Half tone Touch this key if your original is a photograph or has gradations of color (such as a color original). This setting will produce a clearer image than [FINE], [SUPER FINE], or [ULTRA FINE] used alone. Half tone cannot be selected if [STANDARD] has been selected. NOTES G The factory default setting for the initial resolution is [STANDARD]. The initial resolution can be changed to a different setting in the key operator programs (see "Initial resolution setting" on page 8-4). G When using the automatic document feeder, the resolution setting cannot be changed once scanning has begun. G When a fax is sent at [ULTRA FINE], [SUPER FINE], or [FINE] resolution, a lower resolution will be used if the receiving machine does not have that resolution. 1-10
-
 1
1 -
2
-
3
-
4
-
5
-
6
-
7
-
8
-
9
-
10
-
11
-
12
-
13
-
14
-
15
-
16
-
17
-
18
-
19
-
20
-
21
-
22
-
23
-
24
-
25
-
26
-
27
-
28
-
29
-
30
-
31
-
32
-
33
-
34
-
35
-
36
-
37
-
38
-
39
-
40
-
41
-
42
-
43
-
44
-
45
-
46
-
47
-
48
-
49
-
50
-
51
-
52
-
53
-
54
-
55
-
56
-
57
-
58
-
59
-
60
-
61
-
62
-
63
-
64
-
65
-
66
-
67
-
68
-
69
-
70
-
71
-
72
-
73
-
74
-
75
-
76
-
77
-
78
-
79
-
80
-
81
-
82
-
83
-
84
-
85
-
86
-
87
-
88
-
89
-
90
-
91
-
92
-
93
-
94
-
95
-
96
-
97
-
98
-
99
-
100
-
101
-
102
-
103
-
104
-
105
-
106
-
107
-
108
-
109
-
110
-
111
-
112
-
113
-
114
-
115
-
116
-
117
-
118
-
119
-
120
-
121
-
122
-
123
-
124
-
125
-
126
-
127
-
128
-
129
-
130
-
131
-
132
-
133
-
134
-
135
-
136
-
137
-
138
-
139
-
140
-
141
-
142
-
143
-
144
-
145
-
146
-
147
-
148
-
149
-
150
-
151
-
152
-
153
-
154
-
155
-
156
-
157
-
158
-
159
-
160
-
161
-
162
-
163
-
164
-
165
-
166
-
167
-
168
-
169
-
170
-
171
-
172
-
173
-
174
-
175
-
176
-
177
-
178
-
179
-
180
-
181
-
182
-
183
-
184
-
185
-
186
-
187
-
188
-
189
-
190
-
191
-
192
-
193
-
194
-
195
-
196
-
197
-
198
-
199
-
200
-
201
-
202
-
203
-
204
-
205
-
206
-
207
-
208
-
209
-
210
-
211
-
212
-
213
-
214
-
215
-
216
-
217
-
218
-
219
-
220
-
221
-
222
-
223
-
224
-
225
-
226
-
227
-
228
-
229
-
230
-
231
-
232
-
233
-
234
-
235
-
236
-
237
-
238
-
239
-
240
-
241
-
242
-
243
-
244
-
245
-
246
-
247
-
248
-
249
-
250
-
251
-
252
-
253
-
254
-
255
-
256
-
257
-
258
-
259
-
260
-
261
-
262
-
263
-
264
-
265
-
266
-
267
-
268
-
269
-
270
-
271
-
272
-
273
-
274
-
275
-
276
-
277
-
278
-
279
-
280
-
281
-
282
-
283
-
284
-
285
-
286
-
287
-
288
-
289
-
290
-
291
-
 292
292 -
 293
293 -
 294
294 -
 295
295 -
 296
296 -
 297
297 -
 298
298 -
 299
299 -
 300
300 -
 301
301 -
 302
302 -
303
-
304
-
305
-
306
-
307
-
308
-
309
-
310
-
311
-
312
-
313
-
314
-
315
-
316
-
317
-
318
-
319
-
320
-
321
-
322
-
323
-
324
-
325
-
326
-
327
-
328
-
329
-
330
-
331
-
332
-
333
-
334
-
335
-
336
-
337
-
338
-
339
-
340
-
341
-
342
-
343
-
344
-
345
-
346
-
347
-
348
-
349
-
350
-
351
-
352
-
353
-
354
-
355
-
356
-
357
-
358
-
359
-
360
-
361
-
362
-
363
-
364
-
365
-
366
-
367
-
368
-
369
-
370
-
371
-
372
-
373
-
374
-
375
-
376
-
377
-
378
-
379
-
380
 |
 |
