Sharp AR-M355N AR-M355 AR-M455 Operation Manual Suite - Page 368
Scan complete sound setting, Default exposure settings, FAX SETTINGS, Fax default settings
 |
View all Sharp AR-M355N manuals
Add to My Manuals
Save this manual to your list of manuals |
Page 368 highlights
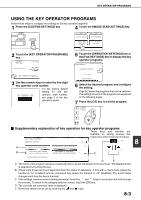
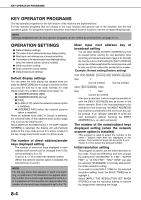
KEY OPERATOR PROGRAMS Scan complete sound setting You can select whether or not a beep sound is made after an original is scanned on the scanner unit. Normally a beep sound is made. You can select "High" or "Low" for the volume of the beep. Default exposure settings This program is used to set the default exposure level for scanning originals in fax / image send mode, and for scan save in document filing mode*. This program is initially set to "AUTO". If changed to "MANUAL", the exposure level can be adjusted to five levels. Level 1 is the lightest level and level 5 is the darkest level. * Can only be used on the AR-M355N/AR-M455N. The AR-M355U/AR-M455U models do not have this function. FAX SETTINGS I Fax default settings The default fax settings can be changed as necessary to meet your faxing needs. The "Fax default settings" are as follows: G Fax own number and name set G Dial mode setting (Setting your line type) G Auto wake up print G Pause time setting G Speaker volume settings G Original print on transaction report G Remote reception number setting (only when extension phone is connected) G Transaction report print select setting G Activity report print select setting G ECM (This setting is only effective if the other machine is a G3 machine that supports ECM) G Distinctive ring detection G Disable of fax number direct entry Fax own number and name set Use this setting to enter the fax number of the machine and the name of the user. The entered name and number are printed at the top of each fax page you send. The number is also used as a passcode when performing polling reception (see "USING THE POLLING FUNCTION" on page 314). 1 Touch the [NAME] key and enter the name. The name entry screen appears. Up to 20 characters can be entered for the name. For information on entering characters, see chapter 7 of the "Operation Manual (for general information and copier operation)". 2 Touch the [FAX No.] key and enter the fax number. Enter up to 20 digits for the number using the numeric keys. To enter a "+", press the " " key. To enter a hyphen, touch the [PAUSE] key. To enter a space, touch the [SPACE] key. If you make a mistake, press the [C] key and reenter the correct digit. NOTE If a hyphen is entered, it will be changed to a space at the time of transmission. 3 Touch the [OK] key. You will return to the OWN NUMBER AND NAME SET screen. The number you entered appears. Make sure it is correct. Dial mode setting (Setting your line type) Select the appropriate setting for your line type. "Tone" is normally selected. It is also possible to have the machine automatically select the line type. Make sure that the telephone line is connected to the machine, 8 and then touch the [AUTO SELECT] key at the lower right. The machine will automatically select "Tone" for a tone dial line, or "Pulse" for a pulse dial line. Auto wake up print Use this setting to select how the machine responds if a fax is received when the power switch is turned off (the fax power switch is turned on). Auto wake up print is normally turned on, which means that the machine automatically activates and prints the received fax. If you turn off this setting, received faxes will not be printed until the power switch is turned on. 8-5
-
 1
1 -
2
-
3
-
4
-
5
-
6
-
7
-
8
-
9
-
10
-
11
-
12
-
13
-
14
-
15
-
16
-
17
-
18
-
19
-
20
-
21
-
22
-
23
-
24
-
25
-
26
-
27
-
28
-
29
-
30
-
31
-
32
-
33
-
34
-
35
-
36
-
37
-
38
-
39
-
40
-
41
-
42
-
43
-
44
-
45
-
46
-
47
-
48
-
49
-
50
-
51
-
52
-
53
-
54
-
55
-
56
-
57
-
58
-
59
-
60
-
61
-
62
-
63
-
64
-
65
-
66
-
67
-
68
-
69
-
70
-
71
-
72
-
73
-
74
-
75
-
76
-
77
-
78
-
79
-
80
-
81
-
82
-
83
-
84
-
85
-
86
-
87
-
88
-
89
-
90
-
91
-
92
-
93
-
94
-
95
-
96
-
97
-
98
-
99
-
100
-
101
-
102
-
103
-
104
-
105
-
106
-
107
-
108
-
109
-
110
-
111
-
112
-
113
-
114
-
115
-
116
-
117
-
118
-
119
-
120
-
121
-
122
-
123
-
124
-
125
-
126
-
127
-
128
-
129
-
130
-
131
-
132
-
133
-
134
-
135
-
136
-
137
-
138
-
139
-
140
-
141
-
142
-
143
-
144
-
145
-
146
-
147
-
148
-
149
-
150
-
151
-
152
-
153
-
154
-
155
-
156
-
157
-
158
-
159
-
160
-
161
-
162
-
163
-
164
-
165
-
166
-
167
-
168
-
169
-
170
-
171
-
172
-
173
-
174
-
175
-
176
-
177
-
178
-
179
-
180
-
181
-
182
-
183
-
184
-
185
-
186
-
187
-
188
-
189
-
190
-
191
-
192
-
193
-
194
-
195
-
196
-
197
-
198
-
199
-
200
-
201
-
202
-
203
-
204
-
205
-
206
-
207
-
208
-
209
-
210
-
211
-
212
-
213
-
214
-
215
-
216
-
217
-
218
-
219
-
220
-
221
-
222
-
223
-
224
-
225
-
226
-
227
-
228
-
229
-
230
-
231
-
232
-
233
-
234
-
235
-
236
-
237
-
238
-
239
-
240
-
241
-
242
-
243
-
244
-
245
-
246
-
247
-
248
-
249
-
250
-
251
-
252
-
253
-
254
-
255
-
256
-
257
-
258
-
259
-
260
-
261
-
262
-
263
-
264
-
265
-
266
-
267
-
268
-
269
-
270
-
271
-
272
-
273
-
274
-
275
-
276
-
277
-
278
-
279
-
280
-
281
-
282
-
283
-
284
-
285
-
286
-
287
-
288
-
289
-
290
-
291
-
292
-
293
-
294
-
295
-
296
-
297
-
298
-
299
-
300
-
301
-
302
-
303
-
304
-
305
-
306
-
307
-
308
-
309
-
310
-
311
-
312
-
313
-
314
-
315
-
316
-
317
-
318
-
319
-
320
-
321
-
322
-
323
-
324
-
325
-
326
-
327
-
328
-
329
-
330
-
331
-
332
-
333
-
334
-
335
-
336
-
337
-
338
-
339
-
340
-
341
-
342
-
343
-
344
-
345
-
346
-
347
-
348
-
349
-
350
-
351
-
352
-
353
-
354
-
355
-
356
-
357
-
358
-
359
-
360
-
361
-
362
-
 363
363 -
 364
364 -
 365
365 -
 366
366 -
 367
367 -
 368
368 -
 369
369 -
 370
370 -
 371
371 -
 372
372 -
 373
373 -
374
-
375
-
376
-
377
-
378
-
379
-
380
 |
 |