Sharp AR-M355N AR-M355 AR-M455 Operation Manual Suite - Page 218
E-mail Print, Configuring E-mail print settings, Using E-mail Print
 |
View all Sharp AR-M355N manuals
Add to My Manuals
Save this manual to your list of manuals |
Page 218 highlights
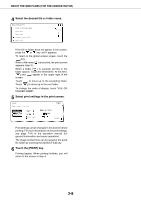
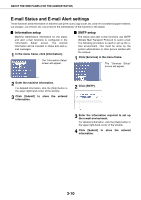
ABOUT THE WEB PAGES (FOR THE ADMINISTRATOR) E-mail Print When an e-mail account is set up for the machine, this function is used to have the machine periodically check the mail server and automatically print attachments to e-mails it receives without the need for the printer driver. I Configuring E-mail print settings To use E-mail Print, the machine's e-mail account information must be configured in the machine. Follow these steps: 1 Click [Print Port] in the link menu of the menu frame. The "Print Port Setup" page appears. 2 Click [E-mail Print]. 3 Enter the E-mail print information. For detailed information, click the [Help] button in the upper right-hand corner of the window. 4 Click [Submit] and store the entered information. I Using E-mail Print In the "To:" line of your e-mail program, enter the e-mail address of the machine, attach the file that you wish to print, and send the e-mail Files with the extensions pcl, ps*, pdf*, tiff, and tif can be printed. *The optional PS3 extension kit is required. The number of copies and other settings can be specified by entering control commands in the message of the email. The following control commands can be entered: Function Command Values Example Number of copies COPIES 1-999 COPIES=2 Staple JOBSTAPLE STAPLENO, STAPLELEFT JOBSTAPLE=STAPLENO Two-sided printing DUPLEX OFF, TOP, LEFT, RIGHT DUPLEX=TOP Account number ACCOUNTNUMBER 5-digit number ACCOUNTNUMBER=11111 File type LANGUAGE PCL, PCLXL, POSTSCRIPT, PDF, TIFF LANGUAGE=TIFF Paper PAPER Useable paper type (LETTER, A4, etc.) PAPER=LETTER, PAPER=A4 Quick File QUICKFILE OFF, ON QUICKFILE=ON NOTES G Specify "Text" for the format of the e-mail message. If rich text format (HTML) is used, the entered commands will be disregarded. G To receive a list of the control commands, send an e-mail with "config" entered in the message. G If nothing is entered in the message, printing will take place according to the settings in "PRINTER CONDITION SETTINGS" in the "PRINTER DEFAULT SETTINGS" menu of the user settings. G Encrypted PDF files cannot be printed, with the exception of files encrypted with a null password. G Only specify a file type when specifying a page description language. Normally a file type does not need to be specified. 3-9
-
 1
1 -
2
-
3
-
4
-
5
-
6
-
7
-
8
-
9
-
10
-
11
-
12
-
13
-
14
-
15
-
16
-
17
-
18
-
19
-
20
-
21
-
22
-
23
-
24
-
25
-
26
-
27
-
28
-
29
-
30
-
31
-
32
-
33
-
34
-
35
-
36
-
37
-
38
-
39
-
40
-
41
-
42
-
43
-
44
-
45
-
46
-
47
-
48
-
49
-
50
-
51
-
52
-
53
-
54
-
55
-
56
-
57
-
58
-
59
-
60
-
61
-
62
-
63
-
64
-
65
-
66
-
67
-
68
-
69
-
70
-
71
-
72
-
73
-
74
-
75
-
76
-
77
-
78
-
79
-
80
-
81
-
82
-
83
-
84
-
85
-
86
-
87
-
88
-
89
-
90
-
91
-
92
-
93
-
94
-
95
-
96
-
97
-
98
-
99
-
100
-
101
-
102
-
103
-
104
-
105
-
106
-
107
-
108
-
109
-
110
-
111
-
112
-
113
-
114
-
115
-
116
-
117
-
118
-
119
-
120
-
121
-
122
-
123
-
124
-
125
-
126
-
127
-
128
-
129
-
130
-
131
-
132
-
133
-
134
-
135
-
136
-
137
-
138
-
139
-
140
-
141
-
142
-
143
-
144
-
145
-
146
-
147
-
148
-
149
-
150
-
151
-
152
-
153
-
154
-
155
-
156
-
157
-
158
-
159
-
160
-
161
-
162
-
163
-
164
-
165
-
166
-
167
-
168
-
169
-
170
-
171
-
172
-
173
-
174
-
175
-
176
-
177
-
178
-
179
-
180
-
181
-
182
-
183
-
184
-
185
-
186
-
187
-
188
-
189
-
190
-
191
-
192
-
193
-
194
-
195
-
196
-
197
-
198
-
199
-
200
-
201
-
202
-
203
-
204
-
205
-
206
-
207
-
208
-
209
-
210
-
211
-
212
-
 213
213 -
 214
214 -
 215
215 -
 216
216 -
 217
217 -
 218
218 -
 219
219 -
 220
220 -
 221
221 -
 222
222 -
 223
223 -
224
-
225
-
226
-
227
-
228
-
229
-
230
-
231
-
232
-
233
-
234
-
235
-
236
-
237
-
238
-
239
-
240
-
241
-
242
-
243
-
244
-
245
-
246
-
247
-
248
-
249
-
250
-
251
-
252
-
253
-
254
-
255
-
256
-
257
-
258
-
259
-
260
-
261
-
262
-
263
-
264
-
265
-
266
-
267
-
268
-
269
-
270
-
271
-
272
-
273
-
274
-
275
-
276
-
277
-
278
-
279
-
280
-
281
-
282
-
283
-
284
-
285
-
286
-
287
-
288
-
289
-
290
-
291
-
292
-
293
-
294
-
295
-
296
-
297
-
298
-
299
-
300
-
301
-
302
-
303
-
304
-
305
-
306
-
307
-
308
-
309
-
310
-
311
-
312
-
313
-
314
-
315
-
316
-
317
-
318
-
319
-
320
-
321
-
322
-
323
-
324
-
325
-
326
-
327
-
328
-
329
-
330
-
331
-
332
-
333
-
334
-
335
-
336
-
337
-
338
-
339
-
340
-
341
-
342
-
343
-
344
-
345
-
346
-
347
-
348
-
349
-
350
-
351
-
352
-
353
-
354
-
355
-
356
-
357
-
358
-
359
-
360
-
361
-
362
-
363
-
364
-
365
-
366
-
367
-
368
-
369
-
370
-
371
-
372
-
373
-
374
-
375
-
376
-
377
-
378
-
379
-
380
 |
 |
