Sharp AR-M355N AR-M355 AR-M455 Operation Manual Suite - Page 301
Sending A Fax, Basic Procedure For Sending Faxes
 |
View all Sharp AR-M355N manuals
Add to My Manuals
Save this manual to your list of manuals |
Page 301 highlights
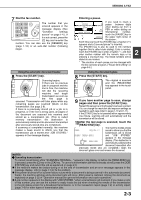
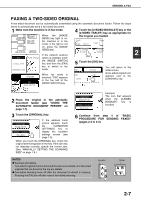
SENDING A FAX BASIC PROCEDURE FOR SENDING FAXES 1 Make sure the machine is in fax mode. When the [IMAGE SEND] key light is on, the machine is in fax mode. If the light is not on, press the [IMAGE SEND] key. FAX E-MAIL/FTP INTERNET FAX MODE SWITCH If the network scanner option is installed, touch the [MODE SWITCH] key and then the [FAX] key to switch to fax mode. SPEAKER FAX MODE SWITCH When fax mode is selected, "FAX" appears in the top half of the [MODE SWITCH] key. 2 Load the original. GUsing the automatic document feeder: Page 1-7 GUsing the document glass: Page 1-7 If you are using the document glass to send multiple pages, load the first page first. NOTE You cannot load documents in both the automatic document feeder and on the document glass and send them in a single fax transmission. 3 Check the original size. If the address book STANDARD RESOLUTION screen appears, touch the [CONDITION SETTINGS] key to AUTO 81/2 X11 ORIGINAL display the condition settings screen (page 1-5). If the original is not a standard size or the size was not detected correctly, touch the [ORIGINAL] key to specify the original size. (See "MANUALLY SETTING THE SCANNING SIZE" on page 1-8.) 4 If needed, adjust the resolution setting. (Refer to page 1-10.) STANDARD RESOLUTION AUTO 81/2X11 ORIGINAL 5 If needed, adjust the exposure setting. (Refer to page 1-11.) AUTO EXPOSURE STANDARD RESOLUTION AUTO ORIGINAL 6 If desired, touch the [FILE] key or the [QUICK FILE] key.* * Can only be used on the AR-M355N/AR-M455N. The AR-M355U/AR-M455U models do not have this function. DDRESS REVIEW These keys are used to ESS TION 100% SPECIAL MODES FILE QUICK FILE store the scanned image in the machine's hard disk. The stored image can be printed or transmitted again at a later time. For information on this function, see "Document filing functions" in chapter 7 of the Operation Manual (for general information and copier operation). If the [FILE] key is grayed out, only the [QUICK FILE] key can be selected. When you touch the [QUICK FILE] key, a message asking you to confirm the save will appear. Touch the [OK] key in the message screen and go to the next step. If you wish to cancel the save, touch the [QUICK FILE] key after touching the [OK] key so that the [QUICK FILE] key is no longer highlighted. 2-2
-
 1
1 -
2
-
3
-
4
-
5
-
6
-
7
-
8
-
9
-
10
-
11
-
12
-
13
-
14
-
15
-
16
-
17
-
18
-
19
-
20
-
21
-
22
-
23
-
24
-
25
-
26
-
27
-
28
-
29
-
30
-
31
-
32
-
33
-
34
-
35
-
36
-
37
-
38
-
39
-
40
-
41
-
42
-
43
-
44
-
45
-
46
-
47
-
48
-
49
-
50
-
51
-
52
-
53
-
54
-
55
-
56
-
57
-
58
-
59
-
60
-
61
-
62
-
63
-
64
-
65
-
66
-
67
-
68
-
69
-
70
-
71
-
72
-
73
-
74
-
75
-
76
-
77
-
78
-
79
-
80
-
81
-
82
-
83
-
84
-
85
-
86
-
87
-
88
-
89
-
90
-
91
-
92
-
93
-
94
-
95
-
96
-
97
-
98
-
99
-
100
-
101
-
102
-
103
-
104
-
105
-
106
-
107
-
108
-
109
-
110
-
111
-
112
-
113
-
114
-
115
-
116
-
117
-
118
-
119
-
120
-
121
-
122
-
123
-
124
-
125
-
126
-
127
-
128
-
129
-
130
-
131
-
132
-
133
-
134
-
135
-
136
-
137
-
138
-
139
-
140
-
141
-
142
-
143
-
144
-
145
-
146
-
147
-
148
-
149
-
150
-
151
-
152
-
153
-
154
-
155
-
156
-
157
-
158
-
159
-
160
-
161
-
162
-
163
-
164
-
165
-
166
-
167
-
168
-
169
-
170
-
171
-
172
-
173
-
174
-
175
-
176
-
177
-
178
-
179
-
180
-
181
-
182
-
183
-
184
-
185
-
186
-
187
-
188
-
189
-
190
-
191
-
192
-
193
-
194
-
195
-
196
-
197
-
198
-
199
-
200
-
201
-
202
-
203
-
204
-
205
-
206
-
207
-
208
-
209
-
210
-
211
-
212
-
213
-
214
-
215
-
216
-
217
-
218
-
219
-
220
-
221
-
222
-
223
-
224
-
225
-
226
-
227
-
228
-
229
-
230
-
231
-
232
-
233
-
234
-
235
-
236
-
237
-
238
-
239
-
240
-
241
-
242
-
243
-
244
-
245
-
246
-
247
-
248
-
249
-
250
-
251
-
252
-
253
-
254
-
255
-
256
-
257
-
258
-
259
-
260
-
261
-
262
-
263
-
264
-
265
-
266
-
267
-
268
-
269
-
270
-
271
-
272
-
273
-
274
-
275
-
276
-
277
-
278
-
279
-
280
-
281
-
282
-
283
-
284
-
285
-
286
-
287
-
288
-
289
-
290
-
291
-
292
-
293
-
294
-
295
-
 296
296 -
 297
297 -
 298
298 -
 299
299 -
 300
300 -
 301
301 -
 302
302 -
 303
303 -
 304
304 -
 305
305 -
 306
306 -
307
-
308
-
309
-
310
-
311
-
312
-
313
-
314
-
315
-
316
-
317
-
318
-
319
-
320
-
321
-
322
-
323
-
324
-
325
-
326
-
327
-
328
-
329
-
330
-
331
-
332
-
333
-
334
-
335
-
336
-
337
-
338
-
339
-
340
-
341
-
342
-
343
-
344
-
345
-
346
-
347
-
348
-
349
-
350
-
351
-
352
-
353
-
354
-
355
-
356
-
357
-
358
-
359
-
360
-
361
-
362
-
363
-
364
-
365
-
366
-
367
-
368
-
369
-
370
-
371
-
372
-
373
-
374
-
375
-
376
-
377
-
378
-
379
-
380
 |
 |
