Sharp AR-M355N AR-M355 AR-M455 Operation Manual Suite - Page 366
USING THE KEY OPERATOR PROGRAMS, Supplementary explanation of key operation for key operator programs
 |
View all Sharp AR-M355N manuals
Add to My Manuals
Save this manual to your list of manuals |
Page 366 highlights
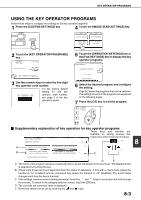
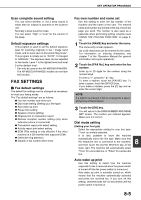
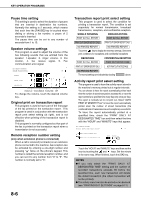
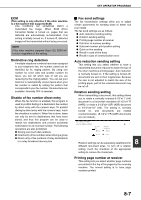
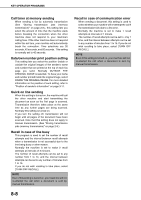
KEY OPERATOR PROGRAMS USING THE KEY OPERATOR PROGRAMS Follow these steps to configure the settings in the key operator programs. 1 Press the [CUSTOM SETTINGS] key. 4 Touch the [IMAGE SEND SETTINGS] key. CONTROL CONTROL DEVICE CONTROL COPY SETTINGS IMAGE SEND SETTINGS DOC. FILING SETTING 2 Touch the [KEY OPERATOR PROGRAMS] key. DEFAULT SETTINGS LIST PRINT FAX DATA SENDER CONTROL RECEIVE/FORWA KEY OPERATOR PROGRAMS 3 Use the numeric keys to enter the five-digit key operator code number. For the factory default setting for the key KEY OPERATOR CODE operator code number, see page 2 of the key operator's guide. 5 Touch the [OPERATION SETTINGS] key or the [FAX SETTINGS] key to display the key operator programs. E SEND SETTINGS OPERATION SETTINGS FAX SETTINGS I-FAX SETTINGS 6 Select the desired program and configure the setting. Page 8-2 shows the programs that can be selected. The settings for each of the programs are explained on the following pages. 7 Press the [CA] key to exit the program. I Supplementary explanation of key operation for key operator programs These keys and indicator are available on setting screens that require the entry of numerical values. KEY OPERATOR PROGRAMS OPERATION SETTINGS OK 15 (1 15) 8 A DEFAULT DISPLAY SETTINGS THE NUMBER OF DIRECT ADDRESS/ 1/2 6 SENDER KEYS DISPLAYED SETTING B MUST INPUT NEXT ADDRESS KEY AT BROADCAST SETTING THE NUMBER OF FILE NAME/ SUBJECT KEYS DISPLAYED SETTING 6 C INITIAL RESOLUTION SETTING D E A The name of the program category or particular item to be set will appear on the touch key. The displayed item is selected by touching the key. B Check mark boxes are touch keys that show the status of selections. A box with a check mark means the function is "on" (enabled) and an unchecked box means the function is "off" (disabled). The on/off status changes each time the box is touched. C If the settings continue on the following screen(s), touch the and keys to move back and forth through the screens. To return to the category selection screen, touch the [OK] key. D The currently set numerical value is displayed. E Numerical values can be set by touching the and keys. 8-3
-
 1
1 -
2
-
3
-
4
-
5
-
6
-
7
-
8
-
9
-
10
-
11
-
12
-
13
-
14
-
15
-
16
-
17
-
18
-
19
-
20
-
21
-
22
-
23
-
24
-
25
-
26
-
27
-
28
-
29
-
30
-
31
-
32
-
33
-
34
-
35
-
36
-
37
-
38
-
39
-
40
-
41
-
42
-
43
-
44
-
45
-
46
-
47
-
48
-
49
-
50
-
51
-
52
-
53
-
54
-
55
-
56
-
57
-
58
-
59
-
60
-
61
-
62
-
63
-
64
-
65
-
66
-
67
-
68
-
69
-
70
-
71
-
72
-
73
-
74
-
75
-
76
-
77
-
78
-
79
-
80
-
81
-
82
-
83
-
84
-
85
-
86
-
87
-
88
-
89
-
90
-
91
-
92
-
93
-
94
-
95
-
96
-
97
-
98
-
99
-
100
-
101
-
102
-
103
-
104
-
105
-
106
-
107
-
108
-
109
-
110
-
111
-
112
-
113
-
114
-
115
-
116
-
117
-
118
-
119
-
120
-
121
-
122
-
123
-
124
-
125
-
126
-
127
-
128
-
129
-
130
-
131
-
132
-
133
-
134
-
135
-
136
-
137
-
138
-
139
-
140
-
141
-
142
-
143
-
144
-
145
-
146
-
147
-
148
-
149
-
150
-
151
-
152
-
153
-
154
-
155
-
156
-
157
-
158
-
159
-
160
-
161
-
162
-
163
-
164
-
165
-
166
-
167
-
168
-
169
-
170
-
171
-
172
-
173
-
174
-
175
-
176
-
177
-
178
-
179
-
180
-
181
-
182
-
183
-
184
-
185
-
186
-
187
-
188
-
189
-
190
-
191
-
192
-
193
-
194
-
195
-
196
-
197
-
198
-
199
-
200
-
201
-
202
-
203
-
204
-
205
-
206
-
207
-
208
-
209
-
210
-
211
-
212
-
213
-
214
-
215
-
216
-
217
-
218
-
219
-
220
-
221
-
222
-
223
-
224
-
225
-
226
-
227
-
228
-
229
-
230
-
231
-
232
-
233
-
234
-
235
-
236
-
237
-
238
-
239
-
240
-
241
-
242
-
243
-
244
-
245
-
246
-
247
-
248
-
249
-
250
-
251
-
252
-
253
-
254
-
255
-
256
-
257
-
258
-
259
-
260
-
261
-
262
-
263
-
264
-
265
-
266
-
267
-
268
-
269
-
270
-
271
-
272
-
273
-
274
-
275
-
276
-
277
-
278
-
279
-
280
-
281
-
282
-
283
-
284
-
285
-
286
-
287
-
288
-
289
-
290
-
291
-
292
-
293
-
294
-
295
-
296
-
297
-
298
-
299
-
300
-
301
-
302
-
303
-
304
-
305
-
306
-
307
-
308
-
309
-
310
-
311
-
312
-
313
-
314
-
315
-
316
-
317
-
318
-
319
-
320
-
321
-
322
-
323
-
324
-
325
-
326
-
327
-
328
-
329
-
330
-
331
-
332
-
333
-
334
-
335
-
336
-
337
-
338
-
339
-
340
-
341
-
342
-
343
-
344
-
345
-
346
-
347
-
348
-
349
-
350
-
351
-
352
-
353
-
354
-
355
-
356
-
357
-
358
-
359
-
360
-
 361
361 -
 362
362 -
 363
363 -
 364
364 -
 365
365 -
 366
366 -
 367
367 -
 368
368 -
 369
369 -
 370
370 -
 371
371 -
372
-
373
-
374
-
375
-
376
-
377
-
378
-
379
-
380
 |
 |
