Sharp HT-X1 HT-X1 Operation Manual
Sharp HT-X1 Manual
 |
UPC - 074000366138
View all Sharp HT-X1 manuals
Add to My Manuals
Save this manual to your list of manuals |
Sharp HT-X1 manual content summary:
- Sharp HT-X1 | HT-X1 Operation Manual - Page 1
DVD MODEL HT-X1 OPERATION MANUAL Thank you for purchasing this SHARP product. To obtain the best performance from this product, please read this manual carefully. It will guide you in operating your SHARP product. HT-X1 Home Theater with DVD consisting of HT-X1 (main unit and subwoofer/amplifier - Sharp HT-X1 | HT-X1 Operation Manual - Page 2
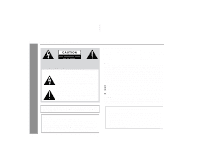
HT-X1 2 Important Instruction SPECIAL NOTES CAUTION: TO REDUCE THE RISK OF ELECTRIC SHOCK, DO NOT REMOVE COVER (OR BACK). NO USER-SERVICEABLE PARTS INSIDE. REFER SERVICING TO QUALIFIED SERVICE cable ground shall be connected to the grounding system of the building, as close to the point of cable - Sharp HT-X1 | HT-X1 Operation Manual - Page 3
See Instruction Manual for replacement or resetting of protective device. If replacement of the plug is required, be sure the service technician has used a replacement plug specified by the manufacturer that has the same overload protection as the original plug. 0304 Important Instruction HT-X1 3 - Sharp HT-X1 | HT-X1 Operation Manual - Page 4
HT-X1 IMPORTANT SAFETY INSTRUCTIONS (continued) Important Instruction 15 Outdoor Antenna Grounding - If an outside antenna or cable system is connected to the product, be sure the antenna or cable system is grounded so as to provide some protection against voltage surges and built-up static - Sharp HT-X1 | HT-X1 Operation Manual - Page 5
SCAN PICTURE PROBLEMS, IT IS RECOMMENDED THAT THE USER SWITCH THE CONNECTION TO THE 'STANDARD DEFINITION' OUTPUT. IF THERE ARE QUESTIONS REGARDING OUR TV SET COMPATIBILITY WITH THIS MODEL 525p AND 625p DVD PLAYER, PLEASE CONTACT OUR CUSTOMER SERVICE CENTER. Important Instruction HT-X1 5 - Sharp HT-X1 | HT-X1 Operation Manual - Page 6
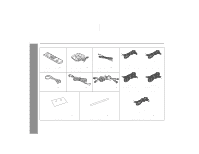
Remote control 1 (RRMCGA027SJZZ) AM loop antenna 1 (QANTL0008SJZZ) FM antenna 1 (QANTWA001SJZZ) White (for left front speaker) approx. 16 feet (5 m) Red (for right front speaker) approx. 16 feet (5 m) Video cable 1 (QCNWGA004SJZZ) AC power cord 1 (QACCU0003SJ00) Blue System connection cable - Sharp HT-X1 | HT-X1 Operation Manual - Page 7
(sound mode 48 - 51 Changing the default setting of the amplifier 52 - 54 Changing the initial setting of DVD 55 - 58 Language code list for disc language 59 Sleep operation 60 Audio connection to other equipment 61 To install the main unit on the wall 62 " References Troubleshooting chart - Sharp HT-X1 | HT-X1 Operation Manual - Page 8
outlet. Plug the AC power cord back in, and then turn on your system. ! In case of an electrical storm, unplug the subwoofer/amplifier unit for safety. General Information 4" (10 cm) 4" (10 cm) 6" (15 cm) Subwoofer/amplifier unit 4" (10 cm) 4" (10 cm) 6" (15 cm) 4" (10 cm) 4" (10 cm) ! Hold - Sharp HT-X1 | HT-X1 Operation Manual - Page 9
HT-X1 " Types of playable discs The unit can play back discs bearing any of the following marks: DVD DVD-Video Disc for NTSC system DVD-R DVD-RW DVD+R DVD+RW for NTSC for NTSC for NTSC for NTSC system system system system 4.7 Recorded in the vid- Recorded in the video mode (*1) (*2) eo mode - Sharp HT-X1 | HT-X1 Operation Manual - Page 10
HT-X1 Description of discs (continued) " DVD-Video A popular type of DVD disc of the same size as a CD, mainly containing video images. Region number DVD discs are programmed with region numbers indicating countries in which they can be played. This system can play discs with region number "1" or - Sharp HT-X1 | HT-X1 Operation Manual - Page 11
on the 2. German (Dolby Dig- DVD. Check them in the ital 2 ch) DVD's manual. " Discs that cannot be played ! DVDs without the region number "1" or "ALL". ! DVDs with PAL system ! DVDs with SECAM system ! DVDs with MPEG sound ! DVD-ROM ! DVD-RAM ! DVD-Audio ! CDG ! Super video CD/Video - Sharp HT-X1 | HT-X1 Operation Manual - Page 12
HT-X1 Controls Unit Stand 18 11. Remote Sensor 26 12. Volume Control 27 13. Headphone Jack Audio Signal) Input Jacks 61 5. Component Video Output Jacks 23 6. S-video Output Jack 23 7. Video Output Jack 22 8. System Connection Jacks (to subwoofer/amplifier unit 19, 20 9. Optical Digital Audio - Sharp HT-X1 | HT-X1 Operation Manual - Page 13
6 7 8 9 10 11 12 13 HT-X1 5 14 15 16 17 " Display Reference page 1. Program Indicator 38, 47 2. Random Play Indicator 42 3. Repeat/One Track Repeat/A - B Repeat Indicators . . . 39, 40 4. 2 channel Stereo Sound Mode Indicator 50 5. Multi Channel Sound Mode Indicator 51 6. PCM Signal Indicator - Sharp HT-X1 | HT-X1 Operation Manual - Page 14
HT-X1 Controls and indicators (continued) 1 12 2 3 17 21 4 18 22 5 19 23 6 7 20 24 8 9 13 10 14 11 15 16 25 26 27 General Information 28 29 " Remote control Reference page 1. Remote Control Angle Button 37 18. DVD Audio Language Select or CD Audio Output Select Button 34 - Sharp HT-X1 | HT-X1 Operation Manual - Page 15
HT-X1 " Remote control Reference page 1. Mute Button 27 2. Tuner (Band) Button 46 3. Auxiliary Button 61 4. Frame Advance or Pause Button 29, 36 5. DVD Initial Setting Button 55 6. Amplifier Initial Setting Button 50 7. Shift Button 33 8. Volume Up and Down Buttons 27 9. Play Button 29 10. - Sharp HT-X1 | HT-X1 Operation Manual - Page 16
HT-X1 Controls and indicators (continued) 3 1 4 2 " Front/surround speakers Reference page 1. Speaker 2. 2 General Information " Subwoofer/amplifier unit Reference page 1. Bass Reflex Duct 1 2. Woofer 3. Cooling Fan 25 3 5 4. AC Power Input Jack 25 5. System Connection Jacks (to main - Sharp HT-X1 | HT-X1 Operation Manual - Page 17
Subwoofer/ amplifier unit Front speaker (left) Center speaker Front speaker (right) Surround speaker (left) Main unit Surround speaker (right) HT-X1 " Placing the speaker system the speakers further away from the TV. Refer to the user's manual of the TV for details. Notes: ! The default - Sharp HT-X1 | HT-X1 Operation Manual - Page 18
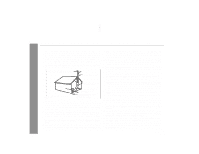
HT-X1 Main unit preparation Installation methods Make sure to unplug the AC power cord before installing the main unit or change the position. The stand is - Sharp HT-X1 | HT-X1 Operation Manual - Page 19
HT-X1 (U) TINSEA050SJZZ System connections HT-X1 ! Make sure to disconnect the AC power cord from the wall outlet before you connect/disconnect cables to/from jacks inside the back cover of the main unit or jacks of the subwoofer/amplifier unit. ! After connecting cables, attach the back cover - Sharp HT-X1 | HT-X1 Operation Manual - Page 20
HT-X1 System connections (continued) " Connecting the system connection cable Connect the main unit and subwoofer/amplifier unit as follows. Subwoofer/ amplifier unit 1 Black 2 Blue Main unit " Antenna connection Supplied FM antenna: Connect the FM antenna wire to the FM 75 OHMS jack and - Sharp HT-X1 | HT-X1 Operation Manual - Page 21
protection circuit is activated and the system enters the stand-by mode. In this case, check that the speaker wire is connected correctly before turning on the power again. Incorrect Preparation for Use Black 2 Connect the other end to the subwoofer/amplifier unit. Black Subwoofer/ amplifier - Sharp HT-X1 | HT-X1 Operation Manual - Page 22
HT-X1 System connections (continued) Preparation for Use " TV connection Three types of jacks (VIDEO OUT, S-VIDEO OUT and COMPONENT VIDEO OUT) are available for connection of a TV and the main unit. Connect according to your TV. Connecting to a TV with a video input jack: You can enjoy DVD images - Sharp HT-X1 | HT-X1 Operation Manual - Page 23
output mode" on page 22. Main unit Main unit HT-X1 Preparation for Use To S-video output jack Video signal To component video output jacks Green Blue Red Video signal S-video cable (commercially available) TV To S-video input jack Note: When the video and S-video cables are both connected - Sharp HT-X1 | HT-X1 Operation Manual - Page 24
HT-X1 System connections (continued) " Attaching the back cover After making all the connections, attach the back cover to the main unit. Fit the claws into the holes. " the headphones disconnects the speakers automati- cally. Adjust the volume using the VOLUME control. Preparation for Use 24 - Sharp HT-X1 | HT-X1 Operation Manual - Page 25
not turn on, check if the AC power cord and system connection cable are plugged in properly. Cooling fan Subwoofer/ amplifier unit To set the system to stand-by mode: Press the ON/STAND-BY button again. Note: After the system enters the power stand-by mode, wait a few seconds to turn on again - Sharp HT-X1 | HT-X1 Operation Manual - Page 26
HT-X1 26 Remote control remote control Check the remote control after checking all the connections (see pages 19 - 25). Point the remote control directly at the remote sensor on the main unit. The remote control incorrectly may cause the system to mal- function. Main unit Remote sensor 8"-20' (0.2 - Sharp HT-X1 | HT-X1 Operation Manual - Page 27
control HT-X1 (U) TINSEA050SJZZ HT-X1 " Volume control Main unit operation: When the VOLUME control is turned clockwise, the volume will increase. When it is turned counterclockwise, the volume will decrease. Remote control (*) After approx. 5 seconds of DVD playback, the display dims and the - Sharp HT-X1 | HT-X1 Operation Manual - Page 28
HT-X1 Playing a disc Turn on the TV, and switch the input to the "VIDEO 1" or "VIDEO 2", etc. accordingly. 1 Press the ON/STAND-BY button to turn the power on. 2 Press the button to set the in- put to "DVD". No Disc DVD CD Audio Visual Entertainment 3 Insert a disc into the disc insertion - Sharp HT-X1 | HT-X1 Operation Manual - Page 29
the STILL button on the remote con- trol. To resume playback from the same point, press the DVD/CD button. Caution when inserting DVD: Press the button twice. CD/MP3/WMA/JPEG: Press the button. To remove the disc: 1. In the stop mode, press the button. 2. Remove the disc. DVD Operation HT-X1 - Sharp HT-X1 | HT-X1 Operation Manual - Page 30
HT-X1 Playing a disc (continued) DVD Operation Notes: ! When you turn on the power or switch the input to "DVD speed or disc. For more details, see the manual for the equipment. ! Sound may skip at high -Stop The system stores the point you stopped. 2 To restart play, press the (DVD/CD ) button - Sharp HT-X1 | HT-X1 Operation Manual - Page 31
. ! Audio CD or MP3/WMA disc sounds will break up during search. This is not a malfunction. ! When a search is performed during playback, pictures may not be forwarded or reversed in the search speed specified in this manual, depending on the disc or the scene being played. DVD Operation HT-X1 31 - Sharp HT-X1 | HT-X1 Operation Manual - Page 32
HT-X1 DVD Operation Basic operation (continued) " To start playback from the desired point (direct play) To select and play the desired title: Playback starts from chapter 1 of the selected title. 1 While in the stop or playback mode, press the DIRECT but- ton. 2 Within 10 seconds, select the - Sharp HT-X1 | HT-X1 Operation Manual - Page 33
HT-X1 The subtitle language and the audio language you select during playback are reset each time you set this system to the stand-by mode languages that are recorded on a DVD. ! To hide subtitles on the screen, select "Subtitle Off". Notes: ! Some DVDs prohibit changing the subtitle language. - Sharp HT-X1 | HT-X1 Operation Manual - Page 34
". Setting Brighter A lot brighter Mono Left Mono Right Stereo Notes: ! The audio language on some DVDs may not be changed. ! For audio language and audio system, refer to the manual of the disc. ! When you set the unit to the stand-by mode or replace the disc, settings return to the default. 34 - Sharp HT-X1 | HT-X1 Operation Manual - Page 35
. S ON Level OFF ON Setting Normal Slightly clearer Level ON ON To restore the original image quality: In step 1, select "OFF". Setting Clearer A lot clearer HT-X1 DVD Operation 35 - Sharp HT-X1 | HT-X1 Operation Manual - Page 36
See the disc jacket for details. " To select a subtitle or audio language from the disc menu You can select the desired subtitle/audio language and sound system (5.1 ch Dolby Digital or DTS sound) on your DVD if it has a disc menu. 1 In the stop mode or during play- back, press the TOP MENU/ MENU - Sharp HT-X1 | HT-X1 Operation Manual - Page 37
HT-X1 " To change the angle You can change the angle of view when playing a DVD video disc that contains scenes not displayed if there is no other angle recorded. " " is displayed instead. ! Refer to the manual of the disc as the operation may vary depending on the disc. Zoom x 1.5 Zoom x 2 - Sharp HT-X1 | HT-X1 Operation Manual - Page 38
DVD Operation HT-X1 38 Useful operation (continued) " To play in the desired order (programmed playback) You can play back the desired chapters, tracks or files in the sequence you want. Maximum of 40 numbers can be programmed. 1 In the stop mode, press the RANDOM/PROGRAM button. The - Sharp HT-X1 | HT-X1 Operation Manual - Page 39
normal playback For audio CD, the mode changes as mode changes as follows: File Rep 1 Repeats the file currently playing. Folder Rep Repeats the folder (directory) currently playing. Disc Rep Repeat play of all of the files. Rep off Disappear The normal playback DVD Operation HT-X1 - Sharp HT-X1 | HT-X1 Operation Manual - Page 40
HT-X1 Useful operation (continued) " To play the contents between the specified points is disabled on some discs. ! Some scenes in DVD may not allow A-B repeat play. ! A-B repeat play for DVD is possible only within a title. ! A-B repeat play for audio CD is possible only within a track. ! When - Sharp HT-X1 | HT-X1 Operation Manual - Page 41
playing time 1 / 19 L R -40:37 Remaining total playing time 1 / 8 2 / 10 DEF 1/9 DEF 1/3 -00:02:38 Remaining playing time of the current chapter 1 / 3 Angle information Repeat mode information Audio language information Subtitle information DVD Operation HT-X1 41 - Sharp HT-X1 | HT-X1 Operation Manual - Page 42
HT-X1 Playing an audio CD The following playback functions are the same as DVD operations. Page Playing a disc 28 - 30 To locate the beginning of a chapter/track (skip 31 Fast forward/Fast reverse (search 31 To change the audio language (audio . In the stop mode, press the SHIFT button - Sharp HT-X1 | HT-X1 Operation Manual - Page 43
point (direct play) To select and play the desired track: While in the stop or playback mode, press the direct number buttons to select the track number. TV screen Unit display Select: 14 If ENTER button. Note: Time search feature is disabled on some discs. HT-X1 Audio CD Operation 43 - Sharp HT-X1 | HT-X1 Operation Manual - Page 44
HT-X1 44 Playing an MP3, WMA or JPEG disc The following playback functions are the same as DVD or CD operations. Page Playing a disc 28 - 30 To locate the beginning of a chapter/track (skip 31 Fast forward/Fast reverse (search 31 To change the audio language (audio mode, press the cursor ( or - Sharp HT-X1 | HT-X1 Operation Manual - Page 45
MP3, WMA and JPEG Disc Operation HT-X1 " Zoom function 1 While a disc is playing, press the SHIFT button and then the ZOOM button. 2 Hold down the or button for 2 seconds or more. Zoom - Sharp HT-X1 | HT-X1 Operation Manual - Page 46
Radio HT-X1 Listening to the radio 46 " Tuning 1 Press the ON/STAND-BY button to turn the power on. 2 Press the TUNER (BAND) button repeatedly to select the desired frequency band (FM or AM). 3 Press the TUNING ( or ) button to tune in to the desired station. Manual tuning: Press the TUNING button - Sharp HT-X1 | HT-X1 Operation Manual - Page 47
HT-X1 " Memorizing a station You can store 40 AM and FM stations in memory and recall them at the push of a button. (Preset tuning) 1 Perform steps 1 - 3 in "Tuning" on page 46. 2 Press the ENTER button to enter the preset tuning saving mode : The backup function protects the memorized stations for - Sharp HT-X1 | HT-X1 Operation Manual - Page 48
-X1 Enjoying surround sound (sound mode) Dolby Digital Unit display CD,VCR etc. Unit display Advanced Features Disc with this trademark A 5.1 surround sound decoding used for home theater surround sound. You can enjoy the stereophonic effect in the home theater system. When you set the audio - Sharp HT-X1 | HT-X1 Operation Manual - Page 49
to the radio. ! If sound is unpleasant to listen to, change the multi channel mode or stereo mode. ! Settings for the multi channel mode and stereo mode are retained by input (DVD, AUX DIGITAL and AUX ANALOG). Advanced Features HT-X1 " " appears when the speakers are receiving audio signals. 49 - Sharp HT-X1 | HT-X1 Operation Manual - Page 50
HT-X1 Enjoying surround sound (sound mode) (continued) You can enjoy spacious sound recorded in Dolby Digital VIRTUAL (*): You can enjoy the great acoustic effects of the front speakers and subwoofer/amplifier unit. Although the surround speaker does not work, you can enjoy spacious surround - Sharp HT-X1 | HT-X1 Operation Manual - Page 51
The dynamic range control (compression) is activated automatically and you can enjoy clear sound HALL: A concert hall atmosphere is created. even at low volumes. Notes: ! When monaural signals are received in the multi channel mode, only the center speaker and subwoofer/amplifier unit produce - Sharp HT-X1 | HT-X1 Operation Manual - Page 52
HT-X1 Changing the default setting of the amplifier Change settings according to the connected speakers. Speaker ) CT Center speaker FR Front speaker (Right) SR Surround speaker (Right) SL Surround speaker (Left) SW Subwoofer/amplifier unit Delay range 1 to 29 ft 1 to 29 ft 1 to 29 ft 1 to 29 ft 1 - Sharp HT-X1 | HT-X1 Operation Manual - Page 53
FT Surround L 6 FT Select Change Return Repeat the operation as instructed. (The number of repetition depends on the setting item.) To change change the amplifier settings unless the input source is set to DVD/CD. ! The amplifier settings cannot be changed in the tuner mode and do HT-X1 53 - Sharp HT-X1 | HT-X1 Operation Manual - Page 54
HT-X1 Changing the default setting of the amplifier (continued) " Speaker level setting If sounds from front speakers and subwoofer/amplifier unit when the surround is "STEREO" or "VIRTUAL (SURROUND)". ! If subwoofer/amplifier unit sound is distorted, lower the subwoofer/amplifier unit level. The - Sharp HT-X1 | HT-X1 Operation Manual - Page 55
button. 2 Press the cursor ( or ) button to select the main menu and press the ENTER button. DVD Setup Language Setup Video Setup Display Setup System Setup HT-X1 Advanced Features 3 Press the cursor ( or ) button to select the submenu and press the ENTER button. ! To return to the previous - Sharp HT-X1 | HT-X1 Operation Manual - Page 56
the NTSC TV. Auto: Select this mode for the multi-system TV. The video output mode should be set according to the connected TV type. Interlace: Select this for a non-progressive scan TV (use a video cable, S-video cable, or component video cable). Progressive: Select this for a progressive scan - Sharp HT-X1 | HT-X1 Operation Manual - Page 57
). No Limit: Parental level control is canceled. Set a country code according to a parental control level of discs. Password Edit Restore Info ---------- Password setting This resets all settings to the factory defaults. Reference page P. 37 P. 58 P. 58 P. 58 Advanced Features HT-X1 57 - Sharp HT-X1 | HT-X1 Operation Manual - Page 58
Press the SET UP DVD button. Note: While playing a disc with parental lock, the display may appear requesting a password in order to watch some restricted scenes. In such a case, enter the password to temporarily change the parental level. To change the password: 1 Select "System Setup" on the setup - Sharp HT-X1 | HT-X1 Operation Manual - Page 59
Tatar TW Twi UK Ukrainian UR Urdu UZ Uzbek VI Vietnamese VO Volapuk WO Wolof XH Xhosa YO Yoruba ZH Chinese ZU Zulu Advanced Features HT-X1 59 - Sharp HT-X1 | HT-X1 Operation Manual - Page 60
HT-X1 Sleep operation You can set the system to the power stand-by mode at the specified time. 1 Play back the 10 0:15 0:30 3 Within 30 seconds, press the ENTER button. 4 The system will enter the power stand-by mode automati- cally after the preset time has elapsed. The volume will be turned - Sharp HT-X1 | HT-X1 Operation Manual - Page 61
Audio connection to other equipment HT-X1 You can hear the sound of other equipment via this product. Connect the DVD player, VCR or digital tuner to a TV directly to receive the images (refer to the operation manual of each equipment). Caution: Turn off the other equipment before making this - Sharp HT-X1 | HT-X1 Operation Manual - Page 62
HT-X1 To install the main unit on the wall Preparation: Remove the stand from the main unit (perform steps 1 - 2 on page 18). Sharp sure that both the screw and the wall can support a load of 4.9 lbs. (2.2 kg). Drive clear, consult with a qualified service technician. ! Mounting screws are not - Sharp HT-X1 | HT-X1 Operation Manual - Page 63
improperly? ! Is a disc other than a DVD (region number 1 or ALL), audio CD, CD-R or CD-RW loaded? ! Is the disc very dirty? ! Is the disc loaded upside down? ! Is the optical pickup dirty? ! Is the TV input set to video (VIDEO 1, VIDEO 2, etc.)? ! Is the system turned on? References HT-X1 63 - Sharp HT-X1 | HT-X1 Operation Manual - Page 64
is operated incorrectly, it may malfunction. If such a problem occurs, do the following: 1 Set the system to the stand-by mode and turn the power on again. 2 If the system is not restored in the previous operation, unplug and plug in the subwoofer/amplifier unit, and then turn the power on. Note: If - Sharp HT-X1 | HT-X1 Operation Manual - Page 65
Error Meaning The disc cannot be played with this system or it is loaded in an incorrect way. Wrong Region The region number of the DVD is neither "1" nor "ALL". The disc does not support the operation described in this operation manual. Optional accessory References " Care of discs Discs are - Sharp HT-X1 | HT-X1 Operation Manual - Page 66
References HT-X1 66 Specifications As part of our policy of continuous improvement, SHARP reserves the 32 ohms) Audio input (AUX): RCA type 2 Optical digital input: Square type 1 System control 2 NTSC color DVD (region number 1 or ALL), DVD-R/RW (video mode), DVD+R/RW (video mode), audio CD, - Sharp HT-X1 | HT-X1 Operation Manual - Page 67
HT-X1 References " Surround speakers Type Maximum input power Rated input power Impedance Dimensions Weight Full range system 3-1/8" (8 cm) speaker 1 than 4 ohms System control 2 50 watts minimum RMS per channel into 4 ohms from 150 Hz to 20 kHz, 10% total harmonic distortion Subwoofer: 50 watts - Sharp HT-X1 | HT-X1 Operation Manual - Page 68
, for any damages or defects in the Product which were caused by repairs or attempted repairs performed by anyone other than an authorized servicer. Nor shall Sharp be liable or in any way responsible for any incidental or consequential economic or property damage. Some states do not allow the
-
 1
1 -
 2
2 -
 3
3 -
 4
4 -
 5
5 -
 6
6 -
 7
7 -
8
-
9
-
10
-
11
-
12
-
13
-
14
-
15
-
16
-
17
-
18
-
19
-
20
-
21
-
22
-
23
-
24
-
25
-
26
-
27
-
28
-
29
-
30
-
31
-
32
-
33
-
34
-
35
-
36
-
37
-
38
-
39
-
40
-
41
-
42
-
43
-
44
-
45
-
46
-
47
-
48
-
49
-
50
-
51
-
52
-
53
-
54
-
55
-
56
-
57
-
58
-
59
-
60
-
61
-
62
-
63
-
64
-
65
-
66
-
67
-
68
 |
 |

MODEL
HT-X1
HOME THEATER WITH DVD
Thank you for purchasing this SHARP product. To
obtain the best performance from this product, please
read this manual carefully. It will guide you in operating
your SHARP product.
HT-X1 Home Theater with DVD consisting of HT-X1 (main
unit and subwoofer/amplifier unit), CP-X1F (front speakers),
CP-X1C (center speaker) and CP-X1S (surround speakers).
OPERATION MANUAL
HT-X1 (U) TINSEA050SJZZ