Sharp HT-X1 HT-X1 Operation Manual - Page 23
To S-video
 |
UPC - 074000366138
View all Sharp HT-X1 manuals
Add to My Manuals
Save this manual to your list of manuals |
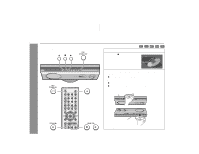
Page 23 highlights
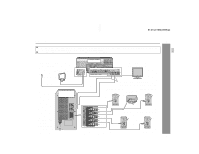
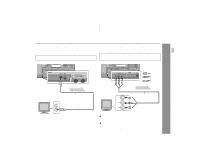
Connecting to a TV with an S-video input jack: If your TV is equipped with an S-video input jack, you can enjoy higher quality images by connecting it with an S-video cable (not supplied). Set the video mode to "Interlace" (default setting). For the procedure, refer to "Changing the video output mode" on page 22. Connecting to a TV with component video input jacks: If your TV is equipped with component video input jacks, purchase a component video cable to enjoy higher quality images. For a progressive scan TV, set the video mode to "Progressive". Select "Interlace" for a non-progressive scan TV. For the procedure, refer to "Changing the video output mode" on page 22. Main unit Main unit HT-X1 Preparation for Use To S-video output jack Video signal To component video output jacks Green Blue Red Video signal S-video cable (commercially available) TV To S-video input jack Note: When the video and S-video cables are both connected, the images from the S-video input jack appears on your TV. Component video cable TV (commercially available) To component video input jacks Notes: ! If your TV has different indications for the component video inputs (Y, CB and CR or Y, B-Y and P-Y), connect jacks with its matching color. ! Some component video jacks designed for the high-vision system are not compatible with DVD. Do not connect this unit to those component video input jacks. (Images may appear distorted or may not appear due to the system difference.) 23
-
 1
1 -
2
-
3
-
4
-
5
-
6
-
7
-
8
-
9
-
10
-
11
-
12
-
13
-
14
-
15
-
16
-
17
-
 18
18 -
 19
19 -
 20
20 -
 21
21 -
 22
22 -
 23
23 -
 24
24 -
 25
25 -
 26
26 -
 27
27 -
 28
28 -
29
-
30
-
31
-
32
-
33
-
34
-
35
-
36
-
37
-
38
-
39
-
40
-
41
-
42
-
43
-
44
-
45
-
46
-
47
-
48
-
49
-
50
-
51
-
52
-
53
-
54
-
55
-
56
-
57
-
58
-
59
-
60
-
61
-
62
-
63
-
64
-
65
-
66
-
67
-
68
 |
 |
