Sony DCR-DVD108 Operating Instructions - Page 28
Step 5: Inserting a disc or a “Memory Stick Duo”, DVD-RW/DVD+RW, DVD-RW
 |
UPC - 027242701786
View all Sony DCR-DVD108 manuals
Add to My Manuals
Save this manual to your list of manuals |
Page 28 highlights
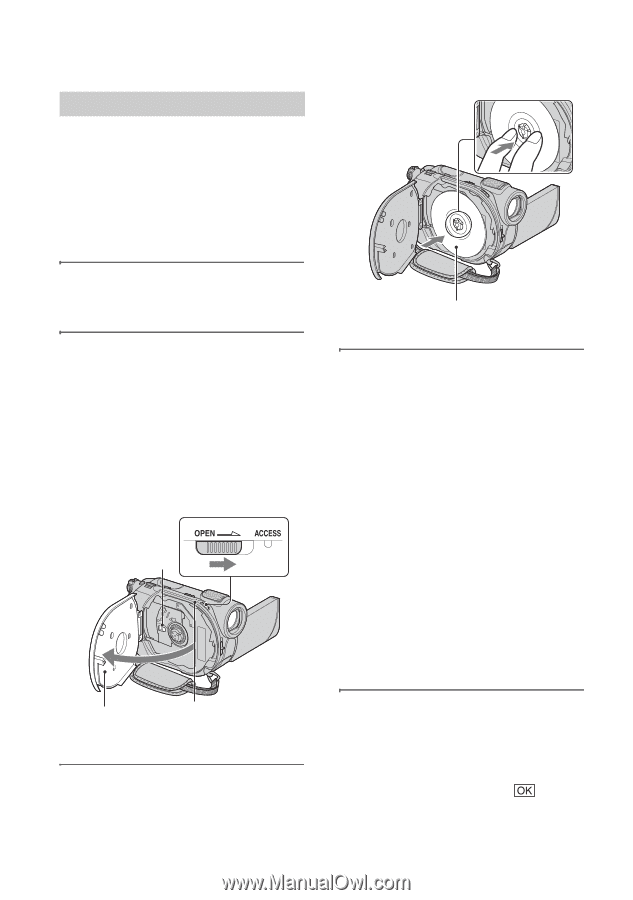
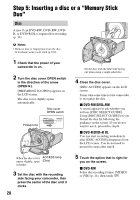
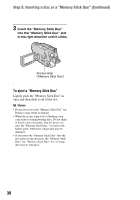
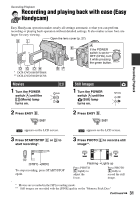
Step 5: Inserting a disc or a "Memory Stick Duo" Disc A new 8 cm DVD-RW, DVD+RW, DVDR, or DVD+R DL is required for recording (p. 14). b Notes • Remove dust or fingerprints from the disc beforehand, using a soft cloth (p.101). 1 Check that the power of your camcorder is on. 2 Turn the disc cover OPEN switch in the direction of the arrow (OPEN B). [PREPARING TO OPEN] appears on the LCD screen. The disc cover slightly opens automatically. Disc cover OPEN switch Pickup lens Set the disc with the label side facing out when using a single-sided disc. 4 Close the disc cover. [DISC ACCESS] appears on the LCD screen. It may take some time for the camcorder to recognize the disc. x DVD-RW/DVD+RW A screen appears to ask whether you will use [DISC SELECT GUIDE]. Using [DISC SELECT GUIDE] lets you format the disc by following the guidance on the screen. If you do not want to use it, proceed to step 5. x DVD-R/DVD+R DL You can start recording immediately after [DISC ACCESS] disappears from the LCD screen. You do not need to proceed to steps after step 5. When the disc cover ACCESS lamp opens slightly, open (Disc) it further. 3 Set the disc with the recording side facing your camcorder, then press the center of the disc until it clicks. 28 5 Touch the option that is right for you on the screen. x DVD-RW Select the recording format, [VIDEO] or [VR] (p. 14), then touch .
-
 1
1 -
2
-
3
-
4
-
5
-
6
-
7
-
8
-
9
-
10
-
11
-
12
-
13
-
14
-
15
-
16
-
17
-
18
-
19
-
20
-
21
-
22
-
 23
23 -
 24
24 -
 25
25 -
 26
26 -
 27
27 -
 28
28 -
 29
29 -
 30
30 -
 31
31 -
 32
32 -
 33
33 -
34
-
35
-
36
-
37
-
38
-
39
-
40
-
41
-
42
-
43
-
44
-
45
-
46
-
47
-
48
-
49
-
50
-
51
-
52
-
53
-
54
-
55
-
56
-
57
-
58
-
59
-
60
-
61
-
62
-
63
-
64
-
65
-
66
-
67
-
68
-
69
-
70
-
71
-
72
-
73
-
74
-
75
-
76
-
77
-
78
-
79
-
80
-
81
-
82
-
83
-
84
-
85
-
86
-
87
-
88
-
89
-
90
-
91
-
92
-
93
-
94
-
95
-
96
-
97
-
98
-
99
-
100
-
101
-
102
-
103
-
104
-
105
-
106
-
107
-
108
-
109
-
110
-
111
-
112
-
113
-
114
-
115
-
116
-
117
-
118
-
119
-
120
-
121
-
122
-
123
-
124
-
125
-
126
-
127
-
128
-
129
-
130
-
131
-
132
-
133
-
134
-
135
-
136
-
137
-
138
-
139
 |
 |