Sony DCR-DVD108 Operating Instructions - Page 29
Memory Stick Duo, DVD+RW, To remove the disc - dvd handycam camcorder
 |
UPC - 027242701786
View all Sony DCR-DVD108 manuals
Add to My Manuals
Save this manual to your list of manuals |
Page 29 highlights
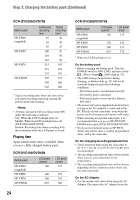
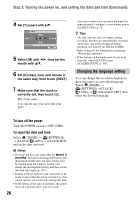
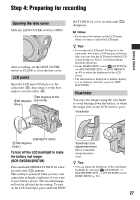
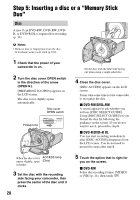
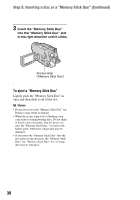
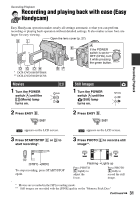
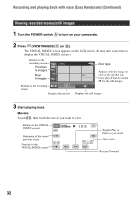
x DVD+RW Select the aspect ratio of the movie, [16:9 WIDE] or [4:3], then touch . 6 Touch [YES]. 7 Touch when [Completed.] is displayed. When the formatting is completed, you can start recording on the disc. z Tips • When you use a DVD-RW while the Easy Handycam operation (p. 31) is set, the recording format is fixed to VIDEO mode. To remove the disc 1 Perform steps 1 and 2 to open the disc cover. 2 Press the disc holder in the center of the disc compartment, and remove the disc by holding the edge. b Notes • Be careful not to obstruct the operation with your hand or other objects, etc., when opening or closing the disc cover. Move the belt to the bottom of the camcorder, then open or close the disc cover. • If you catch the belt when closing the disc cover, it may cause your camcorder to malfunction. • Do not touch the disc with the recording side or pickup lens (p.106). When using a double-sided disc, take care not to smudge the surface with fingerprints. • If you close the disc cover with the disc set incorrectly, it may cause your camcorder to malfunction. • Do not disconnect the power sources during formatting. • Do not apply shock or vibration to your camcorder: - while the ACCESS lamp is on - while the ACCESS lamp is flashing - while [DISC ACCESS] or [PREPARING TO OPEN] is displayed on the LCD screen • It may take some time to remove the disc depending on the disc condition or recorded materials. • It may take up to 10 minutes to remove a disc if it is damaged or is dirty with fingerprints, etc. In that case, the disc might be damaged. z Tips • You can remove the disc when a power source is connected to your camcorder even when your camcorder is turned off. However, the disc recognition process (step 4) does not start. • To delete all of the previously recorded images from a DVD-RW/DVD+RW, then to use it again to record new images, see "Deleting all scenes on the disc (Formatting)" on page 59. • You can check the right disc using [DISC SELECT GUIDE] on the HOME MENU (page 58). "Memory Stick Duo" You can use only a "Memory Stick Duo" marked with or (p. 101). z Tips • The number of recordable images vary, depending on the image quality or the image size. For details, see page 66. 1 Open the LCD panel. Continued , 29 Getting Started
-
 1
1 -
2
-
3
-
4
-
5
-
6
-
7
-
8
-
9
-
10
-
11
-
12
-
13
-
14
-
15
-
16
-
17
-
18
-
19
-
20
-
21
-
22
-
23
-
 24
24 -
 25
25 -
 26
26 -
 27
27 -
 28
28 -
 29
29 -
 30
30 -
 31
31 -
 32
32 -
 33
33 -
 34
34 -
35
-
36
-
37
-
38
-
39
-
40
-
41
-
42
-
43
-
44
-
45
-
46
-
47
-
48
-
49
-
50
-
51
-
52
-
53
-
54
-
55
-
56
-
57
-
58
-
59
-
60
-
61
-
62
-
63
-
64
-
65
-
66
-
67
-
68
-
69
-
70
-
71
-
72
-
73
-
74
-
75
-
76
-
77
-
78
-
79
-
80
-
81
-
82
-
83
-
84
-
85
-
86
-
87
-
88
-
89
-
90
-
91
-
92
-
93
-
94
-
95
-
96
-
97
-
98
-
99
-
100
-
101
-
102
-
103
-
104
-
105
-
106
-
107
-
108
-
109
-
110
-
111
-
112
-
113
-
114
-
115
-
116
-
117
-
118
-
119
-
120
-
121
-
122
-
123
-
124
-
125
-
126
-
127
-
128
-
129
-
130
-
131
-
132
-
133
-
134
-
135
-
136
-
137
-
138
-
139
 |
 |