Sony DCR-IP220 MovieShaker v3.1 Operating Instructions - Page 30
To rearrange the order of scenes, To remove a scene, Drop it on a Scene palette of the Storyboard.
 |
View all Sony DCR-IP220 manuals
Add to My Manuals
Save this manual to your list of manuals |
Page 30 highlights
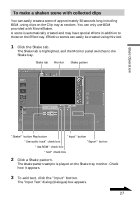
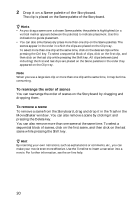
2 Drop it on a Scene palette of the Storyboard. The clip is placed on the Scene palette of the Storyboard. z Hints • As you drag a scene over a chosen Scene palette, the palette is highlighted (or a vertical marker appears between the palettes) to indicate placement. Use this indication to guide placement. • You can also simultaneously place more than one clip on the Scene palettes. The scenes appear in the order in which the clips are placed on the Clip tray. To select more than one clip at the same time, click on the desired clips while pressing the Ctrl key. To select a sequential block of clips, click on the first clip, and then click on the last clip while pressing the Shift key. All clips between (and including) the first and last clips are placed on the Scene palettes in the order they appeared on the Clip tray. Note When you use a large size clip or more than one clip at the same time, it may be timeconsuming. To rearrange the order of scenes You can rearrange the order of scenes on the Storyboard by dragging and dropping them. To remove a scene To remove a scene from the Storyboard, drag and drop it in the Trash in the MovieShaker window. You can also remove a scene by clicking it and pressing the Delete key. You can also remove more than one scene at the same time. To select a sequential block of scenes, click on the first scene, and then click on the last scene while pressing the Shift key. z Hint By inserting your own narrations, such as explanations or comments, etc., you can make your movie even more effective. Use the Timeline to insert a narration into a movie. For further information, see the on-line help. 30
-
 1
1 -
2
-
3
-
4
-
5
-
6
-
7
-
8
-
9
-
10
-
11
-
12
-
13
-
14
-
15
-
16
-
17
-
18
-
19
-
20
-
21
-
22
-
23
-
24
-
 25
25 -
 26
26 -
 27
27 -
 28
28 -
 29
29 -
 30
30 -
 31
31 -
 32
32 -
 33
33 -
 34
34 -
 35
35 -
36
-
37
-
38
-
39
-
40
-
41
-
42
-
43
-
44
-
45
-
46
-
47
-
48
 |
 |