Sony HDR UX1 Operating Guide - Page 61
Creating the Playlist, Turn on your camcorder, then, press, HOME., Touch, OTHERS, PLAYLIST EDIT].
 |
UPC - 027242698918
View all Sony HDR UX1 manuals
Add to My Manuals
Save this manual to your list of manuals |
Page 61 highlights
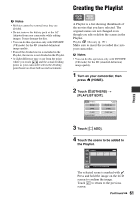
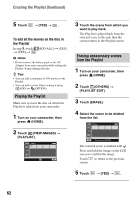
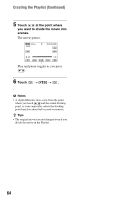
Creating the Playlist b Notes • Molvies cannot be restored once they are divided. • Do not remove the battery pack or the AC Adaptor from your camcorder while editing images. It may damage the disc. • You can do this operation only with DVD-RW (VR mode) for the SD (standard definition) image quality. • Even if the divided movie is included in the Playlist, the movie is not divided in the Playlist. • A slight difference may occur from the point where you touch and the actual dividing point, as your camcorder selects the dividing point based on about half-second increments. A Playlist is a list showing thumbnails of the movies that you have selected. The original scenes are not changed even though you edit or delete the scenes in the Playlist. Playlist Glossary (p. 151) Make sure to insert the recorded disc into your camcorder. b Notes • You can do this operation only with DVD-RW (VR mode) for the SD (standard definition) image quality. 1 Turn on your camcorder, then press (HOME). 2 Touch (OTHERS) t [PLAYLIST EDIT]. Editing 3 Touch [ ADD]. 4 Touch the scene to be added to the Playlist. . The selected scene is marked with . Press and hold the image on the LCD screen to confirm the image. Touch to return to the previous screen. Continued , 61
-
 1
1 -
2
-
3
-
4
-
5
-
6
-
7
-
8
-
9
-
10
-
11
-
12
-
13
-
14
-
15
-
16
-
17
-
18
-
19
-
20
-
21
-
22
-
23
-
24
-
25
-
26
-
27
-
28
-
29
-
30
-
31
-
32
-
33
-
34
-
35
-
36
-
37
-
38
-
39
-
40
-
41
-
42
-
43
-
44
-
45
-
46
-
47
-
48
-
49
-
50
-
51
-
52
-
53
-
54
-
55
-
 56
56 -
 57
57 -
 58
58 -
 59
59 -
 60
60 -
 61
61 -
 62
62 -
 63
63 -
 64
64 -
 65
65 -
 66
66 -
67
-
68
-
69
-
70
-
71
-
72
-
73
-
74
-
75
-
76
-
77
-
78
-
79
-
80
-
81
-
82
-
83
-
84
-
85
-
86
-
87
-
88
-
89
-
90
-
91
-
92
-
93
-
94
-
95
-
96
-
97
-
98
-
99
-
100
-
101
-
102
-
103
-
104
-
105
-
106
-
107
-
108
-
109
-
110
-
111
-
112
-
113
-
114
-
115
-
116
-
117
-
118
-
119
-
120
-
121
-
122
-
123
-
124
-
125
-
126
-
127
-
128
-
129
-
130
-
131
-
132
-
133
-
134
-
135
-
136
-
137
-
138
-
139
-
140
-
141
-
142
-
143
-
144
-
145
-
146
-
147
-
148
-
149
-
150
-
151
-
152
-
153
-
154
-
155
 |
 |