Sony HDR-XR160 Handycam® Handbook - Page 19
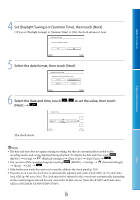
Set [Daylight Savings] or [Summer Time], then touch [Next]., Select the date format
 |
UPC - 027242820081
View all Sony HDR-XR160 manuals
Add to My Manuals
Save this manual to your list of manuals |
Page 19 highlights
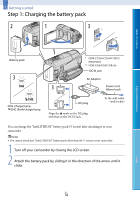
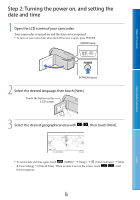
Table of Contents 4 Set [Daylight Savings] or [Summer Time], then touch [Next]. If you set [Daylight Savings] or [Summer Time] to [On], the clock advances 1 hour. 5 Select the date format, then touch [Next]. 6 Select the date and time, touch / to set the value, then touch [Next] . Enjoy Useful Functions Index The clock starts. Notes The date and time does not appear during recording, but they are automatically recorded on the recording media, and can be displayed during playback. To display the date and time, touch (MENU) [Setup] [ (Playback Settings)] [Data Code] [Date/Time] . You can turn off the operation beeps by touching (MENU) [Setup] [ (General Settings)] [Beep] [Off] . If the button you touch does not react correctly, calibrate the touch panel (p. 118). Once the clock is set, the clock time is automatically adjusted with [Auto Clock ADJ ] (p. 97) and [Auto Area ADJ] (p. 98) set to [On]. The clock may not be adjusted to the correct time automatically, depending on the country/region selected for your camcorder. In this case, set [Auto Clock ADJ ] and [Auto Area ADJ] to [Off] (HDR-CX360V/PJ30V/PJ50V). US 19
-
 1
1 -
2
-
3
-
4
-
5
-
6
-
7
-
8
-
9
-
10
-
11
-
12
-
13
-
 14
14 -
 15
15 -
 16
16 -
 17
17 -
 18
18 -
 19
19 -
 20
20 -
 21
21 -
 22
22 -
 23
23 -
 24
24 -
25
-
26
-
27
-
28
-
29
-
30
-
31
-
32
-
33
-
34
-
35
-
36
-
37
-
38
-
39
-
40
-
41
-
42
-
43
-
44
-
45
-
46
-
47
-
48
-
49
-
50
-
51
-
52
-
53
-
54
-
55
-
56
-
57
-
58
-
59
-
60
-
61
-
62
-
63
-
64
-
65
-
66
-
67
-
68
-
69
-
70
-
71
-
72
-
73
-
74
-
75
-
76
-
77
-
78
-
79
-
80
-
81
-
82
-
83
-
84
-
85
-
86
-
87
-
88
-
89
-
90
-
91
-
92
-
93
-
94
-
95
-
96
-
97
-
98
-
99
-
100
-
101
-
102
-
103
-
104
-
105
-
106
-
107
-
108
-
109
-
110
-
111
-
112
-
113
-
114
-
115
-
116
-
117
-
118
-
119
-
120
-
121
-
122
-
123
-
124
-
125
-
126
-
127
-
128
-
129
 |
 |
