Sony HDR-XR160 Handycam® Handbook - Page 90
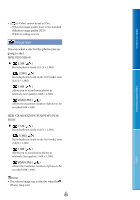
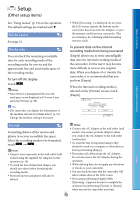
Setup (Other setup items), Other setup items
 |
UPC - 027242820081
View all Sony HDR-XR160 manuals
Add to My Manuals
Save this manual to your list of manuals |
Page 90 highlights
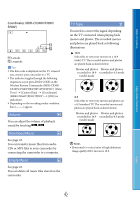
Setup (Other setup items) Table of Contents See "Using menus" (p. 74) on the operation. The default settings are marked with . Media Select See page 21. Media Info You can check the remaining recordable time for each recording mode of the recording media for movies and the approximate free and used media space of the recording media. To turn off the display Touch . Notes Since there is a management file area, the used space is not displayed as 0 % even if you perform [Format] (p. 90). Tips The camcorder can display the information of the medium selected on [Media Select] (p. 21). Change the medium setting if necessary. While [Executing...] is displayed, do not close the LCD screen, operate the buttons on the camcorder, disconnect the AC Adaptor, or eject the memory card from your camcorder. (The access lamp is lit or flashing while formatting memory card.) To prevent data on the internal recording media from being recovered [Empty] allows you to write unintelligible data onto the internal recording media of the camcorder. In this way it may become more difficult to recover any original data. When you dispose of or transfer the camcorder, it is recommended that you perform [Empty]. When the internal recording media is selected on the [Format] screen, touch [Empty]. Enjoy Useful Functions Index Format Notes Connect the AC Adaptor to the wall outlet (wall Formatting deletes all the movies and socket). You cannot perform [Empty] unless photos to recover recordable free space. Select the recording media to be formatted, touch . you connect the AC Adaptor to the wall outlet (wall socket). To avoid the loss of important images, they should be saved on a computer or other devices Notes before performing [Empty]. Connect your camcorder to the wall outlet (wall socket) using the supplied AC Adaptor for this operation (p. 16). To avoid the loss of important images, you should save them before formatting the recording media. Protected movies and photos will also be deleted. Disconnect all cables except the AC Adaptor. Do not disconnect the AC Adaptor during the operation. While deleting data, do not apply any vibrations or shocks to your camcorder. You can check the time that the camcorder will take to delete data on the LCD screen. If you stop performing [Empty] while [Executing...] appears, be sure to complete the operation by performing [Format] or [Empty] when you use the camcorder next time. US 90
-
 1
1 -
2
-
3
-
4
-
5
-
6
-
7
-
8
-
9
-
10
-
11
-
12
-
13
-
14
-
15
-
16
-
17
-
18
-
19
-
20
-
21
-
22
-
23
-
24
-
25
-
26
-
27
-
28
-
29
-
30
-
31
-
32
-
33
-
34
-
35
-
36
-
37
-
38
-
39
-
40
-
41
-
42
-
43
-
44
-
45
-
46
-
47
-
48
-
49
-
50
-
51
-
52
-
53
-
54
-
55
-
56
-
57
-
58
-
59
-
60
-
61
-
62
-
63
-
64
-
65
-
66
-
67
-
68
-
69
-
70
-
71
-
72
-
73
-
74
-
75
-
76
-
77
-
78
-
79
-
80
-
81
-
82
-
83
-
84
-
 85
85 -
 86
86 -
 87
87 -
 88
88 -
 89
89 -
 90
90 -
 91
91 -
 92
92 -
 93
93 -
 94
94 -
 95
95 -
96
-
97
-
98
-
99
-
100
-
101
-
102
-
103
-
104
-
105
-
106
-
107
-
108
-
109
-
110
-
111
-
112
-
113
-
114
-
115
-
116
-
117
-
118
-
119
-
120
-
121
-
122
-
123
-
124
-
125
-
126
-
127
-
128
-
129
 |
 |
