Sony HDR-XR160 Handycam® Handbook - Page 35
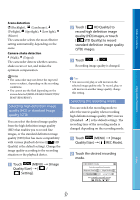
Using “BRAVIA” Sync, When your TV is monaural When your, TV has only one audio input jack
 |
UPC - 027242820081
View all Sony HDR-XR160 manuals
Add to My Manuals
Save this manual to your list of manuals |
Page 35 highlights
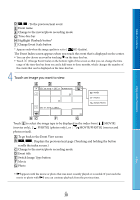
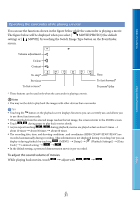
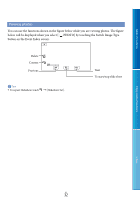
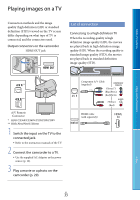
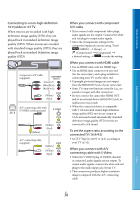
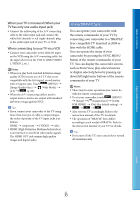
Table of Contents When your TV is monaural (When your TV has only one audio input jack) Connect the yellow plug of the A/V connecting cable to the video input jack and connect the white (left channel) or red (right channel) plug to the audio input jack of your TV or VCR. When connecting to your TV via a VCR Connect your camcorder to the LINE IN input on the VCR using the A/V connecting cable. Set the input selector on the VCR to LINE (VIDEO 1, VIDEO 2, etc.). Notes When you play back standard definition image quality (STD) movies on a 4:3 TV that is not compatible with the 16:9 signal, record movies with 4:3 aspect ratio. Touch (MENU) [Image Quality/Size] [ Wide Mode] [4:3] (p. 87). When the A/V connecting cable is used to output movies, movies are output with standard definition image quality (STD). Tips If you connect your camcorder to the TV using more than one type of cable to output images, the order of priority of the TV input jacks is as follows: HDMI component S VIDEO video HDMI (High Definition Multimedia Interface) is an interface to send both video/audio signals. The HDMI OUT jack outputs high quality images and digital audio. Using "BRAVIA" Sync You can operate your camcorder with the remote commander of your TV by connecting your camcorder to a "BRAVIA" Sync compatible TV launched in 2008 or later with the HDMI cable. You can operate the menu of your camcorder by pressing the SYNC MENU button of the remote commander of your TV. You can display the camcorder screens such as Event View, play selected movies or display selected photos by pressing up/ down/left/right/enter buttons of the remote commander of your TV. Notes There may be some operations you cannot do with the remote commander. To set your camcorder, touch (MENU) [Setup] [ (Connection)] [CTRL FOR HDMI] [On] (the default setting) . Also set your TV accordingly. Refer to the instruction manual of the TV for details. The operation of "BRAVIA" Sync differs according to each model of BRAVIA. Refer to the instruction manual of your TV for details. Tips If you turn off the TV, your camcorder is turned off simultaneously. Enjoy Useful Functions Index US 35
-
 1
1 -
2
-
3
-
4
-
5
-
6
-
7
-
8
-
9
-
10
-
11
-
12
-
13
-
14
-
15
-
16
-
17
-
18
-
19
-
20
-
21
-
22
-
23
-
24
-
25
-
26
-
27
-
28
-
29
-
 30
30 -
 31
31 -
 32
32 -
 33
33 -
 34
34 -
 35
35 -
 36
36 -
 37
37 -
 38
38 -
 39
39 -
 40
40 -
41
-
42
-
43
-
44
-
45
-
46
-
47
-
48
-
49
-
50
-
51
-
52
-
53
-
54
-
55
-
56
-
57
-
58
-
59
-
60
-
61
-
62
-
63
-
64
-
65
-
66
-
67
-
68
-
69
-
70
-
71
-
72
-
73
-
74
-
75
-
76
-
77
-
78
-
79
-
80
-
81
-
82
-
83
-
84
-
85
-
86
-
87
-
88
-
89
-
90
-
91
-
92
-
93
-
94
-
95
-
96
-
97
-
98
-
99
-
100
-
101
-
102
-
103
-
104
-
105
-
106
-
107
-
108
-
109
-
110
-
111
-
112
-
113
-
114
-
115
-
116
-
117
-
118
-
119
-
120
-
121
-
122
-
123
-
124
-
125
-
126
-
127
-
128
-
129
 |
 |
