Sony HT-SS380 Operating Instructions - Page 5

Table of Contents, BRAVIA Sync Features - set up

Page 5 highlights

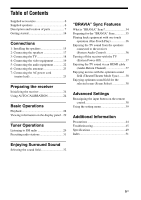
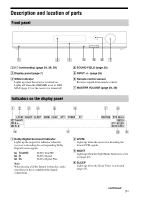
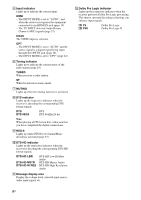
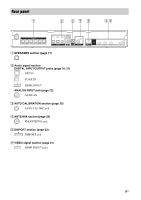
Table of Contents Supplied accessories 6 Supplied speakers 6 Description and location of parts 7 Getting started 14 Connections 1: Installing the speakers 15 2: Connecting the speakers 17 3: Connecting the TV 18 4: Connecting the video equipment 19 5: Connecting the audio equipment 22 6: Connecting the antennas 23 7: Connecting the AC power cord (mains lead 23 Preparing the receiver Initializing the receiver 24 Using AUTO CALIBRATION 24 Basic Operations Playback 28 Viewing information on the display panel .. 29 Tuner Operations Listening to FM radio 29 Presetting radio stations 31 "BRAVIA" Sync Features What is "BRAVIA" Sync 34 Preparing for the "BRAVIA" Sync 35 Playing back equipment with one-touch operation (One-Touch Play 36 Enjoying the TV sound from the speakers connected to the receiver (System Audio Control 36 Turning off the receiver with the TV (System Power-Off 37 Enjoying the TV sound via an HDMI cable (Audio Return Channel 37 Enjoying movies with the optimum sound field (Theatre/Theater Mode Sync) ........38 Enjoying optimum sound field for the selected scene (Scene Select 38 Advanced Settings Reassigning the input button on the remote control 38 Using the setting menu 39 Additional Information Precautions 44 Troubleshooting 45 Specifications 49 Index 51 Enjoying Surround Sound Selecting the sound field 32 5US

  • 1
  • 2
  • 3
  • 4
  • 5
  • 6
  • 7
  • 8
  • 9
  • 10
  • 11
  • 12
  • 13
  • 14
  • 15
  • 16
  • 17
  • 18
  • 19
  • 20
  • 21
  • 22
  • 23
  • 24
  • 25
  • 26
  • 27
  • 28
  • 29
  • 30
  • 31
  • 32
  • 33
  • 34
  • 35
  • 36
  • 37
  • 38
  • 39
  • 40
  • 41
  • 42
  • 43
  • 44
  • 45
  • 46
  • 47
  • 48
  • 49
  • 50
  • 51
  • 52
  • 53
  • 54
  • 55
  • 56
  • 57
  • 58
  • 59
  • 60
  • 61
  • 62
  • 63
  • 64
  • 65
  • 66
  • 67
  • 68
  • 69
  • 70
  • 71
  • 72
  • 73
  • 74
  • 75
  • 76
  • 77
  • 78
  • 79
  • 80
  • 81
  • 82
  • 83
  • 84
  • 85
  • 86
  • 87
  • 88
  • 89
  • 90
  • 91
  • 92
  • 93
  • 94
  • 95
  • 96
  • 97
  • 98
  • 99
  • 100
  • 101
  • 102
  • 103
  • 104
  • 105
  • 106
  • 107
  • 108

5
US
Table of Contents
Supplied accessories
.....................................
6
Supplied speakers
..........................................
6
Description and location of parts
..................
7
Getting started
.............................................
14
Connections
1: Installing the speakers
.............................
15
2: Connecting the speakers
.........................
17
3: Connecting the TV
..................................
18
4: Connecting the video equipment
............
19
5: Connecting the audio equipment
............
22
6: Connecting the antennas
.........................
23
7: Connecting the AC power cord
(mains lead)
............................................
23
Preparing the receiver
Initializing the receiver
...............................
24
Using AUTO CALIBRATION
....................
24
Basic Operations
Playback
......................................................
28
Viewing information on the display panel .. 29
Tuner Operations
Listening to FM radio
.................................
29
Presetting radio stations
..............................
31
Enjoying Surround Sound
Selecting the sound field
.............................
32
“BRAVIA” Sync Features
What is “BRAVIA” Sync?
...........................
34
Preparing for the “BRAVIA” Sync
..............
35
Playing back equipment with one-touch
operation (One-Touch Play)
...................
36
Enjoying the TV sound from the speakers
connected to the receiver
(System Audio Control)
.........................
36
Turning off the receiver with the TV
(System Power-Off)
................................
37
Enjoying the TV sound via an HDMI cable
(Audio Return Channel)
.........................
37
Enjoying movies with the optimum sound
field (Theatre/Theater Mode Sync)
........
38
Enjoying optimum sound field for the
selected scene (Scene Select)
.................
38
Advanced Settings
Reassigning the input button on the remote
control
.....................................................
38
Using the setting menu
................................
39
Additional Information
Precautions
..................................................
44
Troubleshooting
...........................................
45
Specifications
..............................................
49
Index
............................................................
51