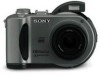
Sony MVCCD300 Operating Instructions
Sony MVCCD300 - 3MP Digital Camera Manual
 |
UPC - 027242589223
View all Sony MVCCD300 manuals
Add to My Manuals
Save this manual to your list of manuals |
Sony MVCCD300 manual content summary:
- Sony MVCCD300 | Operating Instructions - Page 1
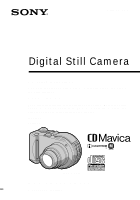
3-067-951-11(1) Digital Still Camera Operating Instructions Before operating the unit, please read this manual thoroughly, and retain it for future reference numbers whenever you call upon your Sony dealer regarding this product. Model No Serial No MVC-CD300 MVC-CD200/CD300 ©2001 Sony Corporation - Sony MVCCD300 | Operating Instructions - Page 2
2 Regulatory Information Declaration of Conformity Trade Name: SONY Model No.: MVC-CD200 Responsible Party:Sony Electronics Inc. Address: 680 Kinderkamack Road, Oradell, NJ 07649 U.S.A. Telephone No.: 201-930-6972 This device complies with Part 15 of the FCC Rules. Operation is subject - Sony MVCCD300 | Operating Instructions - Page 3
for a digital device pursuant to Subpart B of Part 15 of batteries in household or business trash may be prohibited. For the Sony Service Center nearest you call 1-800-222-SONY (United States only) For the Sony Factory Service Center nearest you call 416-499-SONY sound of this camera. This product - Sony MVCCD300 | Operating Instructions - Page 4
"MVC-CD300 only." As you read through this manual, buttons and settings on the camera are shown in capital letters. e.g. Press DISPLAY/LCD BACK LIGHT ON/OFF. This digital still camera uses 8 cm CD-Rs/ CD-RWs as recording media. "CD-R" or "CD-RW" mentioned above is indicated as "disc" in this manual - Sony MVCCD300 | Operating Instructions - Page 5
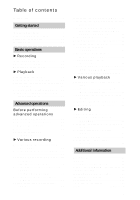
the recorded still image size (RESIZE 80 Selecting still images to print (PRINT 81 Formatting a CD-RW 82 Changing the setup settings (SET UP 84 Additional information Precautions 87 On discs 89 Using your camera abroad 90 About "InfoLITHIUM" battery pack 91 Troubleshooting 93 Warning - Sony MVCCD300 | Operating Instructions - Page 6
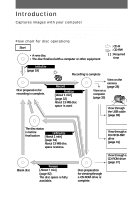
drive, CD-R drive, CD-RW drive, or the USB cable and view and modify images on your computer using application software. When using a CD-ROM drive to view images on your computer, the finalization is required (page 32). Flow chart for disc operations Start : CD-R : CD-RW • A new disc • The disc - Sony MVCCD300 | Operating Instructions - Page 7
longer screws, and may damage the camera. F Accessory shoe G Photocell window for flash Do not block while recording with the flash. H Flash (24) I Self-timer lamp/AF illuminator (24, 25) J Hook for strap and lens cap K Disc cover OPEN lever (16) L ACC (Accessory) jack Connects an external flash or - Sony MVCCD300 | Operating Instructions - Page 8
POWER switch (14) C (Exposure) button (67) D /CHG (Charge) lamp (10, 25) E FOCUS button (66) F Photocell window for LCD screen The LCD screen becomes brighter when exposed to sunlight. G LCD screen H Disc window I DISPLAY/LCD BACK LIGHT ON/ OFF button (23) J ACCESS lamp (20) K Reset button (99) L DC - Sony MVCCD300 | Operating Instructions - Page 9
the power supply Installing the battery pack Your camera operates only with the NP-FM50 (supplied) "InfoLITHIUM" battery pack* (M series). See page 91 for more information about "InfoLITHIUM" battery pack. 1 2 1 2 3 1 2 1 Open the battery cover. Slide the battery cover in the direction of - Sony MVCCD300 | Operating Instructions - Page 10
pack Disconnect the AC power adaptor from the DC IN jack on your camera. Battery remaining indicator The LCD screen on the camera shows the remaining time for which you can still record or play back images. This indication may not be entirely accurate depending on the conditions of use and the - Sony MVCCD300 | Operating Instructions - Page 11
using the LCD backlight, the operating time becomes short. When using the camera in an extremely cold location, place the battery pack in your pocket or other places to keep it warm, then insert the battery pack into the camera just before recording. When using a pocket heater, take care not to let - Sony MVCCD300 | Operating Instructions - Page 12
The numbers of images shown on tables above are as a guide. The numbers may be smaller depending on conditions. • If sufficient battery remaining time is indicated but the power runs out soon, fully charge the battery so that the correct battery remaining time appears. • Do not short the DC plug of - Sony MVCCD300 | Operating Instructions - Page 13
(mains lead) to the AC power adaptor and then to a wall outlet (mains). Using a car battery Use a Sony DC adaptor/charger. Using your camera abroad For details, see page 90. When using the AC power adaptor Be sure to use it near the wall outlet (mains). If a malfunction occurs, - Sony MVCCD300 | Operating Instructions - Page 14
the date and time. If these are not set, the CLOCK SET screen appears whenever you turn on your camera. 1 2 POWER ON/OFF (CHG) lamp 3-6 1 Set the mode dial to , S, A, M, , SCN, or . 2 Push the POWER switch in the arrow direction to turn on the power. - Sony MVCCD300 | Operating Instructions - Page 15
Getting started 5 Set the numeric value with v/V on the control button, then press the center z to enter it. After entering the number, v/V moves to the next item. If you selected [D/M/Y] in step 3, set the time on a 24-hour cycle. 6 Select [OK] with B on the control button, then press the center z - Sony MVCCD300 | Operating Instructions - Page 16
You can use only the 8 cm CD-Rs or 8 cm CD-RWs that have these marks. 1 2 Disc cover OPEN lever Lock tab 1 While sliding the lock tab to the left, slide down the disc cover OPEN lever. Open the disc cover by your hand after the cover is unlocked. 2 Place a disc with the printed side up. Push - Sony MVCCD300 | Operating Instructions - Page 17
to check that the disc is not rotating. • Do not open the disc cover while the ACCESS lamp is lit. If you do, the recorded image may be damaged or the disc may become unusable. • When writing data on a disc or connecting with a computer using the USB connection, the disc cover OPEN lever is locked - Sony MVCCD300 | Operating Instructions - Page 18
(INITIALIZE) When you use a new disc or the disc which was finalized with other equipment than this camera (page 32), you have to initialize the disc. Before initializing the disc, push the POWER switch in the arrow direction to turn on the power and insert the disc. 1 2 1 Set the mode dial to - Sony MVCCD300 | Operating Instructions - Page 19
What is initialization? The initialization is required to record images on a disc. In case that you have executed the finalization (page 32) using the camera to view images on a CD-ROM drive, the initialization is automatically executed. You can continuously record images. When executing the - Sony MVCCD300 | Operating Instructions - Page 20
in JPEG format. Before recording still images, push the POWER switch in the arrow direction to turn on the power and insert a disc. 1 2, 3 ACCESS lamp z is flashing, the camera automatically adjusts the exposure and focus of the captured image. When the camera finishes the automatic adjustments, - Sony MVCCD300 | Operating Instructions - Page 21
not remove the battery pack/disc, or not open the disc cover. Otherwise, an image data breakdown may occur or the disc may become unusable. Notes • When using a CD-R, even if you delete images, the disc remaining space does not increase. • Only when using a CD-RW, the disc remaining space increases - Sony MVCCD300 | Operating Instructions - Page 22
affect the brightness of the images recorded on the disc. To turn off the LCD backlight Press DISPLAY/LCD BACK LIGHT ON/OFF repeatedly to turn off the LCD backlight (page 23). The battery life will be longer. Using the zoom feature The lens part moves in/out while zooming. Be careful not to - Sony MVCCD300 | Operating Instructions - Page 23
Digital zoom does not work for moving images. • The zoom function does not work while recording a moving image. Set the zoom position before you start recording (MVC-CD300 on t The LCD backlight is turned off/warning messages and manual adjustment items which are set using the jog dial are turned - Sony MVCCD300 | Operating Instructions - Page 24
. Recording images with the flash The initial setting is AUTO (no indication). In this mode, the flash automatically pops up and strobes if the camera senses that the surroundings become dark. To change the flash mode, clear the menu (page 46), then press v ( ) on the control button repeatedly so - Sony MVCCD300 | Operating Instructions - Page 25
set to [AUTO] in the menu settings (page 49), the recommended shooting distance is 0.3 to 2.5 m (11 7/8 inches to 8 1/3 feet) (MVC-CD200) or 0.3 to 3.0 m (11 7/8 inches to 9 feet 10 1/8 inches) (MVC-CD300). When it is not set to [AUTO], the flash may be ineffective even if the flash level is changed - Sony MVCCD300 | Operating Instructions - Page 26
on the power and insert a disc. 6, 7 1, 5 1 Set the mode dial to SET UP. The setup screen appears. 2 Select [ ] (CAMERA) with v/V on the control the control button, then press the center z. 26 CAMERA SCENE SELECTION: MOVING IMAGE: DATE/TIME: DIGITAL ZOOM: BRACKET STEP: RED EYE REDUCTION: AF - Sony MVCCD300 | Operating Instructions - Page 27
a moving image is complete. 6 Press the shutter button fully down. "REC" appears on the LCD screen and the image and sound are recorded on the disc. 7 Press the shutter button fully down again to stop recording. The recording automatically stops in the following time even if you do not press the - Sony MVCCD300 | Operating Instructions - Page 28
able to play back images whose image sizes are larger than the maximum image size that can be used with this camera for recording. The indicators on the LCD screen during still image playback Press DISPLAY/LCD BACK LIGHT ON/OFF to turn on/off the indicators on the LCD screen. See - Sony MVCCD300 | Operating Instructions - Page 29
or moving) appears on the LCD screen. 2 Select the desired moving image with b/B on the control button. Moving images are displayed one size smaller than still images except when you shot at the 320 (HQ) (page 53) size. b: To display the preceding image. B: To display the next image. 120min 320 - Sony MVCCD300 | Operating Instructions - Page 30
Adjusting the volume Press v/V on the control button to adjust the volume. v/V on the control button The indicators on the LCD screen during moving image playback Press DISPLAY/LCD BACK LIGHT ON/OFF to turn on/off the indicators on the LCD screen. See page 107 for a detailed description of the - Sony MVCCD300 | Operating Instructions - Page 31
not conform to 8 cm CD, use the supplied 8 cm CD adaptor. 1 Slide the disc into the inner groove and under two of the tabs on the inner circle of adaptor in the numbered order. 1 Printed side of the disc (The other side is recordable side.) 2 Printed side of the adaptor (SONY is printed on this - Sony MVCCD300 | Operating Instructions - Page 32
CD-Rs/CD- RWs. Preparing for viewing images on CD-ROM drives (FINALIZE) You can play back the disc recorded with this camera on CD-ROM drives. You have to execute the finalization before viewing images on a CD-ROM drive. A disc that has not been executed the finalization cannot be read with CD-ROM - Sony MVCCD300 | Operating Instructions - Page 33
. FINALIZE PLACE ON LEVEL SURFACE READY? O K CANCEL OK 5 Select [OK] with v on the control button, then press z. Finalization starts and the disc remaining indicator changes from to , or from to . FINALIZE AVOID ANY VIBRATION READY TO FINALIZE FINALIZE AVOID ANY VIBRATION FINALIZE IN PROGRESS - Sony MVCCD300 | Operating Instructions - Page 34
(UNFINALIZE) (only for CD-RWs) When using CD-RWs, you can cancel the last-executed finalization. Once you cancel it, the disc space for executing the the unfinalization. Do not shake or jar the camera during this operation. Place the camera on a stable surface during the unfinalization. Tip - Sony MVCCD300 | Operating Instructions - Page 35
not need to finalize the disc. You have to install the USB driver and the software, DirectCD included in the supplied CD-ROM. For details on DirectCD, refer to the software operating instructions of DirectCD. OS:Microsoft Windows 98, Windows 98SE, Windows Me, Windows 2000 Professional The above OS - Sony MVCCD300 | Operating Instructions - Page 36
disc. You have to install the software, DirectCD included in the supplied CD-ROM. For details on Windows environment, refer to the software operating instructions of DirectCD. You cannot view images on a Macintosh computer by USB connection. Install the driver - Sony MVCCD300 | Operating Instructions - Page 37
in each case in this manual. Viewing images on a Windows computer When playing back moving images, Real Player or Windows Media Player must be installed into your computer. A Viewing images with a CD-ROM drive Finalize the disc beforehand (page 32). E.g., for Windows Me users 1 Start up your - Sony MVCCD300 | Operating Instructions - Page 38
the USB driver Do not connect the camera to the computer yet. Before connecting your camera to your computer, install the USB driver to the computer. The USB driver is contained in the supplied CD-ROM (SPVD-006). If the drive is not recognized, see "Troubleshooting" on page 93. E.g., for Windows Me - Sony MVCCD300 | Operating Instructions - Page 39
to read "Before disconnecting the USB cable" on page 40. Viewing images When you view images on the disc which was not finalized, you have to install DirectCD included in the supplied CD-ROM. For details on DirectCD, refer to the software operating instructions of DirectCD. E.g., for Windows Me - Sony MVCCD300 | Operating Instructions - Page 40
: [ CD Mavica (E:)]) The folders inside the disc are displayed, and the disc cover of the camera will be locked. To remove the disc, carry out the operation for removing the disc described on the software operating instructions of DirectCD. If the drive is not recognized, see "Troubleshooting" on - Sony MVCCD300 | Operating Instructions - Page 41
systems than above: Simply, disconnect the USB cable. C Viewing images using a CD-R/CD-RW drive You do not need to finalize the disc. You have to install DirectCD included in the supplied CD-ROM. For details on DirectCD, refer to the software operating instructions of DirectCD. Viewing images on - Sony MVCCD300 | Operating Instructions - Page 42
disc folder. 3 Double-click the desired data file. For the detailed folder and file names, see "Image file storage destinations and image file names" (page 43). Desired file type Double-click in this order Still Copying a file to the hard disk of your computer before viewing is recommended. If - Sony MVCCD300 | Operating Instructions - Page 43
names are as follows. ssss stands for any number within the range from 0001 to 9999. E.g., for Windows Me users (The drive recognizing the camera is "E.") B Playback Folder containing still image recorded in normal mode, TEXT mode image and Clip Motion image data Folder containing E-MAIL mode and - Sony MVCCD300 | Operating Instructions - Page 44
saved data is called as the file format. The formats that can be used with this camera are as follows: JPEG format Most digital still cameras, operating systems of computers, and browser software adopt this format. This format is able to compress files without appreciable deterioration. However, if - Sony MVCCD300 | Operating Instructions - Page 45
follows before starting to operate your camera. S UPSET SCN M : To record still images, VOICE memos S: To record in the shutter speed priority mode A: To record in the aperture priority mode M: To record with the shutter speed and aperture set manually - Sony MVCCD300 | Operating Instructions - Page 46
setup screen is displayed, the control button is used to select the buttons, images and menu items displayed on the LCD screen of your camera and modify the settings. The operation methods that are frequently used for "Advanced operations" are described below. Turning on/off the operation buttons - Sony MVCCD300 | Operating Instructions - Page 47
2 When the mode dial is set to SET UP or : 1 Press v/V/b/B on the control button to select the item or setting you want to set up. The selected setting turns yellow. 2 Press the center z to enter the item. When the mode dial is set to , S, A, M, SCN, or : Press v/V/b/B on the control button to - Sony MVCCD300 | Operating Instructions - Page 48
are used frequently are set up using the jog dial and the following direct buttons. The jog dial is used to change the value in manual adjustments. FOCUS* ** Mode dial (S, A, M) ∗ This button is available when the mode dial is set to , S, A, M, SCN, or . ∗∗ This button is available when the mode - Sony MVCCD300 | Operating Instructions - Page 49
. When you record high-quality images, use a low-number setting (except when the mode dial is set to SCN). (IMAGE SIZE) MVC-CD200 x1600×1200 1600 (3:2) 1024×768 640×480 MVC-CD300 x2048×1536 2048 (3:2) 1600×1200 1280×960 640×480 Selects the image size when recording still images (page 53). 49 - Sony MVCCD300 | Operating Instructions - Page 50
GIF file in black-and-white (page 61). VOICE Records an audio file (with a still image) in addition to the JPEG file (page 60). E-MAIL Records a small-size shifted a little (page 63). BURST (MVC- Records three images continuously (page 59). CD300 only) xNORMAL Records an image using the - Sony MVCCD300 | Operating Instructions - Page 51
the displayed image (page 77). CANCEL Cancels deleting of the image. PROTECT - Protects images against accidental erasure (page 78). PRINT - Marks the print mark on still images (page 81). 51 - Sony MVCCD300 | Operating Instructions - Page 52
Item SLIDE* Setting INTERVAL REPEAT RESIZE* ROTATE* START CANCEL MVC-CD200 1600×1200 1024×768 640×480 CANCEL MVC-CD300 2048×1536 1600×1200 1280×960 640×480 CANCEL - ∗ Only in single-image . Cancels the slide show. Changes the recorded image size (page 80). Rotates the still image (page 75). 52 - Sony MVCCD300 | Operating Instructions - Page 53
Press MENU. The menu appears. 3 Select the desired image size with v/V on the control button from [ ] (IMAGE SIZE). Still image sizes: MVC-CD200: 1600×1200, 1600 (3:2)*, 1024×768, 640×480 MVC-CD300: 2048×1536, 2048 (3:2)*, 1600×1200, 1280×960, 640×480 ∗ The image is recorded in the ratio of three to - Sony MVCCD300 | Operating Instructions - Page 54
you can record on a disc MVC-CD200 MVC-CD300 Image size Quality Image size continuous recording Note The number of images recordable on a disc may decrease depending on conditions. Tip The size of four to three to fit the monitor ratio. This camera can also record the image in the ratio of three - Sony MVCCD300 | Operating Instructions - Page 55
B Various recording Recording with the exposure fixed (AE LOCK) Mode dial: /S/A/SCN Once you press AE LOCK, the exposure, now captured, is fixed. For instance, this function is convenient in the following use: Measure the exposure of the desired portion of the subject using the spot light-metering - Sony MVCCD300 | Operating Instructions - Page 56
dial, then press the jog dial. The shutter speed can be selected from 8'' to 1/800 (MVC-CD200) or 8'' to 1/1000 (MVC-CD300) by 1/3 step. Aperture priority mode Once the aperture is adjusted manually, the shutter speed will be automatically adjusted to the suitable value to attain correct exposure - Sony MVCCD300 | Operating Instructions - Page 57
this value according to your taste. 0 EV is the most suitable value set by the camera. 1 2-5 Note If the setting is not appropriate in aperture priority mode, shutter speed priority mode, or manual exposure mode, the setting value indicator on the LCD screen flashes when the shutter button is - Sony MVCCD300 | Operating Instructions - Page 58
subject is under dark situations • When the LANDSCAPE mode is selected, the AF illuminator cannot be used. Tip Under normal recording conditions, the camera automatically makes various adjustments, such as those for the focus, iris, exposure, and white balance, as it shoots. However, you may not be - Sony MVCCD300 | Operating Instructions - Page 59
MVC-CD300) Mode dial: /S/A/M/SCN This mode is used for a continuous recording. Press the shutter button in this mode, the camera same time as recording a normal still image. (The size of the normal still image is set using [ ] record on a disc in E-MAIL mode MVC-CD200 Image size Quality - Sony MVCCD300 | Operating Instructions - Page 60
MVC-CD300 Image size NORMAL] with v/V in step 3. Adding audio files to still images (VOICE) Mode dial: /S/A/M/SCN In the VOICE mode, the audio is also of images that you can record on a disc in VOICE mode* MVC-CD200 Image size Quality STANDARD FINE 1600×1200 1600 (3:2) Approx. 203 - Sony MVCCD300 | Operating Instructions - Page 61
] with v/V. 4 Record the image. The number of images that you can record on a disc in TEXT mode* MVC-CD200 Image size 1600×1200 1600 (3:2) 1024×768 640×480 Minimum 330 Minimum 361 Minimum 618 Minimum 974 MVC-CD300 Image size 2048×1536 2048 (3:2) 1600×1200 Minimum 221 Minimum 244 Minimum 330 61 - Sony MVCCD300 | Operating Instructions - Page 62
may be unable to record a clear image. • Reading and writing data takes more time than normal image recording [STANDARD] or [FINE]. Recording still images as uncompressed files (TIFF) images that you can record on a disc in TIFF mode MVC-CD200 Image size Quality STANDARD FINE 1600×1200 Approx - Sony MVCCD300 | Operating Instructions - Page 63
] (MVC-CD200) or [2048×1536] (MVC-CD300) size other than when [1600 (3:2)] (MVC-CD200) or [2048 (3:2)] (MVC-CD300) is selected. • Writing data takes more time than in normal recording. Recording three images with the exposure shifted (only for MVC-CD300) (EXP BRKTG) Mode dial: /S/A/M/SCN The camera - Sony MVCCD300 | Operating Instructions - Page 64
images. • When the exposure is manually adjusted, the adjusted value is used an animation function that plays back still images in succession. The images are the mode dial to SET UP. The setup screen appears. 2 Select [ ] (CAMERA) with v/V, [MOVING IMAGE] with B/ v/V, [CLIP MOTION] with v/V, then - Sony MVCCD300 | Operating Instructions - Page 65
disc Image size NORMAL (160×120) Approx. 560* MOBILE (80×72) Approx. 1430** ∗ When recording 10 frames per Clip Motion file ∗∗ When recording 2 frames per Clip Motion file Notes • Reading this camera may not be displayed correctly. • All the frame images are immediately recorded on the disc if - Sony MVCCD300 | Operating Instructions - Page 66
or . 2 Press FOCUS. The focus is fixed and the 9 (manual focus) indicator appears. 3 Turn the jog dial to select the distance. Use the information as a guide. • The focus preset does not 3/16 inch) (MVCCD200) or 4 cm (1 5/8 inch) (MVC-CD300) away from the lens surface in macro mode. To return to - Sony MVCCD300 | Operating Instructions - Page 67
is set in the automatic adjustment. 1 3 2 Tip Normally, the camera automatically adjusts the exposure. If the color of the image is too dark or bright as illustrated below, we recommend that you adjust the exposure manually. When recording a backlighted subject or a subject in the snow, set it - Sony MVCCD300 | Operating Instructions - Page 68
the white balance is automatically adjusted (AUTO). When you record with the shooting condition fixed or under the specific lighting condition, you can manually adjust the white balance. 1 3 2 1 Set the mode dial to , S, A, M, SCN, or . 2 Press MENU. The menu appears. 3 Select [WB] (WHITE BAL) with - Sony MVCCD300 | Operating Instructions - Page 69
, the camera cannot resolve the problem by making adjustments. Normally, the camera adjusts it automatically, but, if the image appears in strange colors, we recommend that you change the white balance mode. Enjoying picture effects (P. EFFECT) Mode dial: /S/A/M/SCN/ You can digitally process - Sony MVCCD300 | Operating Instructions - Page 70
Recording the date and time on the still image (DATE/TIME) Mode dial: /S/A/M/SCN 5 1, 4 2, 3 Notes • Clip Motion images. 1 Set the mode dial to SET UP. The setup screen appears. 2 Select [ ] (CAMERA) with v/V, [DATE/TIME] with B/v/V, then press B. 3 Select the date and time setting with v/V, then - Sony MVCCD300 | Operating Instructions - Page 71
B Various recording Using the Spot lightmetering function Mode dial: /S/A/M/SCN/ Use this function when there is backlight or when there is strong contrast between the subject and the background, etc. Press to activate the spot lightmetering function. Position the point you want to record at the - Sony MVCCD300 | Operating Instructions - Page 72
B Various playback Playing back three or nine images at once Mode dial: You can display multiple images on the LCD screen at one time using the zoom buttons. 1 2 1 Set the mode dial to . 2 Press the zoom W/T buttons repeatedly. The LCD screen display changes as follows: • Single (single-image) - Sony MVCCD300 | Operating Instructions - Page 73
, see pages 77, 78, and 81. To close the menu, press MENU again. The menu disappears and the recording information is indicated. Enlarging a part of the still image (Zoom and trimming) Mode dial: 1 3 4 B Various playback 1 Set the mode dial to . 2 Display the image to be enlarged. 3 Zoom in the - Sony MVCCD300 | Operating Instructions - Page 74
image is recorded as the newest file. • If you trim an image, the disc space will be decrease. • If the disc space is not sufficient, you may be unable to trim an image. • Moving images cannot be enlarged. • The still images recorded in TEXT mode can be enlarged, but these images cannot be - Sony MVCCD300 | Operating Instructions - Page 75
The interval setting time may vary depending on the image size. Rotating a still image (ROTATE) Mode dial: You can rotate the image recorded in portrait reflected depending on the application software. • If you rotate an image, the disc space will decrease. • If the disc space is not sufficient, - Sony MVCCD300 | Operating Instructions - Page 76
jack 1 Connect the A/V connecting cable to the A/V OUT (MONO) jack of your camera and to the audio/video input jacks of the TV. If your TV has stereo type the Lch jack. 2 Turn on the TV and start playback on your camera. The playback image appears on the TV screen. Notes • You cannot use a TV - Sony MVCCD300 | Operating Instructions - Page 77
B Editing Deleting images (DELETE) Mode dial: Protected images cannot be deleted. In single-image or tripleimage mode 1 2 2, 4, 5 3 1 Set the mode dial to . 2 In single-image mode: Display the image you want to delete with b/B. In triple-image mode: Press the zoom W button twice to turn to the - Sony MVCCD300 | Operating Instructions - Page 78
Notes • When using a CD-R, even if you delete images, the disc remaining space does not increase. • Only when using a CD-RW, the disc remaining space increases after disc cover, will disappear. • If the disc space is not sufficient, you may not be able to delete an image. • If the lower four-digit - Sony MVCCD300 | Operating Instructions - Page 79
then press z. 4 Select [ALL] or [SELECT] with b/B, then press z. 5 When you select [ALL] Select [ON] with b/B, then press z. All the images in the disc are protected. When you select [SELECT] The frame of the selected image turns green. 1 Select the image to be protected with v/V/b/B, then press - Sony MVCCD300 | Operating Instructions - Page 80
the recorded still image size newest file. • If you resize an image, the disc space will decrease. • If the disc space is not sufficient, you may not be able to Select the desired size with v/V, then press z. MVC-CD200: 1600×1200, 1024×768, 640×480 MVC-CD300: 2048×1536, 1600×1200, 1280×960, 640×480 - Sony MVCCD300 | Operating Instructions - Page 81
images to print (PRINT) Mode dial: You can mark a print mark on still images recorded with your camera. This mark is convenient when you have images printed at a shop that conforms with the DPOF (Digital Print Order Format) standard. In single-image or tripleimage mode To unmark the print mark - Sony MVCCD300 | Operating Instructions - Page 82
you may not be able to mark an image with a print mark. Formatting a CD-RW When deleting all the images in the CD-RW or using the CD-RW formatted with other equipment than this camera, format the CD-RW. When you format a CD-RW, all data stored on the disc will be deleted. Check the contents of the - Sony MVCCD300 | Operating Instructions - Page 83
formatted using other equipment than this camera cannot be used with this camera. Format the disc again with this camera. • It takes about seven minutes to execute the format. • About 300 times formatting can be available on a CD-RW. • Once you format the CD-RW, protected images are also deleted. 83 - Sony MVCCD300 | Operating Instructions - Page 84
OK CANCEL Description Finalizes a disc (page 32). Cancels the finalization. Formats a CD-RW (page 82). Cancels formatting of the CD-RW. Initializes a disc (page 18). Cancels the initialization. Unfinalizes a CD-RW (page 34). Cancels the unfinalization. CAMERA Item Setting Description SCENE - Sony MVCCD300 | Operating Instructions - Page 85
starts from 0001 each time the disc is changed. Set to [ON] when using the VCL-MHG07 conversion lens (not supplied). At this time, the zoom function does not work. Also, note that the VAD-S70 adaptor ring needed to mount the conversion lens to your camera is not sold in some - Sony MVCCD300 | Operating Instructions - Page 86
PTP xNORMAL DEMO xON OFF Description Switches the USB mode (page 35). This is activated only when using the AC power adaptor. [DEMO] is set to [STBY] at the factory and the demonstration starts - Sony MVCCD300 | Operating Instructions - Page 87
itself has been turned off. On handling the camera Do not carry the camera by holding the disc cover Do not touch the rotating disc This may cause serious injuries. On pickup lens cleaning When the pickup lens is dirty and the camera cannot read any image, clean the pickup lens using a commercially - Sony MVCCD300 | Operating Instructions - Page 88
damage the cord (mains lead) and may cause fire or electrical shock. • Prevent metallic objects from coming into contact with the metal parts of the - Dusty or dirty - Very humid - Vibrating On battery pack • Use only the specified charger with the charging function. • To prevent accident from a - Sony MVCCD300 | Operating Instructions - Page 89
. • Or install the fully charged battery pack in your camera, and leave your camera with the power turned off for more than 24 hours. If any problem occurs, unplug your camera and contact your nearest Sony dealer. On discs Be sure to use only 8 cm CD-Rs/CDRWs. You cannot read or write data on other - Sony MVCCD300 | Operating Instructions - Page 90
CD-ROM drive may malfunction or the disc may be scratched. Using your camera abroad Power sources You can use your camera in any country or area with the supplied battery charger the TV must be the same as that of your digital still camera. Check the following list: NTSC system Bahama Islands, - Sony MVCCD300 | Operating Instructions - Page 91
, either disconnect the AC power adaptor from the DC IN jack on your camera or remove the battery pack. Effective use of the battery pack • Battery performance decreases in low-temperature surroundings. So, the time that the battery pack can be used is shorter in cold places. We recommend the - Sony MVCCD300 | Operating Instructions - Page 92
pack up on your camera. This is to maintain the battery pack's functions. • To use the battery pack up on your camera, leave the POWER switch to on in mode until the power goes off without a disc inserted. Battery life • The battery life is limited. Battery capacity decreases little by little - Sony MVCCD300 | Operating Instructions - Page 93
Troubleshooting If you experience trouble with your camera, first check the following items. Should your camera still not operate and time setting is cleared.) Should your camera still not operate properly, consult your Sony dealer or local authorized Sony service facility. If code displays (C:ss:ss) - Sony MVCCD300 | Operating Instructions - Page 94
Cause and/or Solution The picture is out of focus. • Your camera is not in macro recording mode when you shoot a subject that is about 3 to 50 cm (1 3/16 to 19 3/4 inches) (MVC-CD200) or about 4 to 50 cm (1 5/8 to 19 3/4 inches) (MVC-CD300) away from the lens. tSet the macro recording mode (page - Sony MVCCD300 | Operating Instructions - Page 95
. The zoom does not work. (MVC-CD300 only) Digital zoom does not function. The image camera is in one of the following SCENE SELECTION modes: TWILIGHT or LANDSCAPE. tCancel the SCENE SELECTION function or set the flash to (page 24, 58). • [MODE] (REC MODE) is set to [EXP BRKTG] or [BURST] (MVC-CD300 - Sony MVCCD300 | Operating Instructions - Page 96
disc has not been finalized. tFinalize the disc (page 32). • An error occurs during recording by vibration. tPossibly, you may be able to play back images if you connect the camera to your computer with the USB cable. • The CD ] in the setup settings (MVC-CD300 only). tSet it to [OFF] (page 85). 96 - Sony MVCCD300 | Operating Instructions - Page 97
Reinstall the USB driver when using Windows 98, Windows 98SE, Windows Me and Windows 2000 Professional Perform all steps without skipping. 1 Turn on your computer and allow Windows to load. 2 Connect the USB jack on the camera and the computer with the supplied USB cable. 3 Insert a disc. 4 Connect - Sony MVCCD300 | Operating Instructions - Page 98
manager, click "OK." 7 Turn off the camera, disconnect the USB cable, and restart the computer. 8 Install the USB driver in the supplied CD-ROM to the computer following the procedure on page 38. Battery packs Symptom The battery pack cannot be charged. The battery life is short. Cause and/or - Sony MVCCD300 | Operating Instructions - Page 99
pack (page 9, 10). • A deviation has occurred in the remaining battery time. tCharge the battery pack fully (page 10). • A malfunction has occurred in the battery pack. tContact your Sony dealer or local authorized Sony service facility. • The AC power adaptor is not connected. tConnect the power - Sony MVCCD300 | Operating Instructions - Page 100
FINALIZED NO FILE FILE ERROR IMAGE SIZE OVER INVALID OPERATION FILE PROTECT For "InfoLITHIUM" BATTERY ONLY NOT ENOUGH BATTERY Meaning The lens cap is attached. The disc cover is opened. No disc is inserted. There is trouble with the disc drive or the camera. An unusable disc is inserted or there - Sony MVCCD300 | Operating Instructions - Page 101
E CAN NOT UNFINALIZE CAN NOT FORMAT FORMAT ERROR TURN THE POWER OFF AND ON AGAIN Meaning The battery level is too low. A CD-R or the disc that is not finalized is inserted. A CD-R is inserted. The disc that is formatted using other equipment than this camera is inserted. A malfunction occurs on the - Sony MVCCD300 | Operating Instructions - Page 102
is trouble with the disc drive. tTurn the power off and on again. • A disc not compatible with this camera is inserted or the data is broken. tChange the disc. (page 16) • A camera malfunction that you cannot repair has occurred. tContact your Sony dealer or local authorized Sony service facility - Sony MVCCD300 | Operating Instructions - Page 103
TIFF Audio with still image: MPEG1 (Monaural) Recording medium 8 cm CD-R/CD-RW Recommended flash recording distance (ISO is set to AUTO): MVC-CD200: 0.3 m to 2.5 m (11 7/8 inches to 8 1/3 feet) MVC-CD300: 0.3 m to 3 m (11 7/8 inches to 9 feet 10 1/8 inches) Drive Read: Maximum ×8 Write: ×4 Readout - Sony MVCCD300 | Operating Instructions - Page 104
power adaptor (1) Power cord (mains lead) (1) Ferrite Core (1) USB cable (1) NP-FM50 battery pack (1) A/V connecting cable (1) 8 cm CD adaptor (1) Mavica disc (2) (CD-R (1), CD-RW (1)) Shoulder strap (1) Lens cap (1) Lens cap strap (1) CD-ROM (2) Operating instructions (2) Design and specifications - Sony MVCCD300 | Operating Instructions - Page 105
ql w; 9 wa 0 ws qa WHITE BAL ISO MODE wd qs A Battery remaining indicator B Flash level indicator/Flash mode indicator C Red-eye reduction indicator disc capacity indicator S Remaining number of recordable images/Recording time indicator/Self-diagnosis function indicator T Manual - Sony MVCCD300 | Operating Instructions - Page 106
The indicators during still image playback 1 2 3 4 120min 1600 11/12 5 x1.3 6 7 8 9 100-0011 2001 7 4 10:30PM 0 qa A Recording mode/Clip Motion indicator B Image size indicator C Image number D Number of stored images on a disc E Remaining disc capacity indicator F Print mark - Sony MVCCD300 | Operating Instructions - Page 107
9 A Recording mode indicator B Image size indicator C Image number/number of stored images on a disc D Remaining disc capacity indicator E Time counter F Playback image G Playback bar H Menu and guide menu I Playback/pause indicator B is displayed during playback, and x during stop. Additional - Sony MVCCD300 | Operating Instructions - Page 108
46 D DELETE 77 DIGITAL ZOOM 23 Disc Format 82 Inserting 16 Number battery pack 9 91 INITIALIZE 18 J , Jog dial 48 JPEG 20 44 M Macro recording 66 Manual Still image Playback 28 Recording 20 T , TEXT mode 61 TIFF 44 62 U UNFINALIZE 34 USB 35 Using 71 Using flash 24 Using your camera
-
 1
1 -
 2
2 -
 3
3 -
 4
4 -
 5
5 -
 6
6 -
 7
7 -
8
-
9
-
10
-
11
-
12
-
13
-
14
-
15
-
16
-
17
-
18
-
19
-
20
-
21
-
22
-
23
-
24
-
25
-
26
-
27
-
28
-
29
-
30
-
31
-
32
-
33
-
34
-
35
-
36
-
37
-
38
-
39
-
40
-
41
-
42
-
43
-
44
-
45
-
46
-
47
-
48
-
49
-
50
-
51
-
52
-
53
-
54
-
55
-
56
-
57
-
58
-
59
-
60
-
61
-
62
-
63
-
64
-
65
-
66
-
67
-
68
-
69
-
70
-
71
-
72
-
73
-
74
-
75
-
76
-
77
-
78
-
79
-
80
-
81
-
82
-
83
-
84
-
85
-
86
-
87
-
88
-
89
-
90
-
91
-
92
-
93
-
94
-
95
-
96
-
97
-
98
-
99
-
100
-
101
-
102
-
103
-
104
-
105
-
106
-
107
-
108
 |
 |

3-067-951-
11
(1)
Digital Still Camera
Operating Instructions
Before operating the unit, please read this manual thoroughly, and retain it
for future reference.
Owner’s Record
The model and serial numbers are located on the bottom. Record the serial
number in the space provided below. Refer to these numbers whenever you
call upon your Sony dealer regarding this product.
Model No. ________________________
Serial No. ________________________
©2001 Sony Corporation
MVC-CD200/CD300
MVC-CD300