Sony MVCCD300 Operating Instructions - Page 26
Recording moving images - digital camera
 |
UPC - 027242589223
View all Sony MVCCD300 manuals
Add to My Manuals
Save this manual to your list of manuals |
Page 26 highlights
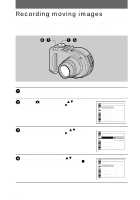
Recording moving images Moving images with audio are recorded in MPEG format. Before recording moving images, push the POWER switch in the arrow direction to turn on the power and insert a disc. 6, 7 1, 5 1 Set the mode dial to SET UP. The setup screen appears. 2 Select [ ] (CAMERA) with v/V on the control button, then press B. 3 Select [MOVING IMAGE] with v/V on the control button, then press B. 4 Select [MPEG MOVIE] with v/V on the control button, then press the center z. 26 CAMERA SCENE SELECTION: MOVING IMAGE: DATE/TIME: DIGITAL ZOOM: BRACKET STEP: RED EYE REDUCTION: AF ILLUMINATOR: SELECT TWIRIGHT MPEG MOVIE OFF ON ±0.7EV OFF ON CAMERA SCENE SELECTION: MOVING IMAGE: DATE/TIME: DIGITAL ZOOM: BRACKET STEP: RED EYE REDUCTION: AF ILLUMINATOR: OK MPEG MOVIE CLIP MOTION CAMERA SCENE SELECTION: MOVING IMAGE: DATE/TIME: DIGITAL ZOOM: BRACKET STEP: RED EYE REDUCTION: AF ILLUMINATOR: SELECT TWIRIGHT MPEG MOVIE OFF ON ±0.7EV OFF ON
-
 1
1 -
2
-
3
-
4
-
5
-
6
-
7
-
8
-
9
-
10
-
11
-
12
-
13
-
14
-
15
-
16
-
17
-
18
-
19
-
20
-
 21
21 -
 22
22 -
 23
23 -
 24
24 -
 25
25 -
 26
26 -
 27
27 -
 28
28 -
 29
29 -
 30
30 -
 31
31 -
32
-
33
-
34
-
35
-
36
-
37
-
38
-
39
-
40
-
41
-
42
-
43
-
44
-
45
-
46
-
47
-
48
-
49
-
50
-
51
-
52
-
53
-
54
-
55
-
56
-
57
-
58
-
59
-
60
-
61
-
62
-
63
-
64
-
65
-
66
-
67
-
68
-
69
-
70
-
71
-
72
-
73
-
74
-
75
-
76
-
77
-
78
-
79
-
80
-
81
-
82
-
83
-
84
-
85
-
86
-
87
-
88
-
89
-
90
-
91
-
92
-
93
-
94
-
95
-
96
-
97
-
98
-
99
-
100
-
101
-
102
-
103
-
104
-
105
-
106
-
107
-
108
 |
 |
